
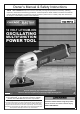
Product manual

Page 9For technical questions, please call 1-888-866-5797.Item 68012
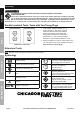
SAFETYOPERATIONMAINTENANCE SETUP
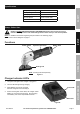
Charging
1. Remove the Battery Pack from the end of
the Multi-function Tool housing by pressing
on the striped side tabs of the Pack and
sliding the Pack away from the housing.
2. Place the Battery Pack on a dry fireproof surface in
a room where the temperature is from 50–104° F.
Note: If recharging a newly spent Battery Pack,
allow it to cool completely before charging.
3. Examine the Battery Pack. It must be
undamaged, and a Li-ion type Battery Pack.
Do not charge a cracked, open, or
leaking Battery Pack, or charge a
non-recommended type of Battery Pack.
4. The Battery Pack’s terminals are designed to fit
this Charger specifically. If the Battery Pack does
to not fit the Charger properly, do not try to insert it.
Do not force a Battery Pack into the Charger.
5. Plug the Power Supply into a grounded,
120VAC, 60Hz receptacle. The green LED
will light once Charger is plugged in.
6. Slide the Battery Pack onto the Charger.
The red LED will light and the
green LED will turn off during charging.
Note: The Battery Pack’s capacity will increase
somewhat during the first few charging cycles.
A fully discharged Battery Pack will take about 1 hour
and 15 minutes (or 75 minutes) to fully charge.
Do not charge longer than 1 hour and 15 minutes.
Overcharging the Battery Pack can
damage the battery cells.
7. While charging, the Battery Pack, Charger, and
Power Supply may become warm to the touch.
This is normal, and does not indicate a problem.
8. When Battery Pack is fully charged, both red and
green LED’s will stay lit. Unplug the Charger and
disconnect it from the Battery Pack when finished.
9. Allow the Battery Pack to cool
completely before using it.
10. Press the Battery Buttons to release
Battery Pack from the Charger.
Workpiece and Work Area Set Up
1. Designate a work area that is clean and well-lit.
The work area must not allow access by children
or pets to prevent distraction and injury.
2. Secure loose workpieces using a vise or clamps
(not included) to prevent movement while working.
3. There must not be objects, such as utility lines,
nearby that will present a hazard while working.
General Operating Instructions
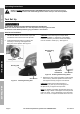
1. Make sure that the Power Switch is in the
off-position, then attach the Battery Pack.
Note: The Battery Pack fits into the Tool housing only one
way. Match up the shape of the tool with the shape of the
housing opening. The Battery Pack should slide easily
into the housing. CAUTION! Do not force it into the Tool.
2. Hold the Tool with both hands and slide
the Power Switch forward to activate.
3. Do not allow contact between Sandpaper, Scraper,
or Blade and workpiece until tool is at full speed.
4. Avoid contact with foreign objects such as metal
screws and nails when sanding, scraping, or cutting.
5. Do not apply excessive pressure on the Tool.
Allow the Tool to do the work.
NOTE: Model 68012 comes with a Speed Control Knob
that can be used to adjust the Tool’s speed.
The Speed Control Knob can be set at six different
speeds (1-6). “1” is the lowest oscillation and “6” is the
highest. Use high oscillation (5-6) for work with the
Scraper Blade. NOTE: Conduct a test run on a scrap
workpiece to determine the correct speed for job.
6. When finished, slide the Power Switch to OFF. Allow
the tool to stop completely before setting it down.
7. To prevent accidents remove the tool’s
Battery Pack after use. Clean, then store
the tool indoors out of children’s reach.