
Product manual


Page 4 Fo r t e c h n i c a l q u e s t i o n s , p l e a s e c a l l 1 - 8 0 0 - 4 4 4 - 3 3 5 3 . Item 61747
Op e r a t i n g In s t r u c t i o n s
Re a d t h e ENTIRE IMPORTANT SAFETY INFORMATION s e c t i o n a t t h e b e g i n n i n g o f t h i s
m a n u a l i n c l u d i n g a l l t e x t u n d e r s u b h e a d i n g s t h e r e i n b e f o r e s e t u p o r u s e o f t h i s p r o d u c t .
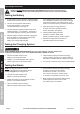
Te s t i n g t h e B a t t e r y
1. To help ensure a good connection, wipe the battery
terminals with a cloth to remove any dirt and grease.
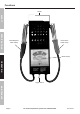
2. Connect the red (positive) Cable Clamp
to the positive terminal (+) on the 6 or
12V lead-acid battery. See figure A.
3. Connect the black (negative) Cable Clamp to the
negative terminal ( –) on the battery. See figure A.
Turn clamps slightly to ensure a good connection.
4. With the clamps connected, the tester’s gauge will
show the battery’s current charge. See figure B.
If it is less than 12V, disconnect the
battery and recharge before testing.
If the recharging will not bring the reading above
12V, the battery is defective. If it shows no reading,
verify that the tester is connected properly. If the
tester is connected properly, the battery is defective.
5. Press (and hold) the Toggle Switch for
at least 5 seconds to simulate an actual
load on the battery. See figure A.
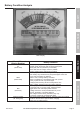
6. View the Meter Display and read
the battery condition. Refer to the
“Battery Condition Analysis” chart on page 6.
7. Release the Toggle Switch and remove
the Cable Clamps from the battery.
Te s t i n g t h e Ch a r g i n g Sy s t e m
AV OID CARB ON MONOX ID E POISONING . Th i s g a s c o m e s f r o m t h e v e h i c l e ’ s e x h a u s t a n d
i s c o l o r l e s s a n d o d o r l e s s . It c a n c a u s e SERIOU S INJ U RY o r D EATH i f i n h a l e d .
1. Connect the Cable Clamps to the
battery as previously described.
2. Outside, or in a well ventilated area, start the
vehicle engine and run at fast idle speed.
3. View the Meter Display and read the charging
system condition (far right on the gauge). Refer to
the “Battery Condition Analysis” section to the right.
4. Turn vehicle’s engine off, then remove Cable Clamps.
Te s t i n g t h e St a r t e r
NOTE: The engine should be at normal
operating temperature and the battery should
be f u l l y c h a r g e d before doing this test.
1. Connect the Cable Clamps to the
battery as previously described.
2. Disable the ignition so the engine will not start.
(Refer to your vehicle’s manual.)
3. Have an assistant crank the engine.
Note the voltage reading during cranking.
4. View the Meter Display and read the voltage.
A reading of 9 Volts or less indicates
excessive current draw. This may be
due to a poor connection, a failing starter,
or a battery of insufficient size for the motor.
5. When finished, disconnect the Cable Clamps,
restore ignition and store tool in a clear,
dry location away from children.
SAFETY OPERATION MAINTENANCESPECIFICATIONS