
Product manual


Page 7For technical questions, please call 1-800-444-3353.Item 69434
Operating Instructions
Read the ENTIRE IMPORTANT SAFETY INFORMATION section at the beginning of this
manual including all text under subheadings therein before set up or use of this product.
Compressor Area Set Up
1. Designate a work area that is clean and well-lit.
The work area must not allow access by
children or pets to prevent injury.
2. Locate the Compressor on a flat level surface to
ensure proper pump lubrication and to prevent
damage to the unit. Keep at least 12″ of space
around the unit to allow air circulation.
3. Route the power cord from the compressor
to the grounded wall outlet, along a safe path
without creating a tripping hazard or exposing
the power cord to possible damage.
General Operation
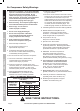
1.
Finger Lever
Nozzle & Needle
(Under the
Protective Cap)
Adjustment Screw
Airbrush Housing
Needle
Chucking Nut
Figure B
Insert the Compressor Power Cord Plug into the
nearest 120 volt, grounded, electrical outlet.
2. Set the Pressure Gauge to the desired
air pressure (maximum 58 PSI).
3. Fill the 22cc Glass Jar after thinning
and straining your paint properly.
NOTE: Use the proper solvent for thinning. Use
lacquer thinner for all lacquers, paint thinner for oil
based paints, and water for all latex based paints.
4. Hold the Airbrush Housing lightly in your hand and
push the tapered fitting on the lid of the 22cc Glass
Jar Assembly into the base of the Airbrush Housing.
It is held in place with friction and is not threaded.
5. Turn on the Power Switch.
6. Press the Finger Lever to begin air flow. Draw back
slowly/gently on the Finger Lever until you achieve
the air volume you need for your spray technique.
7. Continue to adjust the spray volume by using
the Finger Lever, moving it front to back. When
you have the correct spray volume, you may
fix the position using the Adjustment Screw.
8. The spray pattern size is based on the distance
between the work surface and the Airbrush Nozzle.
For extra-fine spray, remove the Protective Cap
and hold the Airbrush nearer the work surface.
9. When you are finished painting, gently release
pressure on Finger Lever (first loosening
the Adjustment Screw, if needed).
Note: If fluid blocks the Nozzle while working, move the
Needle Chucking Nut back and forth. If this does not
clear the Nozzle, try loosening the Adjustment Screw.
This will allow a longer movement for the Needle and
allow the blocked fluid to escape, clearing the Nozzle.
10. After flushing the Airbrush unit completely with
the proper solvent (Lacquer thinner if you used a
lacquer paint, water if you used a latex based paint
and paint thinner for all oil based enamels), spray
any remaining solvent through the Nozzle until clear
solvent sprays from the end of the Airbrush tip.
Note: ALL paints used with this Airbrush are
fast drying by design and can damage your
tool if they are NOT flushed immediately.
Note: The 5cc Metal Cup has two uses. It is
used for excess thinned paint, and also for
solvent when it is time to clean the Airbrush.
Note: The Metal Hook can be attached to a solid surface
and used to hang the Airbrush when it is not being used.
Note: Use this Compressor only with Airbrushes; do not
use this compressor with any other type of equipment.
11. When finished using and cleaning the Air
Compressor, turn its Power Switch off. Release
any remaining air in a safe fashion and disconnect
the Air Brush. Briefly depress the Water Drain
Valve to empty the unit of water after each use.
12. Store the Air Compressor in a clean, dry,
safe location out of reach of children
and other unauthorized people.
SAFETYOPERATIONMAINTENANCE SETUP