NETWORK VIDEO RECORDER User Manual SNR-73200WN
Overview of NVR Contents Overview of NVR 2 3 4 5 6 7 8 8 Contents Safety Instruction Front Panel Rear Panel Remote Controller Install Hard Drive Connect external equipment Connect NVR NVR Boot up 9 9 12 13 System Initialization Startup Wizard Registering with DDNS Main Interface NVR Menu 15 16 17 34 34 34 34 Popup Menu Main Menu Guide Main Menu Menu Lock Split Mode Record Search Start Sequence Web Application Manager 35 38 38 System Environment Requirements Web Application Manager Login Live In
Safety Instruction Please carefully read the following safety instruction so as to avoid personal injuries and prevent the equipment and other connection devices from being damaged. 1. Please use the power supply enclosed or specified by the manufacturer. Never operate the equipment by using unspecified power supply. 4. Do not place the equipment under the rain or humid environment like the basement.
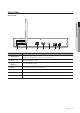
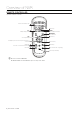
Overview of NVR Front Panel NVR is short for Network Video Recorder. a REC b NET c PWR USB d Type a b Status lamp c d e Key or indicator Identification REC If the "Red" indicator flashes, the hard drive is being read or written to. Net indicator NET Display network connection and data transfer status. Power indicator PWR If the "Blue" indicator is on, NVR is getting power normally.
Rear Panel SNR-73200W ● Overview of NVR CAUTION RISK OF ELECTRI SHOCK DO NOT OPEN CAUTION : TO REDUCE THE RISK OF ELECTRICAL SHOCK DO NOT OPEN COVERS. NO USER SERVICEABLE PARTS INSIDE. REFER SERVICING TO QUALIFIED SERVICE PERSONNEL. WARNING : TO PREVENT FIRE OR SHOCK HAZARD. DO NOT EXPOSE UNITS NOT SPECIFICALLY DESIGNED FOR OUTDOOR USE TO RAIN OR MOISTURE.
Overview of NVR Remote Controller Operation of remote controller Channel select Numeric key ALL Multiple display mode Numeric key MENU Enter into Main menu/Exit SUBMENU Go to Submenu SEL Select key/Edit key Left/Right key; Decrease/Increase parameter value of control bar. Up arrow key Down arrow key Rewind key Forward key Record key Stop manual record; stop playing Enter into record search menu/Play key Pause/Step forward key MM `` There is no function of Mute button.
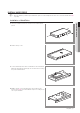
Install Hard Drive is pre-installed. If you want to replace hard disk drive, please refer to the following instruction. Please do not remove the hard drive when NVR MM `` HDD is operating. Installation of Hard Drive ● Overview of NVR 1. Using a screwdriver, remove the screws from the side and back panels. 12V I HDM VGA WAN TION SHOCK CAU SHOCK RICAL EABLE IED ELECT SERVIC OF USER TO QUALIF RISKS. NO ING NOT E THE COVER SERVIC D. DOED REDUC OPEN. REFER TO HAZAR N: NOT DESIGN INSIDE NNEL. URE.
Overview of NVR Connect external equipment Connect your monitor to the NVR using the VGA or HDMI video cable. Connect NVR to the power supply adapter provided. After all connections are completed, plug the NVR in to perform function checks. `` The appearance of power adaptor differs depending on sales region. CAUTION RISK OF ELECTRI SHOCK DO NOT OPEN CAUTION : TO REDUCE THE RISK OF ELECTRICAL SHOCK DO NOT OPEN COVERS. NO USER SERVICEABLE PARTS INSIDE. REFER SERVICING TO QUALIFIED SERVICE PERSONNEL.
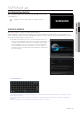
NVR Boot up System Initialization After connecting the NVR power cable to wall outlet, the NVR system initializing screen will appear. MM `` It may take 40 seconds to start up, and the screen may beep 5~6 times. After the NVR startup is complete, the startup wizard will display. Wizard setting menu includes: Homepage, admin password setting, hard drive management, video recording schedule, basic system configuration, network setup, e-mail and DDNS setting.
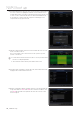
NVR Boot up 2. Hard Drive Management: Any new disk connected must be formatted before use. Click on "Select" to highlight the hard drive to be formatted. Click on "Format HDD" and the user login box will appear. Enter the password to log in. Click on "OK" to format the disk when the "Entire Data Will Be Erased. Do You Want To Continue?" dialog box appears. Formatting process is complete when the progress bar is full. 3. Video Recording Schedule: Select the channel and the date to be set.
6. Email Configuration: Receive or Send NVR alarm email and set parameters like email address, Encryption, email enable, and interval. • Encryption: Disable, SSL, TLS and Auto optional. Auto means it can detect the encryption type automatically. It is recommended to set the encryption type as Auto. ● NVR Boot up • SMTP Port: Mail sending port used by SMTP (Simple Mail Transfer Protocol). Server is generally Port 25, or Port 465 when SSL is used by Gmail.
NVR Boot up Registering with DDNS To register your product with the Wisenet DDNS 1. Visit the Wisenet DDNS web site (http://ddns.hanwha-security.com) and sign in with a registered account. 2. From the top menu bar, select . 3. Click the [Register Product] tab. 4. Enter the product ID. 5. Select a and specify the . 6. Specify the product location with a description if necessary. 7. Click [Product Registration]. The product will be added to the product list that you can check.
Main Interface In real-time preview mode: right click on any area to access the desired menu. Right click on it to open a context menu, whose menu items may vary depending on the specific condition, such as sign-in, sign-out, split screen mode and various operation conditions. Left click on any channel to access shortcut menu, where operations such as image capture, recording and image zoom-in are available.
NVR Boot up Component Name j k l m Pair Main Menu Lock 4-Channel Layout Do the pairing of camera and NVR. Function Access the main menu Sign out or access sign-in page. Display four channels of video. Realtime: There is no delay of video, but it is not that smooth. n Preview Policy Smooth:There may be some delay of video, but it is smooth. Balanced: Take both realtime and smooth into consideration at the same time.
NVR Menu Popup Menu After finishing system initialization, right click the mouse on preview interface or slide the mouse to the bottom of screen to enter into Pop-up Menu. Now you could perform parameter setting and operate on Main Menu, Multi-screen, Record Search, Sequence and Brightness settings. The options in the pop-up menu may vary slightly according to different parameter settings and application environment. The options in the menu will be explained in detail in the following chapters.
NVR Menu Main Menu Guide Wireless Camera Display Output Privacy Zone Record Capture Record Record Schedule Capture Capture Schedule Network Parameter Email Network Email Schedule DDNS RTSP FTP Alarm Motion General Record Search Events Picture Main Menu Device System HDD General DST Users NTP Info Log Advanced Shutdown 16_ NVR Menu General Maintain Events Info
Main Menu On LIVE mode, click the mouse button, or [Menu] button on the remote controller, or click [ menu screen. ] icon on the toolbar to enter the main If system interface is locked, refer to page 34 to unlock by entering your password. In Main Menu mode, you can make settings for Parameter, Record Search, Device, System, Advanced and Shutdown. ● NVR Menu Parameter Wireless Camera Go to "Main Menu" ; "Parameter" ; "Display" ; "Wireless Camera" to enter into the following menu.
NVR Menu Output Go to "Main Menu" ; "Parameter" ; "Display" ; "Output" to enter into the interface. • Video Output: Live Output • Sequence Mode: Layout1 • SEQ Time: Sequence time is set 5 seconds by default. User may set it as required up to 300 seconds • VGA/HDMI Resolution: For VGA output or HDMI output, the optional resolution includes 1024×768, 1280×1024, 1440×900, 1280×720, 1920×1080 • Transparency: Adjust menu transparency in the range of 0-128. • Support Underscan: Support HDMI underscan.
Record Go to "Main Menu" ; "Parameter" ; "Record" ; "Record" to enter into the interface. • Channel: Set the desired channel in the drop-down menu • Record Switch: Enable/disable record • PreRecord: Enable to pre-record motion detection record. ● NVR Menu Record Schedule Go to "Main Menu" ; "Parameter" ; "Record" ; "Record Schedule" to enter recording schedule for the NVR. Schedule interface Select the channel and the date to be set. One week's schedule can be set.
NVR Menu Capture Go to "Main Menu" ; "Parameter" ; "Capture". • Channel: Select capture channel • Auto Capture: Enable/Disable auto capture. • Normal lnterval: 6s / 10s / 30s / 1min / 10min / 30min / 1h • Alarm lnterval: 6s / 10s / 30s / 1min / 10min / 30min / 1h • Manual Capture: Enable/Disable manual capture MM `` You can click on the icon [ with your mouse. Capture Schedule ] in the live window to manually capture the image Go to "Main Menu" ; "Parameter" ; "Capture Schedule".
Network Go to "Main Menu" ; "Parameter" ; "Network" ; "Network" to enter the interface. Select the network connection option (PPPoE, DHCP, Static) to set the port. User can view and do the recording, playback or backup of the video remotely. 1. Select DHCP, click Save and restart the NVR. Input Client Port and HTTP Port (the two ports must be different). 2. Remotely visit the NVR by using IP address plus HTTP port through web browsers.
NVR Menu Click on "settings--Forwarding and POP/IMAP" Click on "Enable IMAP--Save Changes" E-mail Schedule Go to "Main Menu" ; "Parameter" ; "Network" ; "E-mail Schedule" to make Email schedule. Select the channel and the date to be set. One week's schedule can be set. The record schedule of the current channel can be copied to any other channel or all channels.
RTSP Go to "Main Menu" ; "Parameter" ; "Network" ; "RTSP" ● NVR Menu Set User Name and Password to view video by PC software VLC. • RTSP Enable: Enable/Disable • Verify: Enable/Disable • RTSP Port: 00054 • RTSP User Name: admin • RTSP Password: 111111 • Analog Channel: rtsp://IP:Port/chA/B • A: 01(ch1), 02(ch2) • B: 0(main stream), 1(sub stream) Follow the instruction to input IP and port to preview video.
NVR Menu Motion Go to "Main Menu" ; "Parameter" ; "Alarm" ; "Motion" to enter into the interface. • Channel: Select Channel. • Sensitivity: Support 1-8 level, 8 is the highest level. • Buzzer: When detecting object moving, buzzer makes alarms (disable, 10 seconds, 20 seconds, 40 seconds and 60 seconds). • Show Message: Messages will be displayed on the screen when moving object is detected and alarms are made. • Send Email: When moving object is detected, send Email to the specified Email address.
Record Search General ● NVR Menu Go to "Main Menu" ; "Record Search" ; "Record Search" to enter into the interface. • Channel: Select the channel you want to search. • Type: Select the type the playback record. There are three options: All, Normal and Motion. • Start Time/End Time: Select the specific period of time. The default setting is from 0:00 to 24:00. • Playback Channel: Click a date and select corresponding channel in Playback Channel. The selected channels must not be more than 16.
NVR Menu • Clip and backup: When it is under single channel playback, the [ ] icon will appear in the Play Control bar. Click the icon to start video clip function, click the icon again to end the function and pop up the dialog. Now, you may save the clipped video file. • Zoom out: When it is under single channel playback, the [ ] icon will appear in the Play Control bar. Click the icon to zoom in certain area of the playback screen and right click mouse to return the Playback page.
Play Backup Files 1. Copy backup files to the computer. ]. 2. Open SVideo player and click [ + ] or [ For example, if you want to choose *.264, *.avi, *.mp4, add backup file and select a file to play. Play: Click to play file ● NVR Menu Pause: Click to pause. Stop: Click to stop playback. Frame Forward: step forward by frame Slow Play: Click to play at 1/2, 1/4, 1/8, 1/16 speed. Fast forward: Click to play at 16x, 8x, 4x, 2x speed. Open file/Open Directory Expand/pack up the list.
NVR Menu Capture Settings: Set the path to save image MM `` It is recommended to use SVideo Player contained in compact disk for playback. Use of any other player may cause compatibility problem. Picture Go to "Main Menu" ; "Parameter" Support search picture for 5000pcs each time. If the picture number greater than this value, please adjust the date (time) of the current search and search again. Go to "Main Menu" ; "Record Search" ; "Picture" to enter into the interface.
Device HDD Go to "Main Menu" ; "Device" ; "HDD" to enter into the interface. MM `` Recording can only be performed when the HDD is in "OK" state. English _29 ● NVR Menu When HDD is connected, the system will automatically detect if the HDD is OK or not; if the HDD needs to be formatted, select the HDD and format it. If the system detects the HDD is OK, the HDD status will be shown as "OK". • No.: Number of HDD connected to system. • State: It shows the current status of the HDD.
NVR Menu System General Go to "Main Menu" ; "System" ; "General" ; "General" to enter into the interface. User may set Date, Time, Date Format, Time Format, Language, Video Format, Menu Timeouts and Show Wizard on this page. DST Go to "Main Menu" ; "System" ; "General" ; "DST". Enter into the interface to set DST, Time Offset, Start Time and End Time.
NTP ● NVR Menu Go to "Main Menu" ; "System" ; "General" ; "NTP". • NTP service: Enable/Disable NTP function. • Server Address: Select NTP server (time.windows.com, time.nist.gov, pool. ntp.org). • Time Zone: Corresponding time zones for various nations or regions. • Update Time: Enable NTP function and save parameters and click Update Time to calibrate the system time. NTP function is set to "Enable", system will calibrate the system time at every MM `` When 00:07:50 and every start-up.
NVR Menu User Edit User may enable or disable the function or set password. Info Go to "Main Menu" ; "System" ; "Info" to enter into the interface. Log Go to "Main Menu" ; "System" ; "Log". User may search log information in different period of time. Click "Backup" to save all the log information.
Advanced Maintain ● NVR Menu Go to "Main Menu" ; "Advanced" ; "Maintain" to enter into the interface. • Default User: Set a user as default user or turn default user off. • Auto Reboot: Enable the auto maintenance function to reboot system regularly at every day/week/month. When Auto Reboot is enabled, NVR should be in the main interface and no user operation. • Update: Click Update to enter the Device interface and select the updating file in USB to execute.
NVR Menu Menu Lock In consideration of system safety, user may click the icon [ ] on the toolbar when he leaves away from NVR and the system interface will be locked. User has to input Device ID, User Name and Password on the login interface to unlock. In case that the password is forgotten, contact the technical personnel. has all authorization of menu operation and users have limitations for MM `` Administrator authorization and have to get authorization from administrator.
Web Application Manager System Environment Requirements The minimum requirements for hardware and OS required to run Web Application are given below. CPU Hard Drive Display RAM Display Resolution Intel i7 or higher 4GB or more 8GB or more 500GB or more 1000GB or more 2GB or more 4GB or more 1280*1024 1920*1080 Recommended ● Web Application Manager RAM Intel i3 Minimum Windows® Vista, Windows® 7, Windows® 10 OS Mac OS X® 10.12.2 and above Microsoft Internet Explorer (Ver.
Web Application Manager the Web plugins is not downloaded successfully, please check if your browser's safety MM `` Iflevel or firewall setting is set too high. Please open IE browser ; [Menu Bar] Tools ; Internet options ; Security ; Internet ; Custom level ; Enable the options. Download and installation of plugin for IE Enter IP address of NVR in address bar of IE, for example, http://192.168.2.
Shut down IE browser and restart it, and then enter IP address of NVR in address bar to access login page. ● Web Application Manager Download and installation of plugin for Mac SAFARI Enter IP address of NVR in address bar of Mac SAFARI, for example, http://192.168.2.173:80, and click on "download" to download the plugin. Locate the downloaded plugin "WirelessPlugin.dmg" and double click on it Install the plugin by double clicking on "WirelessPlugin.pkg". Click on "Continue" > "Install".
Web Application Manager Shut down Mac SAFARI browser and restart it, and then enter IP address of NVR in address bar to access login page. above instruction is to install the initial plug in. You can use the same plugin for IE MM `` The and Firefox. If plugin for windows OS was installed on IE, Firefox once, you can use IE which needs to be run as administrator, Firefox to log in to NVR. When you download and install plugin on Firefox, please close Firefox when it is prompted to.
Menu Bar Menu Bar: Live, Playback, Remote Setting, Local Setting and Logout. Live Display Video Control Buttons on a single live interface : Open or close the images on Live window. : Bitrate: Mainstream or Substream optional. : Display mode: Single channel or quad view optional. : Open the video on Live window. : Close all the Live channels : Original proportions. : Stretch. : Click to maximize the current window to full screen. Right click to popup menu option and select Exit Full Screen.
Web Application Manager Playback Click [ NVR HDD. ] to enter into Playback interface to remotely view the records in It supports 1 to 4 channel record playback. Record Search Record playback procedure Firstly, select the date you want to check and tick 1 to 4 channels. Any record files in current channel at current date will be displayed in the status bar of the interface.
Playback Control Playback control bar Detailed brief description is shown as below: Description Key Description Play Slow playing x1/2,1/4, 1/8, Fast Forward x1/2/4/8 Pause Open all the playback channels Stop Stop playing all the playback Frame by frame Digital ZOOM Record Clip Original proportions Image Snapshot Stretch Download Full Screen Record file clip After opening playback, click [ ] icon to clip the selected file; and click again to stop the clip function.
Web Application Manager Remote Setting Click Remote Setting to enter into the interface shown, including Record,Capture, Network, Alarm, Device, System and Advance. Record Click option to unfold its sub-options: Record parameter and Schedule. Record Parameters The parameters should be consistent with NVR local setting. Record Schedule The parameters should be consistent with NVR local setting. Green stands for Normal record; Yellow stands for Motion detection.
Network Unfold to show its sub-options: Network, Email, DDNS and RTSP configuration. LAN setting ● Web Application Manager NVR supports Static/DHCP/PPPoE modes. System default network type is . User can set parameters as required. If you change Network type to PPPoE, NVR will automatically restart to make the setting effective. Email Email: Set NVR alarm Email configuration parameters, including Email address, Encryption, Email Enable, and Interval etc.
Web Application Manager Alarm Alarm setting includes Motion Detection Parameters. Motion Detection Configure Sensitivity, Alarm out, Alarm Record and Alarm Capture, etc. Detailed setting should be consistent with NVR local setting. Device Click to unfold its sub-options: HDD HDD User may check HDD status of NVR and overwritten time. Detail setting should be consistent with NVR local setting. System Click option to unfold its sub-options: General, Users and Info.
Users User may configure user name and password and detailed setting should be consistent with NVR local setting. ● Web Application Manager Info User may search device name, device number, device type, MAC address, software version, IE version and hardware version of NVR.
Web Application Manager Advanced Click Advance to unfold its sub-options: Firmware Update, Load default, Events and Maintain. Firmware Update User may remotely update NVR system. Updating procedure Firstly, select the update file path. The file format is *.sw. Secondly, click "Start" to start updating. The updating progress can be seen on the screen. Load Default User may remotely restore default parameters of NVR, with same setting method as that of NVR.
Maintain Allow you remotely set auto maintain time for NVR. Detailed setting should be consistent with NVR local setting. ● Web Application Manager Local Setting User may set Record Path (save Live record and Playback clip file), Download Path for remote file, Snapshot Path for captured pictures, Interval for switching record files (Packaging time), and File type (h.264, AVI and MP4). Logout Click [ ] to log out and return to the login interface.
Mobile App Android Phones/Tablets 1. Open Play Store to search WiseView and click "INSTALL" to install. 2. After installation, open WiseView and select "Device". Then click [ ] to add new device. Scan QR code under Information page of system on local NVR. Then input client port, user name and password, and then click Save to log in to the device.
iPhone/iPad 1. Open App Store to search WiseView, and click icon [ ] to install. ● Mobile App 2. Open WiseView, and go to Device. Click [ ] to add new device. Scan QR code under Information page of system on local NVR. Then input client port, user name and password, and then click Save to log in to the device.
Appendix Troubleshooting Symptom Countermeasures What can I do if the system does not detect the HDD? • Check if the power supply system is properly connected and data cord and power cables are securely connected, and if something wrong with the HDD interface. Or you may check if your HDD is supported by referring to the specifications or descriptions.
Usage Maintenance 1. To shut down NVR, please firstly shut down the system and then turn off the power. Do not turn off the power directly or HDD data will be lost or damaged. 2. Please keep NVR away from heat sources or places. 3. Clean the internal dust regularly. Make sure the good ventilation of NVR so as to ensure the good heat dissipation. 5. Please check the HDD cable and data cable regularly to see if they are ageing. 6.
Appendix Specifications SNR-73200W Description Video Live Performance Operating System Recording Search & Playback Network (IPv4) 52_ Appendix Item Details Inputs 4CH Wireless Resolution 1,920x1,080 (Full HD) Frame rate Max 60fps@1080p - Main stream : 15fps@1080p per channel Resolution 1080p Multi Screen display 1 / 4 / SEQ Embedded Linux Installation wizard Support Compression H.
Item Web / App viewer Storage Security Interface Monitors Alarm Connections General Electrical Environmental Mechanical OSD Lauguage Supported OS - PC : Windows® Vista, Windows® 7, Windows® 10 Mac OS X® 10.12.2 or above - Mobile : Android Ver4.4 or above iOS® 7.0 or above Supported Browser -M icrosoft Internet Explorer (Ver. 11, 10, 9, 8), Mozilla Firefox Ver 43.0.4 or higher, Safari®10.0 and above Protocol support TCP/IP, UDP/IP, UDP, P2P Transmission speed 60fps@1080p Max.
Appendix Item Mechanical / Package information Details Color / Material Black / Metal Dimension (W x D x H) 300X219.7X52.5mm (11.8” x 8.65” x 2.07”) Weight 1.43Kg prox.- 1TB hard drive pre-installed Accessory Printed material Quick start guide - Eng / Fre / Spa / Por / Ger (5 in total) Samsungsv.com insert Package contents insert Return notice insert LAN cable 1 EA (1.5m) HDMI cable 1 EA (1.
Dimension Unit: mm (inch) ● Appendix English _55
Open Announcement oPenSource Source AnnounceMent The software included in this product contains copyrighted software that is licensed under the GPL/LGPL. You may obtain the Corresponding Source code from us for a period of three years after our last shipment of this product If you want to obtain the Corresponding Source code in the physical medium such as CD-ROM, the cost of physically performing source distribution might be charged.
c) Accompany it with the information you received as to the offer to distribute corresponding source code. (This alternative is allowed only for noncommercial distribution and only if you received the program in object code or executable form with such an offer, in accord with Subsection b above.) The source code for a work means the preferred form of the work for making modifications to it.
consider it more useful to permit linking proprietary applications with the library. If this is what you want to do, use the GNU Lesser General Public License instead of this License. gnu generAL PubLIc LIcenSe Version 3, 29 June 2007 Copyright © 2007 Free Software Foundation, Inc. Everyone is permitted to copy and distribute verbatim copies of this license document, but changing it is not allowed.
4. conveying Verbatim copies. You may convey verbatim copies of the Program’s source code as you receive it, in any medium, provided that you conspicuously and appropriately publish on each copy an appropriate copyright notice; keep intact all notices stating that this License and any non-permissive terms added in accord with section 7 apply to the code; keep intact all notices of the absence of any warranty; and give all recipients a copy of this License along with the Program.
permits relicensing or conveying under this License, you may add to a covered work material governed by the terms of that license document, provided that the further restriction does not survive such relicensing or conveying. If you add terms to a covered work in accord with this section, you must place, in the relevant source files, a statement of the additional terms that apply to those files, or a notice indicating where to find the applicable terms.
15. disclaimer of Warranty. THERE IS NO WARRANTY FOR THE PROGRAM, TO THE EXTENT PERMITTED BY APPLICABLE LAW. EXCEPT WHEN OTHERWISE STATED IN WRITING THE COPYRIGHT HOLDERS AND/OR OTHER PARTIES PROVIDE THE PROGRAM “AS IS” WITHOUT WARRANTY OF ANY KIND, EITHER EXPRESSED OR IMPLIED, INCLUDING, BUT NOT LIMITED TO, THE IMPLIED WARRANTIES OF MERCHANTABILITY AND FITNESS FOR A PARTICULAR PURPOSE. THE ENTIRE RISK AS TO THE QUALITY AND PERFORMANCE OF THE PROGRAM IS WITH YOU.
You may charge a fee for the physical act of transferring a copy, and you may at your option offer warranty protection in exchange for a fee. 2. You may modify your copy or copies of the Library or any portion of it, thus forming a work based on the Library, and copy and distribute such modifications or work under the terms of Section 1 above, provided that you also meet all of these conditions: a) The modified work must itself be a software library.
acceptance of this License to do so, and all its terms and conditions for copying, distributing or modifying the Library or works based on it. 10. Each time you redistribute the Library (or any work based on the Library), the recipient automatically receives a license from the original licensor to copy, distribute, link with or modify the Library subject to these terms and conditions. You may not impose any further restrictions on the recipients’ exercise of the rights granted herein.
FCC Compliance Statement This device complies with part 15 of the FCC rules. Operation is subject to the following two conditions: (1) This device may not cause harmful interference, and (2) this device must accept any interference received, including interference that may cause undesired operation. FCC Interference Statement This equipment has been tested and found to comply with the limits for a Class B digital device, pursuant to part 15 of the FCC Rules.
Industry Canada Statement This device complies with RSS-247 of the Industry Canada Rules. Operation is subject to the following two conditions: (1) This device may not cause harmful interference, and (2) this device must accept any interference received, including interference that may cause undesired operation. Ce dispositif est conforme à la norme CNR-247 d’Industrie Canada applicable aux appareils radio exempts de licence.
Hanwha Techwin cares for the environment at all product manufacturing stages, and is taking measures to provide customers with more environmentally friendly products. The Eco mark represents Hanwha Techwin's devotion to creating environmentally friendly products, and indicates that the product satisfies the EU RoHS Directive.
Head Office 6, Pangyo-ro 319 beon-gil, Bundang-gu, Seongnam-si, Gyeonggi-do, 463-400 Rep. of KOREA Tel : +82.70.7147.8753 Fax : +82.31.8018.3740 www.hanwha-security.com Hanwha Techwin America 500 Frank W. Burr Blvd. Suite 43 Teaneck, NJ 07666 Toll Free +1.877.213.1222 Direct +1.201.325.6920 Fax +1.201.373.0124 www.hanwha-security.com Hanwha Techwin Europe Heriot House, Heriot Road, Chertsey, Surrey, KT16 9DT, United Kingdom Tel +44.1932.57.8100 Fax +44.1932.57.8101 www.hanwha-security.