
User's Manual
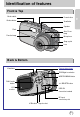

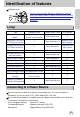
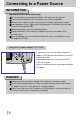
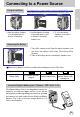
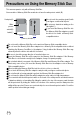

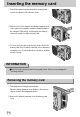
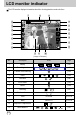
Table Of Contents
- Instructions
- Contents
- Getting to know your camera
- About the icons
- Caution
- An FCC warning
- This digital camera can be used for
- Manufacturer's contents
- Identification of features
- Front & Top
- Back & Bottom
- Side/ 5-function button
- Mode switch
- Lamp
- Connecting to a Power Source
- Using the AC power adapter (3.3V 2.0A)
- Using the batteries
- Removing the battery
- Using the Digimax battery pack ( Optional : SBP-3603, 3.3V)
- Precautions on Using the Memory Stick Duo
- Inserting the memory card
- Removing the memory card
- LCD monitor indicator
- Starting the recording mode
- Things to watch out for when taking pictures
- Using the camera buttons to adjust the camera
- POWER button
- SHUTTER button
- WIDE / TELE button
- Voice memo( )/ UP button
- Macro( ) / Down button (Focusing)
- Fixed focus
- FLASH( ) / LEFT button
- Self-timer( ) / Right( ) button
- MENU/ OK button
- +/- button
- LCD button
- Using the LCD monitor to adjust the camera
- How to use the menu
- Mode
- Size
- Quality
- Metering
- Effect
- Sharpness
- Starting play mode
- LCD monitor indicator
- Using the camera buttons to adjust the camera
- Thumbnail( ) / Enlargement( ) button
- Voice( ) memo / Up button
- Play & Pause( )/ Down button
- LEFT / RIGHT/ MENU/ OK button
- LCD button
- Delete( ) button
- Setting up the play back function using the LCD monitor
- Deleting all images
- Protecting images
- Starting the slide show
- Resize
- Rotating an image
- DPOF : PRINT ORDER
- DPOF : STANDARD
- DPOF : INDEX
- DPOF : PRINT SIZE
- DPOF : CANCEL
- PictBridge
- PictBridge: Picture Selection
- PictBridge: Print Setting
- PictBridge: Picture Printing
- PictBridge : DPOF AUTO PRINT
- PictBridge : RESET
- Setup menu
- File name
- Auto power off
- Language
- Formatting a memory card
- Setting up the Date/ Time/ Date type
- Imprinting the recording date
- Function lamp
- Sound
- LCD brightness
- Selecting Video out type
- Quick view
- Connecting an External Device (USB)
- Initialization(RESET ALL)
- Setting up the MYCAM menu
- Avatar
- Start up image
- Start up sound
- Shutter sound
- List of camera functions
- Starting PC mode
- Important notes
- Warning indicator
- Before contacting a service center
- Specifications
- Software Notes
- About the software
- Setting up the application software
- Removing the USB Driver for Windows 98SE
- Removable Disk
- Removing the removable disk
- Setting up the USB Driver for MAC
- Using the USB Driver for MAC
- Digimax Viewer 2.1
- MGI PhotoSuite III SE
- Get
- Prepare
- Compose
- Organize
- Share
- FAQ

16
Precautions on Using the Memory Stick Duo
Do not insert the Memory Stick Duo on its own into a Memory Stick-compatible device.
Do not insert the Memory Stick Duo adapter into a Memory Stick-compatible device without
attaching the Memory Card Duo to the adapter. Using it without the Memory Stick Duo may
adversely affect the device into which it is inserted.
Be sure to check the proper direction of insertion before use .
Insert the Memory Stick Duo all the way into the Memory Stick Duo adapter. If the Memory
Stick Duo is not inserted correctly into the adapter, it may not operate properly.
Do not attach labels to any part of the Memory Stick Duo and Memory Stick Duo adapter. The
labels may come off as you insert the Memory Stick Duo into the adapter or into a Memory
Stick-compatible device.
When inserting the Memory Stick Duo into the slot, do not force or bend it.
Do not touch the Memory Stick Duo adapter's card pins with your fingers or with metal objects.
Do not allow dirt or foreign material to get into the Memory Stick Duo adapter slot.
Do not leave the Memory Stick Duo with its adapter in areas subject to high temperatures.
Those models with the write-protect switch on the back of the card prevents accidental erasure
of data from deletion or formatting. By sliding the switch to the top of the memory card, the data
will be protected. By sliding the switch to the bottom of the memory card, the data protection
ability will be canceled. Please use a pointed object to move the write-protect switch. Check the
switch position before taking an image.
Card pins(A)
Write
protect
switch(B)
Label(C)
[ Memory Stick Duo ]
FrontBack
This camera operates only with a Memory Stick Duo.
Some models of Memory Stick Duo media do not have the write-protect switch (B).
Do not touch the card pins (part A) with
your fingers or with metal objects.
Do not press hard when writing on the
label (part C).
If you insert the Memory Stick Duo into
the Memory Stick Duo adapter, you will
be able to use it with a Memory Stick-
compatible device.