
User's Manual
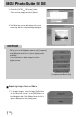
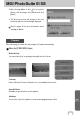
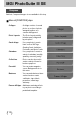
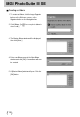
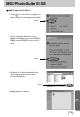
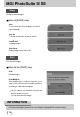
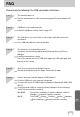
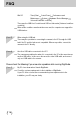
Table Of Contents
- Instructions
- Contents
- Getting to know your camera
- About the icons
- Caution
- An FCC warning
- This digital camera can be used for
- Manufacturer's contents
- Identification of features
- Front & Top
- Back & Bottom
- Side/ 5-function button
- Mode switch
- Lamp
- Connecting to a Power Source
- Using the AC power adapter (3.3V 2.0A)
- Using the batteries
- Removing the battery
- Using the Digimax battery pack ( Optional : SBP-3603, 3.3V)
- Precautions on Using the Memory Stick Duo
- Inserting the memory card
- Removing the memory card
- LCD monitor indicator
- Starting the recording mode
- Things to watch out for when taking pictures
- Using the camera buttons to adjust the camera
- POWER button
- SHUTTER button
- WIDE / TELE button
- Voice memo( )/ UP button
- Macro( ) / Down button (Focusing)
- Fixed focus
- FLASH( ) / LEFT button
- Self-timer( ) / Right( ) button
- MENU/ OK button
- +/- button
- LCD button
- Using the LCD monitor to adjust the camera
- How to use the menu
- Mode
- Size
- Quality
- Metering
- Effect
- Sharpness
- Starting play mode
- LCD monitor indicator
- Using the camera buttons to adjust the camera
- Thumbnail( ) / Enlargement( ) button
- Voice( ) memo / Up button
- Play & Pause( )/ Down button
- LEFT / RIGHT/ MENU/ OK button
- LCD button
- Delete( ) button
- Setting up the play back function using the LCD monitor
- Deleting all images
- Protecting images
- Starting the slide show
- Resize
- Rotating an image
- DPOF : PRINT ORDER
- DPOF : STANDARD
- DPOF : INDEX
- DPOF : PRINT SIZE
- DPOF : CANCEL
- PictBridge
- PictBridge: Picture Selection
- PictBridge: Print Setting
- PictBridge: Picture Printing
- PictBridge : DPOF AUTO PRINT
- PictBridge : RESET
- Setup menu
- File name
- Auto power off
- Language
- Formatting a memory card
- Setting up the Date/ Time/ Date type
- Imprinting the recording date
- Function lamp
- Sound
- LCD brightness
- Selecting Video out type
- Quick view
- Connecting an External Device (USB)
- Initialization(RESET ALL)
- Setting up the MYCAM menu
- Avatar
- Start up image
- Start up sound
- Shutter sound
- List of camera functions
- Starting PC mode
- Important notes
- Warning indicator
- Before contacting a service center
- Specifications
- Software Notes
- About the software
- Setting up the application software
- Removing the USB Driver for Windows 98SE
- Removable Disk
- Removing the removable disk
- Setting up the USB Driver for MAC
- Using the USB Driver for MAC
- Digimax Viewer 2.1
- MGI PhotoSuite III SE
- Get
- Prepare
- Compose
- Organize
- Share
- FAQ

113
MGI PhotoSuite III SE
Organize
Organize your photos and other media files into albums.
Menu of [ORGANIZE] steps
[
Choose a photo album to view or edit]
Select Album : To create an Album, click
[Organize] in the welcome
screen or navigation bar.
Album.. : Open Master Album.
[ Select a photo, and choose an action below.]
- Open : Open selected image.
- Delete : Delete selected image.
- Properties... : view image information.
[ Choose an action to manage your album.]
- Add : click [Add] to add an image to an
Album.
- Sort : click [Sort] to Sort saved images.
- Search : click [Search] to Search saved
images.
- Reset : click [Reset] to reset the setting.
- Update : click [Update] to update images.
- Create Slide Show : click [Create Slide
Show] to create a Slide
Show.
Always start on this page : If you select this
option, the program will start in [Organize].