
User's Manual

9
The WPS LED on the Player should turn back off and the Standby/On
LED on the top panel of the Player should turn fully on blue indicating
the unit is now connected to your network. WPS mode cancels itself
after approximately 30 seconds if no WPS connection is performed.
You should now download the Musaic app to a phone/tablet or PC
connected top your home network and see if you can control your
Player.
Note: You can change the default device name for your Player in the
Settings section of the Musaic app (see page 7).
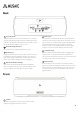
1. Connect your Player via Ethernet
Connect a suitable Ethernet cable (straight through Cat5 or Cat5e
cable, RJ45 to RJ45) from a LAN socket on your router/network switch
to the socket on the back of the Musaic Player. Do this before you
turn the Player on.
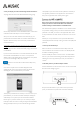
2. Power up the Musaic Player
Make sure the PSU is connected to the Musaic Player and to the
mains and that the mains socket is turned on. The Standby/On LED
should be red indicating Standby.
Press the Standby/On button to turn the unit on. The LED will flash
blue for up to a minute before starting to either flash alternately
blue/red indicating the unit is fully powered up but not yet connected
to a network or turn on blue if it connects straight away.
The Player always looks for an Ethernet connection on power up. If it
finds one the Player should automatically disable Wi-Fi and connect
via Ethernet. The Standby/On LED on the top panel of the Player
should turn fully on blue indicating the unit is now connected to your
network. Note: The Active Standby power consumption with Ethernet
connected is slightly less than when using Wi-Fi as the Wi-Fi portion of
the unit is powered down.
You should now download the Musaic app to a phone/tablet or PC
connected to your home network and see if you can control your
Player.
Note: You can change the default device name for your Player in the
Settings section of the Musaic app (see page 7).
Note: The Musaic Players use DHCP by default, this is standard for
most home networks where DHCP (Dynamic Host Control Protocol) or
Dynamic IP is used to automatically assign a new device a new IP
address.
To run a network with static IP, you can browse to the units IP address
where you will find a web-served interface, here you can then click the
‘DHCP’ box to disable DHCP. You can then use a specific IP address,
subnet mask, default gateway, primary DNS etc. Only do this if you
have the knowledge to setup such a system.
To change between a previously setup Wi-Fi connection and Ethernet
simply turn off the unit, plug in the Ethernet cable and turn it back on.
To change between Ethernet and a previously setup Wi-Fi connection
simply turn off the unit, remove the Ethernet cable and turn it back
on.
If you want to change from one Wi-Fi connection to another you can
restart the connection process as follows. Make sure the unit is
powered, turn it on from the top panel Standby/On button, wait a few
seconds then press the small recessed Reset button on the back
panel for one second. The network connections will be reset and you
can start the setup process again as per the Getting Started section.
Your presets/memories and other settings will be retained.
To perform a full factory reset press and hold the Reset button for 15
seconds, all settings will now be reset see section on Factory Reset at
end of this manual.