
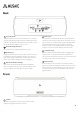
User's Manual


7
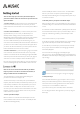
There are three ways you can connect your Musaic Player to
your home network. Choose the one that suits you best from the
options as follows:
1. Connect via Wi-Fi: You will need to know your Wi-Fi password and
have access to a Wi-Fi device that you can connect to your home
network and has an internet browser such as a smart phone, tablet or
laptop.
2. Connect via Wi-Fi with WPS: If your wireless access point/router
supports WPS then you can connect your Musaic Player to it
wirelessly without needing to know your Wi-Fi password. The
disadvantage of this method is that the router/access point generates
a random network name and password that make it harder to
connect non WPS devices later (you would need to log in to your
router to find out these details). WPS is best used when all the devices
you want to connect to a WPS access point/router all support WPS. If
you wish to use WPS check the back of your access point/router for a
button marked ‘WPS’ or ‘Push to Connect’ or similar.
3. Connect via Ethernet: If your Musaic Player is going to be situated
near a router with a free Ethernet socket then this is a very simple
method to use. Ethernet also has the advantage of higher bandwidth
and no drop-outs and is the best method if you want to play high-res
24 bit content or have a lot of Players that are situated far apart.
For more help connecting a Musaic Player to your home network we
recommend watching the help videos available at www.musaic.com.
Note: Do not connect an Ethernet/LAN cable to your Musaic
Player if you want to use Wi-Fi as the connection method, as
doing so enables Ethernet and disables Wi-Fi.
The example below is for a smart-phone/tablet, although the
procedure is the same from a laptop or PC.
The idea is to wirelessly connect directly from a phone/tablet to a
temporary Wi-Fi network made by the Musaic Player so that you can
name the Player and tell it the name and password of your normal
home Wi-Fi network. The Player then checks to make sure it can
connect to your home network and if successful will then turn off its
temporary network. Your phone will then reconnect to your home
network and setup is complete.
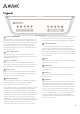
1. Power up the Musaic Player
Make sure the PSU is connected to the Musaic Player and to the
mains and that the mains socket is turned on. The Standby/On LED
should be red indicating Standby.
Press the Standby/On button to turn the unit on. The LED will flash
blue for up to a minute as it powers up before starting to flash
alternately blue/red indicating the unit is fully powered up but not yet
connected to a network.
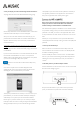
2. Wirelessly connect your phone to the Musaic Player
Make sure that the Wi-Fi on your phone/tablet is turned on and go to
its wireless settings menu to find the list of local Wi-Fi networks that it
can see.
You should see a network called ‘Musaic _XXXXXX_AJ’ where the X’s will
be some letters and numbers unique to your Musaic Player. This is a
temporary network being created by your Musaic Player to aide
setup.
Connect to this network on your phone/tablet.
On iOS devices a browser should automatically open and the settings
page for the Musaic Player should be shown automatically.
On other devices you should open your internet browser manually.
Once you open the internet browser, the settings page should be
automatically displayed.
If for some reason the settings page is not displayed, type
‘http://172.19.42.1/’ into the URL address field of your browser (this is
the address of the Musaic Player’s settings page) and the browser will
open the page.
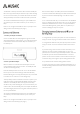
Click this icon in the top right to change the language.
3. Name your Player
In the field called ‘Device Name’ give your Player a name to help you
identify it. This will be what it appears as in the Musaic apps. If you
have several units it is usually a good idea to name them after the
room they are in such as ‘Bedroom’ or ‘Kitchen’ etc.
Type a device name (up to 32 characters) and then select ’Next’.
You can change the device name again later if you wish by using the
Musaic app.