XL 25 T DE Gebrauchsanweisung FR Manuel d’utilisation IT GB Vor Inbetriebnahme Gebrauchsanweisung lesen ! Lire attentivement le mode d‘emploi avant chaquemise en service ! Istruzioni per l’uso Prima della messa in funzione leggere le istruzioni perl‘utilizzo! Operating Instructions Read operating instructions before use! 73701846-04
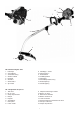
13 7 5 12 12 10 14 8 15 9 6 4 16 3 1 2 DE - Bezeichnung der Teile 1. Fadenkopf 2. Schneidfaden 3. Schutzabdeckung 4. Schaft / Aufsatz 5. Handgriff 6. Gashebel 7. Zündschalter 8. Sperrhebel 9. Startklappe / Choke 10. Startergehäuse 11. Kraftstofftank 12. Luftfiltergehäuse 13. Startergriff 14. Schalldämpferabdeckung 15. Kraftstoffpumpe 16. Schaftkupplung FR - Désignation des pièces 1. Tête de fil 2. Fil de coupe 3. Chape de protection 4. Hampe 5. Poignée 6. Accélérateur 7. Interrupteur 8.
IT 1. 2. 3. 4. 5. 6. 7. 8. - Identificazione dei componenti Testina del filo Filo tagliente Copertura protettiva Fusto Impugnatura Leva dell’acceleratore Interruttore di accensione Leva di bloccaggio GB - List of components 1. Cord cutting head 2. Cutting cord 3. Protection cover 4. Shaft 5. Handle 6. Throttle lever 7. Ignition switch 8. Locking lever 9. Farfalla d’avviamento 10. Alloggiamento del dispositivo d’avviamento 11. Serbatoio del carburante 12. Alloggiamento del filtro dell’aria 13.
B C E Abb. 1 Abb. 2 F Abb. 3 Abb. 5 Abb. 6 Abb. 7 Abb. 8 Abb.9 Abb.10 Abb. 11 Abb. 4 17 cm 5 Abb.
8 6 Abb. 13 Abb. 14 Abb. 15 Abb. 16 Abb. 19 a Abb. 21 Abb. 17 Abb. 19 b Abb. 22 6 Abb. 18 Abb. 20 Abb.
Abb. 24 Abb. 25 Abb. 26 a A Abb. 26 b Abb. 27 0,6-0,7mm Abb. 29 Abb. 30 7 Abb.
SICHERHEITSSYMBOLE UND INTERNATIONALE SYMBOLE DEUTSCH In dieser Gebrauchsanweisung werden Sicherheitssymbole sowie internationale Symbole und Piktogramme beschrieben, die auf dem Gerät angebracht sein können. Lesen Sie die Gebrauchsanweisung, damit Sie mit allen Angaben bezüglich Sicherheit, Montage, Betrieb, Wartung und Reparatur vertraut sind.
Benzintrimmer Technische Daten Modell Motorleistung kW / PS Motortyp Hubraum cm³ Treibstoff Benzin/Öl-Gemisch Tankinhalt ml Max. Motordrehzahl min-1 Leerlaufdrehzahl min-1 Max.
Kopf, Ihre Hände und Ihre Füße bestehen kann. • Schauen Sie sich die zu schneidenden Bereiche sorgfältig an. Entfernen Sie sämtliches Laub, das sich im Faden verfangen kann. Entfernen Sie zudem alle Gegenstände, die beim Schneiden weggeschleudert werden können. SICHERHEITSHINWEISE FÜR BENZINBETRIEBENE TRIMMER UND FREISCHNEIDER WARNUNG: Benzin ist äußerst brennbar, und seine Dämpfe können bei Entzündung explodieren.
NACH DEM BETRIEB • Reinigen Sie den Trimmer nach dem Betrieb von Gras- und Schmutzresten. • Schließen Sie das Gerät an einem geeigneten Ort ein, um es vor unbefugtem Gebrauch zu schützen. WEITERE SICHERHEITSHINWEISE • Wenn sich noch Benzin im Tank des Geräts befindet, lagern Sie es nicht in einem Gebäude, wo die Dämpfe durch offene Flammen oder Funken entzündet werden können. • Lassen Sie den Motor abkühlen, bevor Sie das Gerät in einem geschlossenen Raum unterbringen.
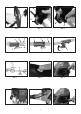
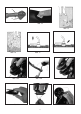
9). Beim Warmstart ist dies nicht mehr notwendig. 3. Drücken Sie die Kraftstoffpumpe(A) 8mal (Abb. 10). 4. Ziehen Sie das Starterseil 2-3mal (Abb. 11) - ein gleichmässiges, schnelles Ziehen ist erforderlich um den Motor zu zünden. 5. Schieben Sie die Starterklappe auf Position „RUN“ (Abb. 12), geben Sie mit dem Gashebel etwas Gas und ziehen Sie erneut am Starterseil, bis der Motor startet. (Zum Betätigen des Gashebels 6 muss zuvor der Sperrhebel 8 gedrückt werden Abb. 13). 6. Lassen Sie den Motor für ca.
verfangen sich unterhalb des Schutzschildes (Abb. 18), dies verhindert eine ausreichende Kühlung des Schaftrohrs. Entfernen Sie die Reste vorsichtig mit einem Schraubenzieher oder dergleichen. Schneidfaden erneuern 1. Entfernen Sie die Verschlusschraube durch Drehen gegen den Uhrzeigersinn (Abb. 19). 2. Entfernen Sie die Fadenspule und Feder von der Spindel (Abb. 20). 3. Entfernen Sie den verbleibenden Schneidfaden (Abb. 21). 4. Legen Sie einen 6m x 2mm Faden in 2 Hälften zusammen.
3. Reinigen Sie die Zündkerze und überprüfen Sie deren Elektrodenabstand. Ersetzen Sie die Zündkerze bei Bedarf. 4. Bereiten Sie das Gerät zum Einsatz vor. 5. Füllen Sie den Tank mit der richtigen Kraftstoff-Ölmischung. Siehe Kapitel “Treibstoff und Öl”. Entsorgung und Umweltschutz Reste von Kettenöl bzw. 2-Taktmischung niemals in den Abfluss bzw. die Kanalisation oder ins Erdreich schütten, sondern umweltgerecht entsorgen, z.B. an einer Entsorgungsstelle.
SYMBOLES DE SECURITE ET SYMBOLES INTERNATIONAUX Français Les symboles de sécurité ainsi que les symboles internationaux et les pictogrammes que porte éventuellement l’appareil sont décrits dans le présent manuel d’instructions. Veuillez lire attentivement le manuel d’instructions afin de vous familiariser avec toutes les indications relatives à la sécurité, au montage, à la mise en service, à l’entretien et à la réparation.
Coupe-bordures à essence Données techniques Modèle Puissance du moteur kW / CV Type de moteur: Cylindrée cm3 Carburant mélange essence/huile Contenu du réservoir à carburant ml maxi.
2) Eteignez toujours le moteur et laissez-le refroidir avant de remplir le réservoir. Vous ne devez jamais enlever le couvercle du réservoir ou rajouter de l’essence aussi longtemps que le moteur est encore chaud. 3) Une certaine pression peut se former dans le réservoir. Otez le couvercle d’abord lentement pour que la pression puisse diminuer. 4) Lorsque vous faites le plein d’essence, veillez à ce que la pièce soit propre et bien aérée. Essuyez tout de suite l’essence ayant éventuellement débordé.
• Ne travaillez avec le coupe-bordures que si le fil de coupe adapté est installé et que si les deux fils de coupe ont la bonne longueur. APRES UTILISATION • Après l’utilisation, nettoyez le coupe-bordures et retirez les restes d’herbe et les salissures. • Enfermez l’appareil dans un endroit approprié afin d’éviter toute utilisation non autorisée.
moteur se mette en marche. (Avant d’activer l’accélérateur 6, le levier d’arrêt 8 doit être enfoncé ill. 13). 6. Laissez chauffer le moteur à vide pendant 10 secondes à peu près. 7. Au cas où le moteur ne démarrerait pas, répétez les points 1-6. CONSEIL: Si le moteur ne redémarre pas après quelques essais, procédez comme décrit au chapitre « Remèdes en cas de dysfonctionnement ». CONSEIL: Sortez la corde de démarrage toujours tout droit. Si vous tirez en biais, la corde se frotte à l’œillet.
1. Enlevez la vis (A) en tournant dans le sens contraire aux aiguilles d’une montre (ill. 19). 2. Enlevez la bobine du fil et le ressort de la broche (ill. 20). 3. Enlevez le fil de coupe restant (ill. 21). 4. Pliez en 2 longueurs égales un fil de 6m x 2mm. Placez l’extrémité du nœud coulant dans l’encoche de la bobine de fil (Ill. 21). L’encoche se trouve sur la partie intermédiaire séparant les deux boîtiers de bobine. 5. Enroulez les deux moitiés du fil simultanément sur la bobine.
3. Nettoyez la bougie et vérifiez la distance des électrodes. Si nécessaire, remplacez la bougie. 4. Préparez l’appareil à la mise en service. 5. Remplissez le réservoir avec le bon mélange de carburant et d’huile. Voir chapitre “Carburant et huile”. Au cas où votre appareil devenait un jour inutilisable ou si vous n’en aviez plus l’usage, ne jetez en aucun cas l’appareil avec les déchets ménagers, mais veillez à un recyclage conforme aux principes écologiques.
ITALIANO SIMBOLI DI SICUREZZA E SIMBOLI INTERNAZIONALI Nelle presenti istruzioni per l’uso sono descritti simboli di sicurezza nonché simboli e pittogrammi internazionali che potrebbero essere riportati sull’attrezzo. Leggere le istruzioni per l’uso per acquisire la necessaria conoscenza delle indicazioni relative a sicurezza, montaggio, uso, manutenzione e riparazione dell’attrezzo.
TRIMMER A BENZINA Dati tecnici Modello Potenza motore kW / CV Tipo di motore: Cilindrata cm³ Carburante miscela benzina/olio Capacità serbatoio ml Numero di giri massimo motore min -1 Numero di giri al minimo min -1 Numero di giri massimo dell’utensile da taglio min -1 Consumo di carburante kg/h Larghezza di taglio cm Spessore del filo mm Scorta filo m Prolunga del filo Peso kg Livello di potenza sonora dB (A) Livello di pressione sonora secondo EN 27917 dB (A) Vibrazioni - a tutto gas (secondo EN ISO
AVVERTENZE DI SICUREZZA PER TRIMMER A BENZINA E DECESPUGLIATORI AVVERTENZA: la benzina è altamente infiammabile ed i vapori che si sviluppano durante la combustione potrebbero esplodere all’accensione. Occorre pertanto prestare attenzione a quanto segue: 1) conservare la benzina soltanto in recipienti indicati ed omologati per il deposito di tali sostanze. 2) Spegnere sempre il motore e lasciarlo raffreddare prima di riempire il serbatoio.
• all’utilizzatore e far decadere tutti i diritti di garanzia. Lavorare con il trimmer soltanto se su di esso è installato il giusto tipo di filo e se entrambi i fili sono regolati alla giusta lunghezza. Montaggio dell’elemento superiore (Abb. 4 - 6) Attenzione: prima di montare l’elemento superiore spegnere l’attrezzo. Pericolo di ferimento! Avvertenza: per agevolare il montaggio e lo smontaggio dell’elemento superiore, appoggiare l’attrezzo a terra o su di un banco da lavoro. 1.
5. Spostare la farfalla d’avviamento in posizione „RUN“ (fig. 12), dare un po’ di gas azionando la leva dell’acceleratore 6 e tirare nuovamente il cavo d’accensione fino a quando il motore non parte. (Per azionare la leva dell’acceleratore 6 occorre prima premere la leva di bloccaggio 8, fig. 13). 6. Far girare a folle il motore per circa 10 secondi. 7. Qualora il motore non dovesse accendersi, ripetere la procedura da 1 a 6.
Sostituzione del filo 1. Togliere la vite (A) svitandola in senso antiorario (fig. 19). Utilizzare a tal fine la chiave fornita in dotazione. 2. Rimuovere il rocchetto portafilo e la molla dall’asta (fig. 20). 3. Togliere il filo rimanente (fig. 21). 4. Piegare in due a metà un filo di 6 m x 2mm. Infilare l’estremità piegata nell’asola del rocchetto portafilo (fig. 21). L’asola si trova nel ponticello centrale che separa le due camere del filo. 5.
Smaltimento e protezione dell’ambiente il cavo d’accensione per distribuire l’olio all’interno del motore. Rimontare la candela. 9. Depositare l’attrezzo in un luogo fresco, asciutto ed al sicuro da fiamme libere e fonti infiammabili quali scalda-acqua istantanei, caldaie ad olio combustibile ecc. Non scaricare i residui di olio per catena e/o miscela negli scarichi, nelle fognature o nel terreno, bensì smaltirli in modo ecologico, ad esempio conferendoli in discarica.
ENGLISH SAFETY SIGNS AND INTERNATIONAL SYMBOLS These Operating Instructions describe safety symbols and international symbols and pictographs that may be applied to the device. Read the Operating Instructions to familiarise with all information concerning safety, assembly, operation, maintenance and repair. SYMBOLS MEANING • READ THE OPERATING INSTRUCTIONS If you do not adhere to the instructions and safety measures described in the Operating Instructions severe injuries may occur.
Petrol trimmer Ratings Model Engine output kW / HP Engine type Cubic capacity cm3 Fuel lubricated petrol Tank volume ml Maximum engine speed min-1 Idling speed min-1 Max. speed of the cutting tool min-1 Fuel consumption kg/h Cutting diameter cm Cord diameter mm Overall cord length m Cord extension Weight kg Acoustic capacity level dB(A) Sound pressure level (acc. to EN 27917) dB (A) Vibration – full throttle (acc. to EN ISO 7916) m/s2 Vibration – idling (acc.
5) Make sure that you use the right fuel or petrol/oil mix (lubricated petrol). To operate the device the tank cap must be closed tightly. 6) Start the device at least three meters away from the place where you fuelled it. Do not smoke during fuelling or operation and take care that no sparks or open flames reach into the working area. DURING OPERATION • Use this trimmer for its provided purpose only, i.e. for the cutting of grass, brushwood and weed. • Avoid any inadvertent starting of the engine.
2. Use the included screw (E) and nut (F) to fix the protection cover (Fig. 3). ATTENTION : Make sure that all components are mounted and assembled correctly and all screws properly tightened. ATTENTION ! - Do always act in accordance with the applicable safety instructions and apply all required safety measures. The trimmer may only be used to cut grass or smaller weeds. It is explicitly forbidden to cut any other kind of material.
NOTE : When trimming near foundations, stone walls etc., even extreme care cannot avoid an increased wear of the cutting cord. TRIMMING / MOWING Swing the trimmer in sickle-like movements from side to side. Always hold the cutting head parallel to the ground. Examine the territory and determine the desired cutting height. Lead and hold the cutting head in the desired height to achieve an even cutting result (Fig. 18).
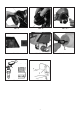
SPARK PLUG 1. Spark plug air gap : 0,6-0,7 mm (Fig. 29) 2. Tighten the spark plug with a torque of 12-15Nm. Put the spark plug connector on the spark plug. ATTENTION : Any maintenance works that are not explicitly described in these Operating Instructions must be carried out by an authorized workshop. To ensure a consistent and proper operation use ORIGINAL SPARE PARTS only. SHARPENING THE CORD CUTTER 1. Remove the cutter (E) from the protection cover (F) (Fig. 30). 2.
DE EG-Konformitätserklärung Wir, ikra GmbH, Schlesier Straße 36, D-64839 Münster / Altheim, erklären in alleiniger Verantwortung, dass das Produkt Benzintrimmer XL 25 T, auf das sich diese Erklärung bezieht, den einschlägigen Sicherheits- und Gesundheitsanforderungen der EG-Richtlinien 98/37/EG (Maschinenrichtlinie alt, gültig bis 28.12.2009) und 2006/42/ EG (Maschinenrichtlinie neu, gültig ab 29.12.
IT Dichiarazione CE di Conformità Noi, ikra GmbH, Schlesier Straße 36, D-64839 Münster / Altheim, dichiara sotto la propria responsabilità che i prodott trimmer a benzina XL 25 T, sono conformi ai Requisiti Essenziali di Sicurezza e di Tutela della Salute di cui alle Direttive 98/37/CE (Direttiva Macchine vecchia, valida fino al 28.12.2009) e 2006/42/CE (Direttiva Macchine nuova, valida a partire dal 29.12.
DE Garantiebedingungen Für dieses Benzinwerkzeug leisten wir unabhängig von den Verpflichtungen des Händlers aus dem Kaufvertrag gegenüber dem Endabnehmer wie folgt Garantie: Die Garantiezeit beträgt 24 Monate und beginnt mit der Übergabe die durch Originalkaufbeleg nachzuweisen ist. Bei kommerziellem Einsatz sowie Verleih reduziert sich die Garantiezeit auf 12 Monate.
SERVICE DE -Service AT c/o MOGATEC Moderne Gartentechnik GmbH Max-Wenzel-Straße 31 ikra - Reparatur Service c/o MOGATEC Moderne Gartentechnik GmbH Max-Wenzel-Straße 31 DE - 09427 Ehrenfriedersdorf DE - 09427 Ehrenfriedersdorf Tel.: 0180 3 664 283* Fax: 037341-131 24 Tel.: +43 - 7207-34115 Fax: +49 - 37341-131 24 * (0,09 € / min. im dt.