
Assembly & Operating Instructions

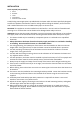
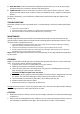

4. LEVEL BUTTON: Press the level button to adjust the 3 heat levels (L1, L2, L3) by pressing up
and down buttons to increase or decrease the heating level.
5. TIMER BUTTON: To set the timer from 0-9, which is the number of hours it will run. T0 will
display and then adjust to the number of hours you would like to set, using the up and down
buttons.
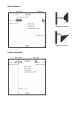
To replace the battery, press the battery compartment release button and then slide out the
battery tray.
TROUBLESHOOTING:
The heater contains no user-serviceable parts. Troubleshooting is limited to checking the power
source:
1. Check if the unit is turned on.
2. Check if the power cord is plugged into a properly-grounded electrical outlet.
3. Check if the electrical outlet’s circuit breaker/fuse is on and working
MAINTENANCE:
Periodic inspection and removal of dirt and contaminants will ensure that the heater can be
operated safely. Always perform maintenance and cleaning before operating the heater if it has
not been used in a long period of time.
1. Check the Reflector and IR-Filament at least once a month for dirt and dust. If cleaning is necessary,
follow the cleaning and maintenance instructions.
2. Inspect more frequently if the environment is prone to unusual amounts of dirt or dust.
3. Visually inspect the heater, power cord and plug for any damage or wear at least once per month. If
damaged or worn, consult with a technical service.
Note: Proper and regular maintenance is easy and important for the long and efficient operation
of your heater.
CLEANING:
Regular and careful cleaning helps your infrared heater operate efficiently for many trouble-free
years. To clean your heater, follow the steps below:
1. Unplug the power cord for your safety before cleaning your appliance.
2. Make sure the heater is cool before continuing.
3. Clean the outer shell with a soft, damp cloth. You may use a mild detergent if necessary.
After cleaning, dry the unit with a soft cloth.
CAUTION: DO NOT let liquids enter the heater.
4. DO NOT use alcohol, gasoline, abrasive powders, furniture polish or rough brushes to clean
the heater. This may cause damage or deterioration to the surface of the heater.
5. Use an air blower to remove any loose dust, dirt or debris from the unit.
6. DO NOT immerse the heater in water
7. Wait until the heater is completely dry before use.
Storage: Store the heater in a cool, dry location when not in use to prevent dust and dirt build up.
Use the original carton or other clean container to store.
CAUTION:
1. Always disconnect the heater from the electrical supply and allow it to cool before attempting
to work on it.
2. If the heater has collected dust or dirt inside the unit or around the heating element, have the
unit cleaned by a qualified service agent. Do not operate the heater in this condition.