
User Guide


18
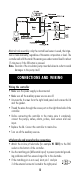
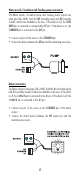
Main power supply connection
Before connecting the unit to the mains, make sure the controller is
completely wired and all the connections for pumps, alarm, probes, etc.
have been done.
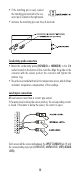
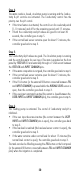
• Connect the mains power wires to the power
supply input pins.
• Replace the right panel lid and tighten the four
provided screws.
• Connect the controller to the mains.
CONTROLLER START-UP
Before starting-up make sure the controller has been properly calibrated,
and the pH and conductivity setpoints have been adjusted (see the
following pages).
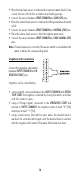
The pH electrode, conductivity probe and any reference pin must be
properly connected and wired to the controller (see the section above).
The EC probe must be immersed in the solution above the air-vent holes
on the external sleeve, and installed in such a way to minimize the
presence of air bubbles (see probe installation tips at the end of the
manual).
Remove the protective cap from the pH electrode and immerse the
electrode (at least 4cm/1.5") into the solution to be tested. Install the
electrode in such a way that it permanently lies in the solution.
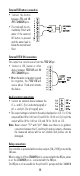
The level sensors, user input, external fill button and humidity sensor
must be connected accordingly with the chosen tank assembly.
If some of the inputs are not used, they must be connected as explained
in the TANK ASSEMBLY section.
The pumps, water nozzle and alarm must be wired as described above.
Turn on the water supply and start the controller by connecting it to the
mains power supply.
The HI 9914 controls different status and gives visual information through
various LED:
- When the dosing pumps are active, the corresponding EC and pH pump
LEDs are on.
- When the circulation or the feeding pump is running, the corresponding
LED is ON.
- When the water nozzle is open, the water nozzle LED is ON.