
User Guide


14
To prepare the instrument for use, choose the most appropriate tem-
perature probe(s) for your application (see accessories) and connect it
(them) to the connector(s) located on the top of the instrument.
The factory default thermocouple type is K, represented with the "dF"
indication. If needed, select a different type (J and T types also
available) through setup code 70.
With the meter facing you, channel #1 is the first connector on the
top left hand side.
Press the ON/OFF key to power on the instrument.
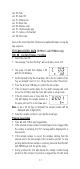
To take temperature measurements, insert the
probe in the sample to be tested and allow
the reading to stabilize. The temperature is
displayed on the upper LCD. The lower LCD
displays the selected channel number (HI98704 and HI98804 only).
The meter selects channel 1 as default. Press CH/
TIME (HI98704 and HI98804 only) or TEMP/TIME
(HI98701, HI98801 only) to view the reading of the
other channels, the cold junction temperature, date
and time in the following order:
• channel 2 temperature reading (4-channel versions only)
• channel 3 temperature reading (4-channel versions only)
• channel 4 temperature reading (4-channel versions only)
• cold junction temperature reading ( "C J" appears in the lower LCD)
• date
• time
Pressing CH/TIME or TEMP/TIME again, the meter returns to channel 1
temperature reading.
If the reading is out of range or the probe is
not connected to a channel, the LCD will
display a dashed line in place of the reading.
Note: To choose between "°C " and "°F" unit, enter the setup code 71.
Note: The meter is factory calibrated. After 1
year since last thermocouple calibra-
tion the "DATE" symbol starts blinking
on the LCD to warn the user that a recalibration is suggested to
maintain the accuracy of the meter. It is recommended that
recalibration is performed by authorized technical personnel
only. Contact your nearest HANNA service center.
TAKING TEMPERATURE MEASUREMENTS