
User Guide

pH
CAL
ON/OFF
H
p
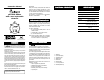
5.8
3cm
(1¼“)
pH ELECTRODE CONNECTION & MAINTENANCE
In order to protect pH against
vapors and humidity, the DIN connector is
shielded behind a waterproof sheath.
• Slide the protective sheath down. Con-
nect the HI 1219 pH electrode to the
DIN connector and then slide the protective sheath back
up all the way up to the pH
casing. To
ensure maximum protection, make sure the connector is
completely covered.
• Do not be alarmed if white crystals appear around the
electrode protective cap. This is normal with pH elec-
trodes and they dissolve when rinsed with water.
• When not in use, rinse the electrode with water to
minimize contamination and store it with a few drops of
storage (HI 70300) or pH 7 (HI 7007) solution in the
protective cap. Always replace the protective cap after use.
DO NOT USE DISTILLED OR DEIONIZED WATER FOR
STORAGE PURPOSES.
• If the electrode has been left dry, soak the tip in a
storage (HI 70300) or pH 7 (HI 7007) solution for at
least one hour to reactivate it.
• To minimize clogging and provide longer life for the pH
electrode, it is recommended to clean the electrode
monthly. Immerse the tip of the electrode in HI 7061
cleaning solution for ½ hour, then rinse it with tap
water and recalibrate the meter
For better accuracy, frequent calibration of the instrument is
recommended. In addition, the instrument must be recali-
brated whenever:
a) The pH electrode is replaced.
b) After testing aggressive chemicals.
c) Where high accuracy is required.
d) At least once a month.
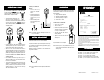
CALIBRATION PROCEDURE
• Open a pH 7.01 sachet.
• Turn the meter on.
• Remove the protective cap from the
electrode, rinse the tip and immerse it
in the pH 7.0 buffer solution.
• Stir gently and then wait until the
reading stabilizes.
• Adjust the “CAL” dial until the LCD
shows pH 7.0.
The pH calibration is now complete.
Note: Instead of pH 7.0, other pH buffers such as pH 4.0
can also be used to calibrate the meter closer to the
working range.
CALIBRATIONCALIBRATION
CALIBRATIONCALIBRATION
CALIBRATION
pH
CAL
ON/OFF
H
p
7.0
pH 7.01
BUFFER SOLUTION
20 mL sacket
HI 70007
CE DECLARATIONCE DECLARATION
CE DECLARATIONCE DECLARATION
CE DECLARATION
OF CONFORMITYOF CONFORMITY
OF CONFORMITYOF CONFORMITY
OF CONFORMITY
DECLARATION OF CONFORMITY
We
Hanna Instruments Srl
Via E.Fermi, 10
35030 Sarmeola di Rubano (PD)
ITALY
herewith certify that the pH meter
has been tested and found to be in compliance with the following regulations:
Electrostatic Discharge
RF Radiated
Fast Transient
Radiated, Class B
Date of Issue: 26-10-1999
D.Volpato - Engineering Manager
On behalf of
Hanna Instruments S.r.l.
HI 981408
IEC 801-2
IEC 801-3
IEC 801-4
EN 55022
EN 61010-1 Electrical Safety
Recommendations for Users
Before using this product, make sure that it is entirely suitable for the environment in
which it is used. Operation of this instrument in residential areas could cause unaccept-
able interference to radio and TV equipment.
The glass bulb at the end of the electrode is sensitive to electrostatic discharges. Avoid touching
this glass bulb at all times. During operation, ESD wrist straps should be worn to avoid possible
damage to the electrode by electrostatic discharges.
Any variation introduced by the user to the supplied equipment may degrade the instrument’s
EMC performance.
To avoid electrical shock, do not use this instrument when voltage at the measurement surface
exceeds 24 VAC or 60 VDC. To avoid damage or burn, do not perform any measurement in
microwave ovens.
ACCESSORIESACCESSORIES
ACCESSORIESACCESSORIES
ACCESSORIES
HI 70004P pH 4.01 solution, 20 mL sachet (25 pcs)
HI 70007P pH 7.01 solution, 20 mL sachet (25 pcs)
HI 7004M pH 4.01 solution, 230 mL bottle
HI 7007M pH 7.01 solution, 230 mL bottle
HI 7061M Electrode cleaning solution, 230 mL bottle
HI 77400P pH 4 & 7 solutions, 20 mL sachet (5 each)
ISTR981408 10/99PRINTED IN PORTUGAL
Note: the electrode should be submerged at least 3 cm
(1¼”) in the solution.
OPERATIONAL GUIDEOPERATIONAL GUIDE
OPERATIONAL GUIDEOPERATIONAL GUIDE
OPERATIONAL GUIDE
pH
CAL
ON/OFF
H
p
5.8
pH
CAL
ON/OFF
H
p
5.8
TAKING pH MEASURE-
MENTS
• Turn the meter on by
pushing the “ON/OFF”
button.
• Remove the protective cap
from the pH electrode and
immerse it’s tip in the
sample.
• Allow the reading to stabi-
lize and note the pH value
on the LCD.
BATTERY REPLACEMENTBATTERY REPLACEMENT
BATTERY REPLACEMENTBATTERY REPLACEMENT
BATTERY REPLACEMENT
When the batteries are weak, the numbers become faint, the
meter does not switch on or can not be calibrated.
To replace the batteries, open the back panel with the help
of a screwdriver and replace both AA type batteries, paying
attention to their polarity.
Batteries should only be replaced in a non hazardous area
using alkaline batteries.
Note: Once the batteries have been replaced, recalibrate the
meter.