Instruction Manual HI 95715 Ammonia Medium Range ISM This Instrument is in Compliance with the CE Directives www.hannainst.
Dear Customer, Thank you for choosing a Hanna product. This manual will provide you with the necessary information for the correct use of the instrument. Please read it carefully before using the meter. If you need additional technical information, do not hesitate to e-mail us at tech@hannainst.com. This instrument is in compliance with directives. TABLE OF CONTENTS PRELIMINARY EXAMINATION .............................................................................................. 3 GENERAL DESCRIPTION .
PRELIMINARY EXAMINATION Please examine this product carefully. Make sure that the instrument is not damaged. If any damage occurred during shipment, please notify your Dealer. Each HI 95715 Ion Selective Meter is supplied complete with: • Two Sample Cuvets and Caps • 9V Battery • Tissue for wiping cuvets • Instruction Manual and Quick Reference Guide • Instrument Quality Certificate • Rigid carrying case Note:save all packing material until you are sure that the instrument works correctly.
GENERAL DESCRIPTION The HI 95715 is an auto diagnostic portable microprocessor meter that benefits from Hanna’s years of experience as a manufacturer of analytical instruments. It has the advanced optical system based on a LED light source and a narrow band interference filter that allows most accurate and repeatable readings. All instruments are factory calibrated and the electronic and optical design minimizes the need of frequent calibration.
SPECIFICATIONS 0.00 to 9.99 mg/L (as NH3-N) 0.01 mg/L for measurement 0.1 mg/L for calibration and validation Precision ±0.12 mg/L @ 6.00 mg/L Typical EMC Deviation ±0.01 mg/L Light Source Light Emitting Diode with narrow band interference filter @ 466 nm Light Detector Silicon Photocell Method Adaptation of the ASTM Manual of Water and Environmental Technology, D1426-93, Nessler Method. The reaction between ammonia and the reagents causes a yellow tint in the sample.
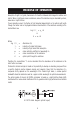
PRINCIPLE OF OPERATION Absorption of Light is a typical phenomenon of interaction between electromagnetic radiation and matter. When a light beam crosses a substance, some of the radiation may be absorbed by atoms, molecules or crystal lattices.
A microprocessor controlled LED emits radiation which is first optically conditioned and beamed to the sample contained in the cuvet. The optical path is fixed by the diameter of the cuvet. Then the light is spectrally filtered to a narrow spectral bandwidth, to obtain a light beam of intensity Io or I. The photoelectric cell collects the radiation I that is not absorbed by the sample and converts it into an electric current, producing a potential in the mV range.
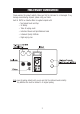
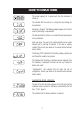
KEYPAD DESCRIPTION • ON/OFF: to turn the meter on and off. • ZERO: to zero the meter prior to measurement. • READ/TIMER: this is a bi-functional key, just press for making a measurement, or hold the key for 3 seconds to start a pre-programmed countdown prior to measurement. • CAL CHECK: this bi-functional key allows to perform validation of the instrument just pressing the CAL CHECK key, or hold the key for 3 seconds to enter the calibration mode.
GUIDE TO DISPLAY CODES This prompt appears for 1 second each time the instrument is turned on. This indicates that the meter is in a ready state and zeroing can be performed. Sampling in Progress. This flashing prompt appears each time the meter is performing a measurement. This indicates that the meter is in a zeroed state and measurement can be performed. Light over range: the cuvet is not inserted correctly and an excess ambient light is reaching the detector.
The flashing digits indicate that: 1) the month can be set 2) the day can be set “Storage”: this prompt appears for 1 second at the end of the calibration procedure, to indicate that the calibration data has been stored. “Error”: the concentration of the calibration solution used is not correct. Repeat the calibration procedure with the right standard solution, and verify it is not expired. If the calibration procedure fails again, contact your dealer or the nearest Hanna Customer Service Center.
Under range. A blinking "0.00" indicates that the sample absorbs less light than the zero reference. Check the procedure and make sure you use the same cuvet for reference (zero) and measurement. A flashing value of the maximum concentration indicates an over range condition. The concentration of the sample is beyond the programmed range: dilute the sample and re-run the test. A flashing value lower than the maximum concentration indicates a low signal-to-noise ratio condition.
• It is important that the sample does not contain any debris. This would corrupt the reading. • In order to avoid reagent leaking and to obtain more accurate measurements, it s recommended to close the cuvet first with the supplied HDPE plastic stopper and then with the black cap. • Each time the cuvet is used, the cap must be tightened to the same degree. • Whenever the cuvet is placed into the measurement cell, it must be dry outside, and completely free of fingerprints, oil or dirt.
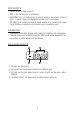
MEASUREMENT PROCEDURE Turn the meter on by pressing ON/OFF and follow instruction manual to perform either the MEASUREMENT, VALIDATION or CALIBRATION PROCEDURE. MEASUREMENT PROCEDURE • Turn the meter on by pressing ON/OFF. • When the LCD displays “715”, it is ready. • Fill the cuvet with 10 mL of unreacted sample, up to the mark, and replace the cap. • Place the cuvet into the holder and ensure that the notch on the cap is positioned securely into the groove.
• Replace the cuvet into the holder and ensure that the notch on the cap is positioned securely into the groove. • Hold READ/TIMER for three seconds. The display will show the countdown prior to measurement. Alternatively, wait for 3 minutes and 30 seconds and just press READ/TIMER. In both cases “SIP” will blink during measurement. or • The instrument directly displays concentration in mg/L of ammonia nitrogen (NH3-N) on the Liquid Crystal Display.
VALIDATION PROCEDURE Use the validation procedure to ensure that the instrument is properly calibrated. Warning: do not validate or calibrate the instrument with standard solutions other than the Hanna CAL CHECK Standards, otherwise erroneous results will be obtained. For accurate Validation and Calibration, please perform test at room temperature: 18 to 25°C (64.5 to 77.0°F). • Turn the meter on by pressing ON/OFF. When the LCD displays “715”, it is ready.
CALIBRATION PROCEDURE Note: it is possible to interrupt calibration procedure at any time by pressing ON/OFF. Warning: do not validate or calibrate the instrument with standard solutions other than the Hanna CAL CHECK Standards, otherwise erroneous results will be obtained. For accurate Validation and Calibration, please perform test at room temperature: 18 to 25°C (64.5 to 77.0°F). CALIBRATION PROCEDURE • Turn the meter on by pressing ON/OFF. • When the LCD displays “715”, it is ready.
• Press READ/TIMER and “SIP” will blink during measurement. • The instrument will show for three seconds the Cal Check standard value. Then the date of last calibration (e.g.: “01.08”) appears on the display, or “01.01” if the factory calibration was selected. In both cases the number of the month is blinking, ready for date input. Note: if the display shows “ERR” the calibration procedure failed.
FACTORY CALIBRATION RESET It is possible to restore factory calibration: • Enter the calibration mode by holding CAL CHECK for three seconds. • Hold ZERO for 10 seconds. The display will show for 2 seconds “F.CAL” and "715" appears. The factory calibration is automatically restored and the instrument is ready for measurement. BATTERY REPLACEMENT Battery replacement must only take place in a non-hazardous area. Simply slide off the battery cover on the back of the meter.
CE DECLARATION OF CONFORMITY Recommendations for Users Before using these products, make sure that they are entirely suitable for your specific application and for the environment in which they are used. Operation of these instruments may cause unacceptable interferences to other electronic equipments, this requiring the operator to take all necessary steps to correct interferences. Any variation introduced by the user to the supplied equipment may degrade the instruments' EMC performance.
MAN95715R1 w w . h a n n 20 a i n s t .