Instruction Manual HI 92710 / HI 92740 HI 92810 / HI 92840 Portable Microprocessor Printing and Logging Thermometers These Instruments are in Compliance with the CE Directives
Dear Customer, Thank you for choosing a Hanna Instruments Product. Please read this instruction manual carefully before using the instrument. This manual will provide you with all the necessary information for the correct use of the instrument, as well as a more precise idea of its versatility in a wide range of applications. These instruments are in compliance with the directives. TABLE OF CONTENTS Preliminary Examination ............................. 1 General Description .................................
PRELIMINARY EXAMINATION Remove the instrument from the packing material and examine it carefully to make sure that no damage has occurred during shipping. If there is any damage, notify your Dealer. In addition to this instruction manual you will also find: • Printing Thermometer • HI 762BL Temperature Probe (one channel version only) • Paper Rolls (5 pcs) • AA size Batteries (4 pcs) • Rugged Carrying Case Note: Save all packing material until you are sure that the instrument functions correctly.
HI 92810 and HI 92840 have a capacity of 16,000 individual temperature readings with recording intervals selected by the user. Using the HI 9200 infrared transmitter, all the recorded data can be fed to a PC for easy reproduction, storage or elaboration without the interference of cables and cords between the meter and the receiver.
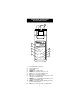
FUNCTIONAL DESCRIPTION HI 92710 AND HI 92740 1 2 e instrum nts 3 °C 4 HI 92740C 5 MICROPROCESSOR PRINTING THERMOMETER 8 RANGE -50.0 . . . +150.0°C 6 ON/OFF PAPER INTV UP 9 10 7 DOWN 11 0.1/1 PRINT 1) 2) 3) 4) 5) 6) 7) 8) LOG Temperature Probe Connectors Power adapter plug LCD Display PAPER key, to pull the paper ON/OFF key, to turn the meter on or off INTV key, to select the printing interval 0.
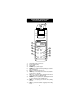
FUNCTIONAL DESCRIPTION HI 92810 AND HI 92840 1 2 e instrum nts 3 °C 4 HI 92840C 5 MICROPROCESSOR LOGGING THERMOMETER 8 RANGE -50.0 . . . +150.
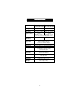
SPECIFICATIONS HI 92710C/HI 92810C HI 92710F/HI 92810F HI 92740C/HI 92840C HI 92740F/HI92840F Range Resolution Accuracy (@25°C/77°F) Typical EMC Deviation Battery Type/Life Auto Shut-off Channels Printer Printing Intervals -50.0 to 150.0°C -55.0 to 300.0°F 0.1°C 0.1°F From -20 to +120°C: From -4 to +248°F: ±0.4°C ±0.8°F Outside: ±0.7°C Outside: ±1.3°F for one year, excluding probe error ±0.6°C ±1.2°F 4x1.
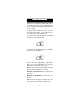
INITIAL PREPARATION Each meter is supplied complete with batteries. Remove the back cover, unwrap the batteries and install them while paying attention to the polarity. To prepare the instrument for use, connect the temperature probe to the connector located on the top of the instrument. To switch the HI 92710 and the HI 92740 "ON", press the ON/OFF key. ON/OFF To switch the HI 92810 and the HI 92840 "ON" press the TEMP key.
If the temperature probe or a calibration test plugs is not connected to the channel input, the meter will display and print "----" to alert the user. °C CH This also indicates the possibility of a broken probe cable. The channel is displayed with "CH" and the number of channel (four channels versions only). Note: To ensure accurate readings it is recommended that the temperature probes be connected to consecutive channels beginning with channel #1.
OPERATIONAL GUIDE SETTING THE PRINTING INTERVAL (for HI92710 and HI92740 only) Turn the instrument on by pressing the ON/OFF key. ON/OFF Press the INTV and the UP or DOWN keys simultaneously. UP OR INTV DOWN The display will show the log number. At the bottom of the display the printing interval will be flashing. INTV Keep the INTV key pressed and set the printing interval by pressing the UP or DOWN key. Select between 1, 2, 5, 10, 15, 30, 60, 120 and 180 minutes.
SETTING DATE / TIME / PRINTING INTERVAL (for HI92810 and HI92840 only) Press the ALT and the TIME keys simultaneously. The display will show the date setting. At the bottom of the display the year will be blinking. ALT UP TEMP TIME DATE Use the UP or the DOWN arrow keys to select the year. UP DOWN When the correct year is selected, press the TIME key once. The left digit of the display blinks, showing the month. DATE TIME Select the month by using the UP or the DOWN arrow keys.
Press the TIME key, the right hand side of the display shows the day. DATE TIME Use the UP or the DOWN arrow key to select the correct day. UP DOWN Press the ALT and the TIME keys simultaneously and the display will now show the clock time with the printing interval blinking. ALT UP TIME INTV TEMP TIME Any interval can be selected from 1, 2, 5, 10, 15, 30, 60, 120 or 180 minutes by using the UP and the DOWN arrow keys.
To select the hour, press the UP or the DOWN arrow keys (24 hour clock). UP DOWN To set the hour press the TIME key once, the minutes start blinking. TIME INTV TIME Use the UP or the DOWN keys to select the minutes. UP DOWN Press the ALT and the TIME keys to leave this mode. ALT UP TEMP TIME The time, date and printing interval are now set and stored in the memory even when the display is switched off.
TO VIEW DATE / TIME / TEMPERATURE (for HI 92810 and HI 92840 only) To view the time press the TIME key. This also displays the selected interval time on the secondary LCD. TIME INTV TIME To view the date, press the UP key when the LCD is displaying time. DATE UP To view temperature press TEMP key. °C CHANNEL CH TEMP Using UP or DOWN keys select which channel to monitor (four channels versions only).
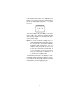
PRINTING / RECORDING WITH HI 92710 AND HI 92740 To print the measured values press the PRINT key. The printout provides the following PRINT information: a - Running sample number a 0001 *10.25 #1 20.0 °C. b - The total accumulative #2 85.5 °C. #3 ---- °C. d #4 ---- °C. time c - Temperature value. d - Channel number (HI 92740 only) b c RECORDING MODE (PROGRAMMED PRINTOUTS ) Press the LOG key to enter the recording mode.
If probes are added to the remaining channels during the recording mode, the data from the additional probes will not be printed. Data from remaining channels can only be added if the recording mode is exited and a new log number is entered. A blinking "CH" will appear on the display next to the channel numbers not being utilized and/or recorded. °C LOG CH If more than one channel is being monitored, the printer will automatically print the temperature of all the connected channels.
PRINTING / LOGGING WITH HI 92810 AND HI 92840 To print the measured values shown on the display, press the PRINT key. This function can be activated in normal PRINT operation mode as well as during logging and scanning data on display (see above). When in measurement mode, the printout provides the following information: a - Running sample number 10-01-96 b 0001 *10.24 a c b - Date #1 20.0 . d #2 45.4 . c - Time #3 ----- . e #4 ----- .
To continue logging without printing, press now the ALT and the PAPER keys at the same time and the "LOG" symbol on display will start to blink. °C PRINT PAPER ALT UP LOG CH After approximately 5 minutes the display will switch off but the logging function remains active. To reactivate the display press the TEMP key. TEMP If you wish to re-start printing press the ALT and PAPER keys simultaneously again. The printout provides the following information: a 10-01-96 c ==07== 0005M b f 0001 *14.
SAMPLE NUMBER During logging it is possible to know the running sample number. Press the LOG key twice and the display will show the number of values that have been taken in the current log. LOG LOG LOGGING MODE WITH PRINTING This function is suggested when an immediate report of the measurement is required in addition to the recording of the data into memory. Press the ALT and the LOG key simultaneously to enter the logging mode.
To reactivate the display press the TEMP key. TEMP The printout provides the following information: a - Date (DD-MM-YY) b - A running log number c - A running sample number (in that particular log) d - Printing interval indicator in minutes e - Time (HH-MM) f - Temperature value(s) b c 10-01-96 ==07== 0005M 0014 *14.25 #1 25.0 °C. #2 27.3 °C. a d e f It is always possible to switch from the logging with printing function to the logging only function.
• • • It is possible to insert a new paper roll during logging session (see page 30) Once in the logging mode, the interval cannot be changed. Exit the logging ALT UP DOWN mode first (pressing the ALT and the LOG keys) TEMP TIME LOG before setting the new interval. If the PRINT key is pressed while in logging mode, a printout is produced without affecting the PRINT running sample number. TO STOP LOGGING Press the ALT and the LOG keys simultaneously, this will generate a log exit status printout.
TO SCAN STORED DATA ON DISPLAY Press the LOG key. The display will show the log number and the page number of the next log. LOG While pressing the ALT key, press the DOWN key until the log number to scan appears on the secondary display. The primary display will show the number of samples of that particular log. ALT DOWN Press the ALT and the TEMP keys simultaneously. This now shows the date in which the log has started.
Press the UP key and the temperature will be displayed. °C CH Continue pressing the UP key to display one by one all the memorized data of the same log in the above sequence i.e. time and temperature value. Press the DOWN key to revert back to sampling time and move back through samples. To exit from the recall mode press the LOG key.
TO PRINT STORED DATA Once a log number is selected by using ALT and DOWN keys, as detailed in the chapter "TO SCAN STORED DATA ON DISPLAY" you can print all or part of that log section by using the ALT and the PRINT keys. The printer will start to print the logged section beginning with the selected sample number without altering the content of the memory. Note: It is always possible to print only the sample shown on the display by pressing the PRINT key.
WORKING SAMPLE (HI 92810 and HI 92840 only) The following is a step by step procedure of a typical monitoring situation where we have assumed that you have already inserted the batteries and set the date and time correctly. It is an example of a meter used to monitor and store every 2 minutes. The meter will log 10 samples but print only 3, display the data contained in sample number 1 and print samples 5 through 10.
The meter is now in the printing/logging mode utilizing log number 1, page 16. "LOG" and P 15 shown in the secondary display indicate that the meter has entered the log mode, and has 15 available pages of memory remaining. After the initial printout, the time and printing/ logging interval will reappear. TIME INTV Press the LOG key to view the running log and page numbers.
Step Four - Leaving the log mode: Once the number of samples stored in memory has reached 10, press the ALT and LOG keys. The meter will exit the log mode after generating a log exit status printout. ALT UP DOWN TEMP TIME LOG ==01== 0010 10-01-96 0002M *00.18 Step Five - Reviewing the stored data in sample number 1: Press LOG key to enter the memory recall mode. The next available log and page number will be shown on the display.
Press the UP key to view the time. TIME UP Press the UP key again to view the temperature. °C CH UP With HI 92840 when more than one probe have been connected, press the UP key to view the other channels values. Step Six - Printing the stored data (samples 5 through 10): Press and hold the ALT key and press the DOWN key until the total number of samples recorded in log number 1 is displayed. ALT DOWN Scroll through the sample numbers by using either the UP or DOWN keys until number "5" appears.
DATA TRANSFER TO PC HI 92810 and HI 92840 provide infrared emitting circuitry. Set the meter to the TIME mode and place your datalogger on a HI 9200 Infrared Transmitter (ensuring that the TIME two infrared LEDs are placed on top of each other). The memory can be downloaded to your PC through the HI 9200's RS 232 port. During the data transfer the instrument displays the message "r 232".
Data transmission from the instrument to the PC is now much easier with new HI 92000 Windows® compatible application software offered by Hanna Instruments. HI 92000 allows you to use the powerful means of the most spread sheet programs (e.g.Excel©, Lotus 1-2-3©). Simply run your favorite spread sheet and open the file downloaded by HI 92000. It is then possible to make any elaboration available with your software (e.g. graphics, statistical analysis).
MEMORY ORGANIZATION (HI 92810 & HI 92840 ONLY) Capacity: 16,000 data samples, divided into 16 pages. Data capacity per page: 1000 data samples with 1 channel monitored; 500 data samples with 2 channels monitored (four channels versions only); 250 data samples with 3 or 4 channels monitored (four channels versions only). Each time a new logging period starts, it automatically starts from a new page.
PRINTER MAINTENANCE TO CHANGE THE INK CARTRIDGE When printouts become faint, it might be necessary to change the ink cartridge. Contact your Hanna authorized center. TO INSERT THE PAPER ROLL The HI 92710, HI 92740, HI 92810 and HI 92840 use plain paper rolls 38 mm width (HI710034). To insert a new roll is very easy. Open the paper cover pulling it gently. Take the carton cylinder away. Insert the paper edge in the printer slot and feed the printer by pressing the PAPER key.
Allow approximately 5 cm (2") to exit from the printer and replace the paper cover. TO RESET PRINTER Take the battery cover off by removing the screws. Using a pencil press the black button. This will reset the printing mechanism. - 1.5V + 1.5V - - 1.5V + + 1.5V - + SCREW POTS RESET Before replacing the battery cover investigate the cause of the printer jam (e.g. the paper caught under the cover and prevented printer from advancing paper feed). Replace the battery cover and secure screws.
BATTERY REPLACEMENT If "LO BAT" appears on the display, it is an indication that the batteries are running down. If it appears during printing, it means that 200 printouts can be made before the batteries are exhausted. When there is only sufficient power for 100 printouts, the "LO BAT" sign is displayed continuously in the LCD. °C CH LOBAT Battery replacement must only take place in a non hazardous area using the battery types specified in this instruction manual (see page 39). - 1.5V + 1.
Note: The instrument uses the following configuration. - + It is recommendable to purchase Hanna Instruments HI 710005 and HI 710006 voltage adapters that use the proper polarity configuration. HI 92710, HI 92740, HI 92810 and HI 92840 can also be used with other adapters. In this case, remember to check the correct polarity of your adapter before connecting it to the meter. WARNING: In HI 92810 and HI 92840, if the external power supply and batteries are disconnected, all stored data will be erased.
CALIBRATION All Hanna Instruments thermometers have been accurately pre-calibrated at the factory. However, as a general rule, it is recommended to have all thermometers recalibrated at least once a year. For an accurate annual recalibration, contact your nearest Hanna Service Center. Hanna Test Plugs provide a quick and easy way to test the meter's accuracy by simply connecting these Test Plugs to the probe connector of the meter. If the reading differs by more than 0.4°C (0.
TEMPERATURE PROBES Hanna Instruments offers a wide range of probes to meet all your requirements (from liquids to air and penetration to surface). These probes use highly sensitive thermistor sensors which provide greater accuracy, faster response and a temperature range that is superior to conventional thermistor probes. All Hanna temperature probes are supplied pre-calibrated from the factory and are ready to be used with your meter.
HI 762PG/10 Penetration probe with 10 m (33') cable and green handle HI 762PR Penetration probe with 1 m (3.3') cable and red handle HI 762PR/10 Penetration probe with 10 m (33') cable and red handle HI 762PW Penetration probe with 1 m (3.
UN-HOUSED NTC SENSORS It is often necessary in the laboratory to "customize" testing to meet specific criteria. For this reason, Hanna offers a wide line of NTC Thermistor sensors that can be custom mounted in almost any situation. Select the sensor that matches your application, attach it to the RCA adaptor and plug it into the meter. You now have a temperature sensor that is custom fit to your requirements.
HI 76S2-4 NTC Thermistor sensor. Molded tip with epoxy seal for aggressive environments. 406mm 16" 6.4mm 0.25" 2mm 0.08" 9.6mm 0.38" MOLDED TIP EPOXY FILLET HI 76S2-5 NTC Thermistor sensor. Aluminum tab with mounting hole. 300mm 12" 8mm 0.31" DIA 3mm 0.12" EPOXY 1.6mm 0.06" 12.7mm 0.50" 6.4mm 0.25" 4.7mm 0.19" ALUMINUM HOUSING HI 76S2-6 NTC Thermistor sensor. PVC encapsulated tip for protection in aggressive environments. 6.4mm 0.25" 25.4mm 1.0" 15.8mm 0.625" 300mm 12" 7.1mm 0.
ACCESSORIES POWER UNITS HI 710005 Voltage adapter from 110 VAC to 12 VDC HI 710006 Voltage adapter from 220 VAC to 12 VDC OTHER ACCESSORIES HI 721308 1.5V AA battery (10 pcs) HI 9200 Infrared Transmitter (25-pin) HI 9200/9 Infrared Transmitter (9-pin) HI 92000 Windows® software for data transfer to PC HI 710031 Rugged carrying case HI 710034 10 Plain Paper Spare Rolls HI 710035 Spare Ink Cartridge (1 pc) MANPRNR2 Instruction manual Windows® is registered Trademark of "Microsoft Co.
WARRANTY All Hanna Instruments meters are warranted for two years against defects in workmanship and materials when used for their intended purpose and maintained according to instructions. The probes are warranted for a period of six months. This warranty is limited to repair or replacement free of charge. Damages due to accidents, misuse, tampering or lack of prescribed maintenance are not covered. If service is required, contact the dealer from whom you purchased the instrument.
CE DECLARATION OF CONFORMITY DECLARATION OF CONFORMITY We Hanna Instruments Srl V.le delle industrie 12 35010 Ronchi di Villafranca (PD) ITALY herewith certify that the thermometers HI 92710 HI 92740 HI 92810 HI 92840 have been tested and found to be in compliance with the following regulations: IEC 801-2 IEC 801-3 IEC 801-4 EN 55022 Electrostatic Discharge RF Radiated Fast Transient Radiated, Class B Date of Issue: 14-12-1995 D.Volpato - Engineering Manager On behalf of Hanna Instruments S.r.l.
PRINTED IN ITALY MANPRNR2 03/98 Stay in Touch with the Manufacturer!