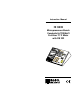
Instruction Manual HI 9032 Microprocessor Bench Conductivity/TDS/NaCl Fertilizer/°C/°F Meter with RS 232 These Instruments are in Compliance with the CE Directives http://www.hannainst.
Dear Customer, Thank you for choosing a Hanna Instruments Product. Please read this instruction manual carefully before using the instrument. This manual will provide you with all the necessary information for the correct use of the instrument, as well as a precise idea of its versatility in a wide range of applications. This instrument is in compliance with CSA, UL (EN 50081-1 and EN 50082-1) direcand tives. TABLE OF CONTENTS Preliminary Examination ............................. 3 General Description .....
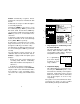
4 THE FRONT PANEL CALIBRATION 1 Select Cond. HI9032 microcomputer conductivity meter Fert. NaCl or T.D.S. 3 CAL 2 Depress ins rum n s e HI 9032 automatically recognizes buffers @ 84 µS/cm, 1413 µS/cm, 12.88 mS/cm, 80.0 mS/cm.
If the temperature probe is disconnected during operation, the decimal point will start blinking. It will blink also if the temperature range is exceeded. This LCD also displays the program # during programming. 3.
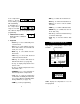
THE REAR PANEL RESET button and restart the entire operation. Power connection Plug the 12VDC adapter (HI710005 or HI710006) into the DC socket (#6). Plug the adapter into the mains. Note: The instrument uses the following configuration. 1. DIN female socket for the conductivity probe (HI7686) 2. Temperature probe socket for use with the HI7669/2W 3. Reset button 4. Potentiometer for conductivity calibration (0.0µS) 5. RS 232C socket for serial communication. 6. DC Power Socket (for HI710005 or HI710006).
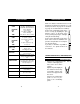
SPECIFICATIONS MEASURE COND. FERTILIZER NaCl TDS TEMP. RESOLUTION COND. FERTILIZER NaCl TDS TEMP. 0.0-399.9 / 399-3999 µS/cm 3.99-39.99 / 39.9-99.9 mS/cm 0.00 to 39.99 g/l 0.0 to 130.0% 0.0-199.9 / 0-1999 ppm; 0.00 to 19.99 g/l 0.0 to 50.0°C / 32.0 to 122.0°F 0.1 µS/cm; 1 µS/cm; 0.01 mS/cm; 0.1 mS/cm 0.01 g/l 0.1% 0.1 pmm; 1 ppm; 0.01 g/l 0.1°C / 0.1°F ACCURACY (@20°C/ 68°F) TEMP. ±1% full scale each range ±0.5°C / ±1°F excluding probe error TYPICAL EMC DEVIATION ±1% full scale all 4 ranges ±0.
Conductivity measurement mode • By pressing the Cond. key, the display will show "CONDUCTIVITY" to confirm the measurement mode. ON • Switch the instrument on by pressing the ON key. Cond. The meter automatically defaults to the conductivity mea- CONDUCTIVITY surement mode with 2.0% as temperature %TC coefficient (on the large LCD) and the temperature in the Celsius scale (on the TEMP. LCD). Select a different measurement mode by pressing the following keys: CONDUCTIVITY mS • Fert. • the Fert.
Press the ENTER key. %TC °F • %TC ENTER . 2 5 . mS If further measurements are desired, rinse the probe with a small amounts of the next sample and then proceed. Fertilizer measurement mode • By pressing the Fert. key the display will show "FERTILIZER" to confirm the measurement mode and the secondary display will show "1", i.e. Fertilizer #1. CONDUCTIVITY Fert. gm %TC FERTILIZER 8 PGM To clear the numeric entry, press the CLEAR key.
NaCl measurement mode • By pressing the NaCl key the display will show "NaCl" to confirm the measurement mode. • The meter will automatically default the TDS factor value to 0.5 (shown on the secondary display) every time it is turned on. Change the TDS factor to the value of the solution, by pressing the FTR key. The TDS factor value will start blinking on the secondary LCD.
• To clear the numeric entry, press the CLEAR key. PGM • Press the ATC/MTC key and the decimal point will blink on the TEMP. display (both when in the Celsius and in the Fahrenheit scale). Clear ATC MTC See page 45 for further information about the TDS factor. • • HI9032 is an auto-ranging TDS meter, and the reading automatically switches from one resolution to the next (from 0.00mg/l up to 19.99 g/l).
• If further measurements are desired, rinse the probe and test the next sample. TAKING TEMPERATURE MEASUREMENTS Taking a temperature measurement is very easy. Connect the temperature probe to the instrument and turn the meter on by pressing the ON key. ON Dip the liquid/general purpose temperature probe HI7669/2W into the sample and allow the reading on the TEMP. display to stabilize (1 or 2 minutes).
• Press the CAL key and "12.88 mS" prompt starts blinking with the "CAL" symbol fixed on the display, to indicate that the buffer value can be selected. Once CAL is pressed, the %TC will be set automatically to 1.9%. • • mS CAL CONDUCTIVITY CAL %TC • • It is possible to operate with the four different standard buffers provided, or to manually choose a different buffer through the keyboard. Pour a small quantity of the chosen conductivity solution into a beaker.
The conductivity calibration procedure is now complete. • Notes: • If the buffer differs by more than ±15% from the set value, the " " symbol will blink on the display. • The instrument should be calibrated weekly or every time the probe has been changed. • To quit from calibration mode, press the CAL key. mS CONDUCTIVITY CAL CAL PGM Clear CAL %TC BUF BUF Press the CAL key to exit the calibration mode and repeat the procedure using the correct buffer.
MANUAL SELECTION OF THE BUFFER THROUGH THE KEYBOARD If the buffer values are entered manually, the temperature coefficient can be set to a different value than 1.9%. • Pour a small quantity of the chosen conductivity solution into a plastic beaker. • Immerse the HI7686 probe into the solution submerging the holes of the sleeve into the liquid. Immerse the HI 7669/2W temperature probe as close as possible to the conductivity probe. Wait for 2 or 3 minutes for the thermal equilibrium.
µS • • • The "CAL" and " " prompts will appear on the large display and the " " symbol will start blinking. Wait for approximately 30 seconds for the reading to stabilize. When the value is stable, " " and "CAL" symbols will disappear and the "CON" symbol will start blinking to prompt the user to confirm the reading. • BUF CONDUCTIVITY CAL BUF %TC Take the temperature of the solution with a Checktemp or a glass thermometer.
(both in the Celsius and in the Fahrenheit scale). • • • • During calibration once the selected buffer value is confirmed, "25°C" or "77.0°F" will start blinking on the TEMP. display to prompt the selection of the calibration temperature value. ENTER Take the temperature of the solution with a Checktemp or a glass thermometer. Enter the correct buffer temperature value by using the numeric keys and press ENTER to confirm the temperature setting.
the liquid. Immerse the HI 7669/2W temperature probe as close as possible to the conductivity probe. Wait for 2 or 3 minutes for the thermal equilibrium. Notes: • If the temperature probe is not connected to the meter, once the selected buffer value is confirmed, "25°C" or "77°F" will start blinking on the TEMP. display. % • If the buffer is within 39 and 49 mS, the " " symbol stays still.
• • • Take the temperature of the solution with a Checktemp or a glass thermometer. Enter the correct buffer temperature value by using the numeric keys ENTER and press ENTER to confirm the temperature setting. Continue the procedure as for calibration with ATC, but without temperature probe connection. FERTILIZER CALIBRATION INITIAL PREPARATION Dissolve 1 g of the fertilizer to be used in 1 L of distilled water. Rinse the probe thoroughly in distilled water.
• • • Pour a small quantity of the prepared fertilizer solution into a plastic beaker. Immerse the HI7686 probe into the solution submerging the holes of the sleeve into the liquid. Immerse the HI7669/2W temperature probe as close as possible to the conductivity probe. Wait for 2 or 3 minutes for the thermal equilibrium. Press the ENTER key to accept the 1.00 gm value, otherwise enter manually the desired value through the keyboard followed by the ENTER key to confirm the entry of the calibration value.
Enter the correct sample temperature value by using the numerical keys and press ENTER to confirm the temperature setting. • ENTER • Now the calibration procedure is complete. • To quit from the calibration mode, press the CAL key. CAL • Take the temperature of the solution with a Checktemp or a glass thermometer. Enter the correct buffer temperature value by using the numeric keys ENTER and press ENTER to confirm the temperature setting.
SETTING TEMPERATURE To set a temperature value manually, proceed as follows: • • °C Press ENTER ("37.2 °C will be displayed on the LCD). Cond. °F %TC ENTER 3 7 2 . Disconnect the temperature probe or press ATC/MTC. The decimal point will blink on the TEMP. display (both in the Celsius and in the Fahrenheit scale). Note: To clear the numeric entry, press the CLEAR key. ATC MTC 0 • Press the °C or the °F key to select the scale.
SETTING TEMPERATURE COEFFICIENT To set a temperature coefficient value manually, proceed as follows (only available in conductivity measurement mode): e.g. to enter 2.5 %TC • Press %TC ("%TC" will blink on LCD) mS %TC Both parameters are temperature dependent. The dependency of conductivity on temperature is expressed as a relative change per degree Celsius at a particular temperature, commonly as percent °C. The following table reports the conductivity values at various temperatures.
The temperature coefficient automatically defaults to 2% when the meter is turned on and can be set from 0% (without compensation) to 3% per degree Celsius. mS SETTING TDS FACTOR CONDUCTIVITY To set a TDS factor value proceed as follows (only available in TDS measurement mode): e.g. 0.90 • Press the FTR key %TC FTR ppm TDS DETERMINATION OF THE TEMPERATURE COEFFICIENT OF A SOLUTION 1 Follow the procedure described below: • Immerse the probe into a sample of the solution.
The following table reports the TDS calibration solution values at various temperatures. °C °F HI7032 ppm (mg/L) 0 32.0 758 HI7036 ppt (g/L) HI7038 ppt (g/L) 3.58 5 41.0 676 10 50.0 999 8.99 4.67 4.11 15 59.0 1122 10.10 5.24 16 60.8 1148 5.36 17 62.6 1173 5.48 18 64.4 1200 5.60 19 66.2 1224 20 68.0 1251 21 69.8 1277 5.96 22 71.6 1303 6.08 23 73.4 1329 6.20 24 75.2 1358 25 77.0 1382 26 78.8 1408 6.57 27 80.6 1438 6.69 28 82.4 1461 6.
• • Press 1 and "P 1" will blink FTR 1 Press ENTER and "P 1" will be displayed on the TEMP. LCD ENTER To stop any of the programs or to quit to revert to normal operation: • Press the PGM key • Press 0 • Press the ENTER key. PGM ATC MTC Clear 0 ENTER PROGRAM # 1 Setting of RS232 Baud Rate e.g. Baud Rate 300 • Press PGM • Press 1 • Press ENTER. "P 1" on the TEMP. display and the current setting will blink on the primary LCD • Press 3 • Press 0 • Press 0.
B. Setting the conductivity calibration factor e.g. CAL factor is 0.999 • Press the CAL key and the current calibration factor will blink on the primary LCD • Press . • Press 9 • Press 9 • Press 9. "0.999" and "CAL" symbol will blink on the large LCD • Press ENTER. "0.999" will be fixed on large LCD with the "CON" symbol will be blinking • Press the CON key Note: To quit from the setting mode, press the CAL key.
This program provides a fast way to perform the calibration (without going through the "CAL" procedure) based on the formula: KFERT = (CALBUF * (1 + 3.0% (Tp-25)) / Gt where: CALBUF = calibrated buffer solution Gt = measured solution conductivity at Tp Tp = temperature in °C e.g. The buffer value is 1.00 g, but the meter shows 0.9 g, so by changing the KFert to 1.111, the meter will then show 1.00 g and the meter is calibrated. * calibrated factor value range : 0.01 - 1.
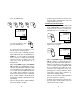
INTERFACE WITH PC Data transmission from the instrument to the PC is now much easier with the new HI 92000 Windows® compatible application software offered by Hanna Instruments. User friendly, HI 92000 offers a variety of features and has an on line help feature to support you throughout all situations. HI 92000 allows you to use the powerful means of the most diffused spread sheet programs (e.g. Excel©, Lotus 1-2-3©). Simply run your favorite spread sheet and open the file downloaded by HI 92000.
Command Types To send a command to the pH meter the scheme is: < command> Na? This line makes the computer send a Data Link Escape character, the command expressed as a number or a 3-character sequence) and a CR character. Note: Windows Terminal® and all the other terminal programs that support the ANSI escape sequence, represent the DLE character by the string '^P' and the CR character by the string '^M'. E.g. the line '^PPHR^M' sets the range to pH.
Numeric Entries PROBE MAINTENANCE 0, 1, 2, 3, 4, 5, 6, 7, 8, 9, and . - same as pressing the numeric key on the keyboard. The maximum length of a numeric entry is 7 characters (plus DCE and the CR). CHANGING THE COMMAND PREFIX These commands may be sent with either capital or small letters. Invalid commands will be ignored. The characters sent by HI 9032 are always capital letters. SPECIFICATIONS • Serial interface compatible with RS232 levels. • Optically insulated.
ACCESSORIES CONDUCTIVITY & TDS BUFFER SOLUTIONS HI 7030L 12880 µS/cm (µmho/cm), 460 mL HI 7030M 12880 µS/cm (µmho/cm), 230 mL HI 7031L 1413 µS/cm (µmho/cm), 460 mL HI 7031M 1413 µS/cm (µmho/cm), 230 mL HI 7033L 84 µS/cm (µmho/cm), 460 mL HI 7033M 84 µS/cm (µmho/cm), 230 mL HI 7034L 80000 µS/cm (µmho/cm), 460 mL HI 7034M 80000 µS/cm (µmho/cm), 230 mL HI 7035L 111800 µS/cm (µmho/cm), 460 mL HI 7035M 111800 µS/cm (µmho/cm), 230 mL HI 7039L 5000 µS/cm (µmho/cm), 460 mL HI 7039M 5000 µS/cm (µmho/cm), 230 mL HI
WARRANTY CE DECLARATION OF CONFORMITY All Hanna Instruments meters are warranted for two years against defects in workmanship and materials when used for their intended purpose and maintained according to the instructions. The probes are warranted for a period of six months. Damages due to accidents, misuse, tampering or lack of prescribed maintenance are not covered. This warranty is limited to repair or replacement free of charge.
h t t p : / / w w w . h a n n a i n s t .