QUICK START GUIDE HI 903 KARL FISCHER VOLUMETRIC TITRATOR Revision 1.11 www.hannainst.
QUICK START GUIDE Dear customer, Congratulations on choosing a Hanna Instruments Product. This guide has been written for the HI 903 Karl Fischer Volumetric Titrator. Please read this Quick Start Guide carefully before using the instrument. This guide will provide you with the necessary information for the correct use of the instrument. The purpose of this guide is to present a quick overview of setting up and using the instrument.
QUICK START GUIDE Contents INTRODUCTION ..........................................................................................................3 SAFETY MEASURES.....................................................................................................4 TITRATOR CONNECTIONS .........................................................................................5 USER INTERFACE .........................................................................................................
QUICK START GUIDE 4
QUICK START GUIDE INTRODUCTION The HI 903 Karl Fischer volumetric titrator is extremely flexible, capable of performing a wide variety of highly accurate and precise water content titration methods. The HI 903 finds a titration endpoint using a polarized electrode and an advanced detection algorithm. A constant flow of current is maintained between the two platinum pins of the titrator’s electrode.
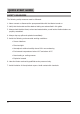
QUICK START GUIDE SAFETY MEASURES The following safety measures must be followed: 1. Never connect or disconnect the pump assemblies with the titrator turned on. 2. Verify that the burette and the attached tubing are as described in this guide. 3. Always check that the titrant, solvent and waste bottles, as well as the titration beaker are properly assembled. 4. Always wipe up spills and splashes immediately. 5.
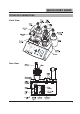
QUICK START GUIDE TITRATOR CONNECTIONS Front View Rear View 7
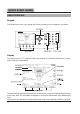
QUICK START GUIDE USER INTERFACE Keypad The titrators have their own keypad with 29 keys grouped in four categories, as follows: Display The titrators have a 5.7” graphical backlit color display. The Standby Mode screen is shown below with short explanations. The user interface contains several screens. In each screen, many information fields are present at the same time. The information is displayed in an easy-to-read manner, using different size fonts.
QUICK START GUIDE HOW TO SELECT YOUR LANGUAGE To change the language, press from the main screen. Highlight the Language option and then press . Using the and keys select the language from the options listed in the Set Language screen and press . Restart the titrator in order to apply the new language setting. HOW TO USE THE CONTEXTUAL HELP Any information about the titrator can be easily accessed by pressing .
QUICK START GUIDE BEFORE PERFORMING THE FIRST TITRATION Setup the Titrator • Make sure that all of the titrator assemblies are properly installed (see Instruction Manual, Setup section). • Make sure that the beaker system is properly sealed against atmospheric moisture (the fittings and tubes are correctly mounted). • The desiccant had been properly dried.
QUICK START GUIDE HOW TO PERFORM THE FIRST TITRATION Method Selection For this analysis we will use the HI8301EN Solvent with 5mg/ml 1-component Titrant standard method. To select this method: • Press from the Idle screen. Use the and keys to highlight the HI8301EN Solvent with 5mg/ml 1-component Titrant method. . • Press After accomplishing these operations, the method’s name will be displayed on the top line of the Idle screen. Setting Method Parameters To display the method parameters, press .
QUICK START GUIDE • Highlight the Setup Titration Report option and press . • Mark the fields to be included with the “*” symbol using the press • Press and keys and to toggle the selection. and then press to return to the main screen. Fill Titration Beaker with Solvent The titration beaker must be filled with 1-component up to the MIN marker (about 50 mL of solvent): • From the Idle screen, press . • Push and hold the FILL button located on the top of the air pump.
QUICK START GUIDE Solid Samples: • Solid samples with larger pieces may need to be pulverized or ground in an analytical mill. These samples can be added with a weighing boat by removing the sample port plug. • Semisolid samples with non-homogeneous water content may need to be homogenized before addition. The sample can be added using a syringe without the needle by removing the sample port plug.
QUICK START GUIDE Understanding the Displayed Information During a titration, the following screen is displayed: Viewing Graph During Titration Press to display the real time titration graph. The curve displayed is a plot of Electrode Potential vs. Titrant Volume. A dashed horizontal line represents the user selected end point potential. Titration Termination The titration is terminated when the conditions of the Termination Criteria have been met.
QUICK START GUIDE • The Review Result screen will be displayed. • Use the and keys to display information related to the last titration performed. See titration report on page 15. Printing the titration report Connect a DOS / Windows compatible printer directly to the DB 25 connector (parallel port) located on the back of the titrator. Note: To connect the printer, please turn off the titrator and the printer. Printing out the report: • From the Review Report screen, press .
QUICK START GUIDE • Transferring a report file will automatically transfer the corresponding log file and titration graph BMP file (if applicable). • Press , to return to the General Options screen. • Press again, to return to the Idle screen. Titration report While scrolling with the and keys, the fields below can be seen on the titrator display or printed. The same information is available on the saved report file (KF_00003.rpt in this example, with all report fields selected).
QUICK START GUIDE Standby Duration: 720 minutes Imposed Current: 20 uA Minimum Dose: 0.5000 uL Maximum Dose: 30.0000 uL Timed Increment: 1 second End Point Value: 180.0 mV Signal Averaging: 3 Readings Flow Rate: 10.0 mL/min Termination Parameters: Maximum Duration: 3600 sec Maximum Titrant Volume: 20.0000 mL Term. Criterion: mV End Point mV End Point: 4 sec Result Unit: % Nr 0 1 2 3 4 5 6 7 8 9 10 Volume[ml] 0.0000 0.0000 0.0028 0.0078 0.0128 0.0178 0.0228 0.0278 0.0328 0.0378 0.0428 mV 403.6 403.5 403.
QUICK START GUIDE QS 903 10/13 18
INSTRUCTION MANUAL HI 903 KARL FISCHER VOLUMETRIC TITRATOR Revision 1.11 www.hannainst.
Dear customer, Congratulations on choosing a Hanna Instruments product. Please read this instruction manual carefully before using the instrument. This manual will provide you with the necessary information for the correct use of the instrument. © 2013 Hanna Instruments All rights are reserved. Reproduction in whole or in part is prohibited without the written consent of the copyright owner, Hanna Instruments Inc., 584 Park East Drive, Woonsocket, Rhode Island 02895, USA.
TABLE OF CONTENTS Chapter 1. INTRODUCTION Chapter 2. SETUP Chapter 3. USER INTERFACE Chapter 4. GENERAL OPTIONS Chapter 5. METHODS Chapter 6. TITRATION Chapter 7. AUXILIARY FUNCTIONS Chapter 8. MAINTENANCE, PERIPHERALS Chapter 9. OPTIMIZATION Appendix 1. TECHNICAL SPECIFICATIONS Appendix 2. RECOMMENDED REAGENTS Appendix 3.
4
INTRODUCTION 1 INTRODUCTION The HI 903 is an automatic volumetric Karl Fischer titrator with high accuracy, great flexibility and repeatability. The titrator is designed to perform titrations for a variety of sample types. The main attributes of this titrator are: Flexibility Support up to 100 titration methods (standard and user defined). User defined titrant and standard database. High accuracy Precise dosing system, capable of delivering as little as 0.125 µL of titrant with a single dose.
INTRODUCTION 1-2
SETUP Chapter 2. Contents 2 SETUP ................................................................................................... 2 - 3 2.1 Unpacking ............................................................................................. 2 - 3 2.2 Safety Measures ..................................................................................... 2 - 4 2.3 Installation ........................................................................................... 2 - 5 2.3.
SETUP 2-2
SETUP 2 SETUP 2.1 Unpacking The titrator and the accessories are shipped in a single box containing: 1 2 3 4 5 6 7 8 9 ITEM QUANTITY Titrator ................................................................... 1 pc. Dosing Pump Assembly ........................................... 1 pc. Burette Assembly ..................................................... 1 pc.
SETUP 10 Waste Bottle Assembly ............................................. • Bottle Cap • Desiccant • Desiccant Cartridge • Fittings, O-rings • Tubes (Silicone and PTFE Tubing) 11 Calibration Key ........................................................ 12 Power Supply .......................................................... 13 USB Cable ............................................................... 14 Instruction Manual Binder ......................................... 15 USB Storage Device ............
SETUP • Environment temperatures below 10°C and above 40°C • Explosion hazards 6. Have the titrator serviced only by qualified service personnel. 2.3 Installation 2.3.
SETUP 2.3.2 Titrator Rear View 2.3.
SETUP 2.3.4 Titrator Assembly Note: Assembly operations must be completed before connecting the titrator to the power supply! 2.3.4.1 Connecting the Pumps Dosing Pump: The dosing pump is driven by a stepper motor, which provides 40,000 steps for a single burette volume. The pump housing also holds the motor, which automatically positions the valve for filling and dispensing titrant.
SETUP Connect the air pump with the following steps (see Figure 2.): (1) Retrieve the air pump cable (PUMP 2) from inside the right bay. Connect the cable to the air pump as shown in Figure 2. The air pump connector is located on the left side of the motor. (2) Lower the pump into the titrator, then slide it towards the front of the titrator chassis until it is firmly latched. (3) Secure the pump with the locking screw.
SETUP 2.3.4.2 Attaching the Burette The 5 mL glass syringe features a highly precise inner diameter, which has been individually verified to produce consistent titrant dosage according to standard ISO 8655. All of the non-glass, wetted syringe and valve components, including the shoulders and plunger cap, are constructed from PTFE to ensure resistance to both degradation due to Karl Fisher titrant and water vapor permeability.
SETUP 2.3.4.3 Attaching the Beaker and Dispensing Tip The titration reaction takes place in a closed, conical, glass beaker, sometimes called a titration vessel, reaction vessel, titration cell or reaction cell. The primary design features of the HI 903 titration vessel include the following: • Durability, easy to use, clean and maintain. • Conical, glass vessel body which provides strong, repeatable mixing for reaction volumes between 50 and 150 mL.
SETUP • • • • Place beaker ring (C) onto beaker support with the notches on top (see Figure 6). Insert the glass beaker (B) into the beaker ring (C). Add the stir bar to the glass beaker (B). Carefully place the beaker top onto the beaker (B). Secure in place by pushing the beaker top through the beaker ring (C) with the 4 notches of the beaker ring aligned with the 4 steel pins of the beaker top (A). • Twist the beaker ring (C) counter-clockwise to lock the top in place. 2.3.4.3.
SETUP Karl Fischer Electrode The Karl Fischer electrode consists of two parallel, platinum pins sealed into a 10mm diameter glass body. Two steel pins connect the platinum elements to a standard BNC connector, which allows for easy attachment to the HI 903. Attach to the beaker top as follows: • Carefully insert the electrode through a 10-mm fitting (E) and 10-mm o-ring (F). • Insert electrode through proper port in beaker top (see Figure 7).
SETUP 2.3.4.4 Electrical Connections • Connect the KF electrode to the BNC connector (C). • Connect the power adapter cable to the power input connector (B).
SETUP 2.3.5 Titrant, Solvent, Waste Bottle Assembly The bottle top assemblies are equipped with desiccant cartridges containing indicating silica gel which ensures that the air passing through the solvent handling system has been dried. The desiccant has a limited capacity to absorb moisture and is typically exhausted after 2 to 4 weeks. Silica gel, indicating or otherwise, can be regenerated at 150 °C.
SETUP 2.3.5.2 Solvent / Waste Bottle Assembly (HI 900531) Caution: Most Karl Fischer solvents give off harmful vapors. Consult manufacturer’s MSDS for safe handling guidelines. To assemble the solvent or waste bottle, see Figure 10 and follow the next steps: • Insert a PTFE top (J) into a GL45 cap (E).
SETUP 2-16
USER INTERFACE Chapter 3. Contents 3 USER INTERFACE .................................................................................. 3 - 3 3.1 Start Up................................................................................................. 3 - 3 3.2 Description ............................................................................................ 3 - 4 3.2.1 Keypad .................................................................................................... 3 - 4 3.2.1.
USER INTERFACE 3-2
USER INTERFACE 3 USER INTERFACE 3.1 Start Up Once the instrument is assembled and installed, follow the steps below to start the titrator: • Connect the instrument to a power outlet with the supplied power adapter. • Turn on the titrator using the power switch located on the back of the instrument. • Wait until the titrator finishes the initialization process. • Press when prompted or wait a few seconds for titrator to start.
USER INTERFACE 3.2 Description This chapter describes the basic principles of navigation through the user interface, selecting fields and entering values from the keypad. 3.2.1 Keypad The titrator’s keypad is grouped into five categories, as follows: 3.2.1.1 Function Keys If one of these keys is pressed, the associated function is immediately performed.
USER INTERFACE 3.2.1.3 Arrow Keys These keys have the following functions: • Move the on-screen cursor. • Increase and decrease the stirrer speed and other settings. • In the alphanumeric screen, to select a character. • To navigate through menu options. 3.2.1.4 Numeric Keys Keys to Used for numeric entries. Toggles between positive and negative values. Decimal point. Initiates entry of exponent for scientific notation. 3.2.1.
USER INTERFACE 3.2.3 The Idle Screen After start up and initialization, the first screen displayed is the Idle Screen . Idle Screen fields: Method name: Displays the name of the selected method. Time and date: Displays the current date and time. Stirrer information: Actual / Set stirrer speed is displayed in RPM. When stirrer is off, the stirrer information is not displayed. Titrant: Displays the name of the current titrant. Last Standardization: Displays the titrant standardization date / time.
USER INTERFACE 3.2.4 The Process Screen When the user presses while in Idle Screen, all titration related processes are started. The titrator displays the Process Screen. Process Screen fields: Method name: Displays the name of the selected method. Time and date: Displays the current date and time Process stage field: Displays the current process (Pre-titration, Drift Analysis, Standby, Sample Analysis / Titrant Standardization).
USER INTERFACE 3.3 Menu navigation 3.3.1 Selecting an Option To select an option, simply press the option key below the virtual key. For example, to access the Method Options screen press the option key below it. 3.3.2 Selecting a Menu Item To select an item from the menu screen use the arrow keys and to move the cursor. When the menu is larger than the display, a scroll bar is active on the right side. The and used to scroll through the pages.
USER INTERFACE 3.3.4 Saving Modifications The Saving Method screen allows the user to save the modifications. To exit from Saving Method screen without saving, press or highlight the Exit Without Saving . To save the Method option and then press modifications highlight the Save Method option and then press . Note: To access the contextual help menu, press displayed screen. Press or press at any time. Help is related to the again to return to the previous screen.
USER INTERFACE 3-10
GENERAL OPTIONS Chapter 4. Contents 4 GENERAL OPTIONS ............................................................................. 4 - 3 4.1 Date and Time Setting ....................................................................... 4 - 3 4.2 Display Settings .................................................................................. 4 - 4 4.3 Beeper ................................................................................................. 4 - 5 4.4 Stirrer ........................
GENERAL OPTIONS 4-2
GENERAL OPTIONS 4 GENERAL OPTIONS The General Options screen gives access to options that are not directly related to the from the main screen while in idle titration process. To access this screen, press mode. In Pre-titration, Drift Analysis, Standby or Titration process, the General Options can be accessed by pressing the <> key on a PS/2 keyboard. The available menus are described below: 4.1 Date and Time Setting This screen allows the user to set the date and time.
GENERAL OPTIONS 4.2 Display Settings This screen allows the user to customize the viewing features of the display. Option Keys: Increases the backlight saver time interval Decreases the backlight saver time interval The backlight intensity can be adjusted using the and keys. There are 8 levels of backlight intensity, ranging from 0 to 7. A color palette is displayed in the center of the screen, allowing an easy selection of the appropriate backlight intensity.
GENERAL OPTIONS 4.3 Beeper This screen allows the user to turn the Beeper On (Enable) or Off (Disable). The beeper will sound after a titration is completed, when an invalid key is pressed or when a critical error occurs during titration. 4.4 Stirrer This screen allows the user to select the internal magnetic stirrer, an external magnetic stirrer or a user-controlled stirrer uncontrolled by the titrator (custom). The external stirrer is automatically detected when it is connected.
GENERAL OPTIONS 4.5 Language Select an available language. 4.6 Estimated Cell Volume This screen allows the user to enter the estimated volume of solution in the titration beaker.
GENERAL OPTIONS 4.7 Titrant Database This screen allows the user to store information about all of the titrants available for use, including the titrant name and Standardization information. The titrant for the currently-selected method cannot be modified from this screen. For details on the full functionality of the database, see section 5.5.12. 4.
GENERAL OPTIONS 4.9 Save Files to USB Storage Device This option allows the user to save files from titrator to a USB storage device. On the titrator, the available file types are: Standard Method Files - HIxxxxyy.MTD (e.g.: HI8001EN.MTD, HI8101EN.MTD) User Method Files - USERxxxx.MTD (e.g.: USER0001.MTD) Drift/Titration Report Files - DR_xxxxx.RPT, KF_xxxxx.RPT (e.g.: DR_00001.RPT, KF_00001.RPT) Insert the USB Storage Device into the USB port on the left side of the titrator.
GENERAL OPTIONS 4.10 Restore Files from USB Storage Device This screen allows the user to transfer files from the USB storage device to the titrator. Insert the USB Storage Device into the USB port on the left side of the titrator. The file types that can be transferred are: Standard Method Files - HIxxxxyy.MTD (e.g.: HI8001EN.MTD, HI8101EN.MTD) User Method Files - USERxxxx.MTD (e.g.: USER0001.MTD) Drift/Titration Report Files - DR_xxxxx.RPT, KF_xxxxx.RPT (e.g.: DR_00001.RPT, KF_00001.
GENERAL OPTIONS 4.11 USB Link with PC The USB Link feature is useful to transfer methods/reports directly to/from a PC. To use this feature, connect the USB cable to the labeled connector on rear of titrator and connect to a PC with HI 900 PC Application installed. The titrator automatically attempts to connect to the PC while on this screen. Inactive: Active: Ready: Transmit: Speed: 4.12 The titrator is not connected to the HI 900 PC Application. The titrator is connected to the HI 900 PC Application.
GENERAL OPTIONS Disconnect the KF electrode, then connect the HI 900941 calibration key to the electrode input (BNC connector). Depending on which parameters you want to check, follow the indications below: Checking the mV input accuracy: Set the multimeter to mV mode. If necessary, switch the calibration key to mV mode by pressing the red button. Connect the calibration key banana plugs to the multimeter mV input. Choose the current value using the and keys (from the pre-defined list).
GENERAL OPTIONS Configure the settings on the titrator Balance Configuration menu to match the settings for your particular balance (baud rate, data bits, parity, stop bit number, request command syntax). It may be necessary to change settings on your balance. Users should consult their balance instruction manual. Before leaving this screen be sure the connection with the balance is working properly by key. pressing the 4.
GENERAL OPTIONS 4.15 Reset to Default Settings This option restores the manufacturer settings. Note: Please be careful!!! This will also delete all the user created methods, reports and restore all manufacturer settings such as titrator configuration, standard method parameters, etc. 4.16 Update Software This screen allows the user to update the titrator software from a USB storage device containing a software setup kit. To update the software: • Copy the “Setup 903” folder to a USB storage device.
GENERAL OPTIONS 4-14
METHODS Chapter 5. Contents 5 METHODS .............................................................................................. 5 - 3 5.1 Selecting Methods ................................................................................ 5 - 3 5.2 Standard Methods................................................................................. 5 - 4 5.2.1 Upgrading Standard Methods....................................................................... 5 - 4 5.2.2 Deleting Standard Methods ........
METHODS 5.5.11.3 Concentration Unit ........................................................................................5 - 16 5.5.11.4 Water Content .............................................................................................5 - 16 5.5.11.5 Standard Size ...............................................................................................5 - 16 5.5.12 Titrant ..................................................................................................... 5 - 16 5.5.12.
METHODS 5 METHODS All of the parameters required to complete an analysis are grouped into a method. The titrator is supplied with a pack of standard methods. Standard and user methods can be upgraded, stored or deleted by connecting the titrator to a PC using the HI 900 PC application or a USB storage device. 5.1 Selecting Methods To select a method, press the displayed. key (when available).
METHODS 5.2 Standard Methods The standard methods were developed for the most common types of analysis. Also, the standard methods can be used as a model to create new user methods. Only specific method parameters can be modified by the user (see Section 5.5, Method Options section). 5.2.
METHODS 5.2.3 Restoring the Standard Methods to the Manufacturer Settings You can restore the standard method to the manufacturer setting by highlighting a standard method and pressing . 5.3 User Methods These methods are defined by the user (usually by modifying a standard method). The user methods can be developed in accordance with the requirements of the user. All method parameters can be modified by the user. 5.3.
METHODS Note: Only a limited number of user methods can be generated. The titrator can hold 100 methods (standard and user). When it is reached, a warning message will be displayed. 5.3.2 Deleting User Methods To remove a user method, press want to delete and press (when available). Highlight the user method that you . A screen will appear in order to confirm the deletion. Press again to confirm, or press 5.4 to cancel the operation.
METHODS Save method: After making modifications highlight Save Method and press After making modifications, press 5.5 Method Options 5.5.1 Naming the User Method . and select Save Method to keep the changes. This option allows you to enter a name for the new method (up to 24 characters). Use the arrow keys to navigate through the character table. Press to add the highlighted character to the method name.
METHODS 5.5.2 Method Revision This option allows you to enter a string representing the current method revision. The revision string format should be “X.Y”, where X and Y are numerical digits. 5.5.3 Method Type Method type is a parameter listed in each method. In order to conduct a titration the user has to choose between water determination in the sample (Sample Analysis) or determination of titrant concentration (Titrant Standardization).
METHODS 5.5.4 Predispensing Amount The titration time can be shortened by adding a large fraction of the titrant at the start of the analysis, if the approximate water content of the sample is known. The predispensing amount can be set to deliver between 1 and 90% of the titrant required to reach the end point. Setting the amount to 0% will disable the titrant predispensing feature. 5.5.
METHODS 5.5.6 Stirring Speed The stirring speed can be set between 200 and 2000 RPM with a resolution of 100 RPM. The stirrer will remain on, as long as the method is active. The speed can be adjusted at any time by using the 5.5.7 and keys when the stirrer is running. Stirbar Type Allows the user to edit the stirbar description.
METHODS 5.5.8 Drift Entry Allows the user to choose the drift entry mode that is used during the titration process: Automatic - the drift rate will be calculated automatically after the Pre-titration of the solvent. User - the drift is set to a fixed value (entered by the user). The user enters the estimated drift value. The drift analysis stage will be skipped and the user must enter the drift value between 0.0 µg/min and 10.0 µg/min.
METHODS 5.5.9 Solvent Name The user can enter a name for the solvent (up to 15 characters). Use the arrow keys to navigate through the character table. Press to add the highlighted character to the solvent name. 5.5.10 Sample Parameters (Sample Analysis mode only) This screen allows the user to access and configure the specific sample parameters.
METHODS 5.5.10.1 Sample Determination This screen allows the user to select the sample determination mode. Normal sample determination is performed through direct titration of samples that are soluble in solvent or are finely divided and have homogeneous distribution in water. External extraction is a method for the preparation of insoluble samples that require an external water extraction.
METHODS 5.5.10.3 Sample Type This option allows the user to select the type of the sample: mass, volume or pieces. This information is used to determine the appropriate sample size required by the titration prior to analysis. 5.5.10.4 Sample Size This option allows the user to enter the sample size. For external/Dissolution, enter the size of the aliquot taken from the external vessel. Before the titration is started, the user is asked again to enter the sample size.
METHODS 5.5.10.5 External Solvent Size ( External Dissolution/Extraction Determination Modes Only). Enter the mass of the solvent used for external dissolution or extraction of the sample. Weigh the solvent after determining the solvent water content but before adding sample to the solvent. 5.5.10.6 External Solvent Conc. (External Dissolution/Extraction Determination Modes Only). 5.5.10.7 Extracted Sample Size (External Extraction Determination Mode Only). 5.5.10.
METHODS Hanna Standard Methods (Titrant standardizations only) are designed to be used with standards of specific types and water contenets. The HI903 will automatically select an appropriate standard when such a method is selected. If there is no usable standard in the database, a new one will be created. 5.5.11.1 Standard Name This option allows the user to edit the name of the standard. 5.5.11.2 Standard Type The user can select the type of the standard: Mass or Volume. 5.5.11.
METHODS Before the titrant standardization is started, the user is asked again to enter the standard size. The standard size (mass and volume) can be acquired automatically from a compatible analytical balance (when the balance feature is enabled - see Section 4.11, Setup Balance Interface). 5.5.13 Titrant The user can access the Karl Fischer titrant database and customize related parameters. Using the choose it.
METHODS Hanna Standard Methods are designed to be used with titrants of specific types and concentrations. The HI 903 will automatically select an appropriate titrant when such a method is selected. If there is no usable titrant in the database, a new one will be created. 5.5.13.1 Titrant Name The user can edit the name for the titrant. 5.5.13.2 Titrant Type The user can select the type of titrant. 5.5.13.3 Nominal Titrant Concentration The user can enter the titrant concentration.
METHODS 5.5.13.4 Standardized Titrant Concentration The user can manually enter the exact titrant concentration. 5.5.13.5 Titrant Age Reminder The user can set a reminder that a verification of the titrant concentration is necessary. When the set reminder period has expired, a warning message will be displayed on the main screen. The reminder period will reset once the titrant is restandardized or the set time is modified. 5.5.
METHODS 5.5.14.1 Start Mode The user can select the starting mode for the titration. In Cautious mode, the titrant dosing begins with the minimum dose in order to prevent over-titration. In Normal mode, the titrant dosing begins with the median value between the minimum and maximum (i.e. minimum dose 5 µL, maximum dose 25 µL, first dose will be 15 µL). 5.5.14.2 Standby Mode When enabling this option the titrator will automatically revert to Standby mode after a titration is completed.
METHODS 5.5.14.3 Standby Duration The user can enter the period of time which the cell is kept dry and ready for subsequent analysis after a titration has finished. The user can set the standby period up to 72 hours. 5.5.14.4 Imposed Current The HI 903 uses a bivoltametric electrode system. During a titration, the titrator monitors the voltage required to maintain a constant polarization current (imposed current).
METHODS 5.5.14.5 Dosing Parameters The user can set the minimum and maximum volume of titrant / dose. The titrant min and max dose values are determined by the type of reagent, reagent concentration and the expected content of water in the sample. Correct determination of these values is necessary in order to prevent over-titration and ensure the highest possible accuracy. 5.5.14.6 Timed Increment The user can enter the period of time between two successive doses.
METHODS 5.5.14.7 End Point Value This option defines the mV value at which the titration equivalence point (endpoint) has been reached. The pre-titration is completed when the mV is under the endpoint value, for a user defined period of time (see Section 5.5.14.4, Endpoint Stability Time). The mV value can be set from 5.0 to 600.0 mV. 5.5.14.8 Signal Averaging This option enables averaging of the mV reading when enabled. If 1 Reading is selected, the filtering is disabled.
METHODS 5.5.14.9 Flow Rate The flow rate for the dosing system can be set by the user in an interval of 0.1 to two times the burette volume: 0.1 to 10 mL/min for a 5 mL burette Note: The titrator will automatically detect the burette size and display the correct high limit volume. The flow rate is set for all burette operations. 5.5.15 Termination Parameters This screen allows the user to set the control parameters related to the end of the titration.
METHODS 5.5.15.1 Maximum Duration Specify the maximum time a titration is allowed to run. Once this point is reached the titration will be terminated even if the end point is not reached. The time can be set from 10 to 3600 seconds. 5.5.15.2 Maximum Titrant Volume The maximum titrant volume used in the titration must be set according to the analysis. If the titration end point is not reached, the titration will be terminated after the maximum titrant volume has been dispensed.
METHODS 5.5.15.3 Termination Criterion This screen allows the user to set the titration termination criterion. mV End Point Absolute Drift Relative Drift The titration is terminated when the potential remains below a set mV value for a specified period of time (see Section 5.5.14.4, End Point Stability Time). The titration is terminated when the actual drift is less than the predefined absolute drift value.
METHODS 5.5.16 Result Unit The titrator provides the results based on the selected units. 5.6 Printing To print method parameters, press from the main screen, then . If no printer is connected to the dedicated socket, or if the printer is offline, an error message will appear on the display (see Section 8.3.3, Connecting a Printer for information about connecting a printer to the titrator).
METHODS 5-28
TITRATION Chapter 6. Contents 6 TITRATION ........................................................................................... 6 - 3 6.1 Idle ........................................................................................................ 6 - 3 6.2 Pre-titration.......................................................................................... 6 - 3 6.3 Drift Analysis ........................................................................................ 6 - 4 6.4 Standby ...
TITRATION 6-2
TITRATION 6 TITRATION 6.1 Idle The titrator first enters Idle mode when it is switched on. All of the HI 903’s software features and adjustable parameters can be accessed from the Idle state. This includes all of the user-adjustable method parameters, solvent handling system, file transfers, calibration checks, software upgrades, options for interface with PC and accessories as well as burette options. To access the titration menu (Process screen) press .
TITRATION During the pre-titration the user cannot change the currently selected method or access the method parameters. Note: If the pre-titration lasts longer than 30 minutes the titrator switches to Idle mode. Errors may have occurred in your titration system (beaker is not properly sealed, wrong or missing titrant, unconnected or bad electrode, etc.). Check the system and start the pre-titration again. 6.
TITRATION 6.4 Standby After the drift rate has been determined, the HI 903 moves into Standby mode. In standby mode the dryness of the titration cell is maintained and the drift rate is continuously monitored and updated. From Standby mode a sample analysis, titrant standardization or drift rate logging session can be launched as well as method selection, customization of method parameters, and general options (external keyboard only, by pressing <>).
TITRATION 6.5 Sample Analysis While in Standby mode, press . Note: If the drift value is zero a warning message appears to inform the user that the solvent may be overtitrated. The user can choose to continue the titration by pressing mode by pressing or to return to Standby in order to wait until the drift is stabilized at a higher value.
TITRATION Manual Entering Follow the steps below: Sample size by mass: 1. Measure the mass of the sample in a weigh boat or syringe. 2. Slide the sample plug up out of the vessel top to open the sample port, or insert the syringe needle through the septum. 3. Rapidly add the sample through the sample port ensuring that ALL of the sample is transferred to the solvent. Avoid any contact between the sample and the cell cover. 4.
TITRATION Automatic Mass Acquisition from Analytical Balance It is available only for Sample Mass and Sample Volume types. The sample size can be automatically acquired from the balance when connected to the titrator using the RS232 interface. Note: The user must make sure that the balance and the titrator are properly configured and the balance feature is enabled (see Section 4.10, Setup Balance Interface). Procedure 1. Place the syringe or the weighing boat containing the sample on the balance. 2.
TITRATION The titrator returns to the previous screen and the sample size is automatically updated. Now the analysis can be started. Start Analysis Press to begin analysis. Suspend Titration While the titration is in progress, you can temporarily stop it by pressing will stop dispensing titrant. To continue the titration press . The burette .
TITRATION Viewing the Titration Curve During a titration, the titration curve can be displayed on the Titration Graph screen, by pressing . The titration ID report is also displayed inside the graph window. Press to stop the titration manually and return to Idle mode. Press to stop the titration and return to Standby mode. When the end point is reached the titration is finished and the following screen is displayed.
TITRATION Averaging Sample Analysis Results By pressing , results will be added to the Sample Analysis History in order to obtain an average of titration results. Use the Use and keys to scroll the concentration results list. to choose the sample concentration results that will be used for averaging. Note: When there are no results selected dashes will appear in the Average Sample Concentration and the Standard Deviation fields. 6.6 Titrant Standardization While in Standby mode, press .
TITRATION Adding the standard: The user must add the standard into the beaker and enter the standard size. The units of sample size are determined by the method setting. Follow the same procedure as for adding samples (see Section 6.5, Sample Analysis). Start Standardization Press to begin standardization. Note: During titrant standardization the user has the same options as a sample analysis (see Section 6.5, Sample Analysis).
TITRATION Averaging Titrant Standardization Results By pressing results can be added to the sample analysis history in order to obtain an average of titrant concentration. Use the Use Press and keys to scroll the concentration results list. to choose the titrant concentration results that will be used for averaging. to update the concentration with the current average. Note: When there are no results selected dashes will appear in the average titrant concentration and the standard deviation fields.
TITRATION 6-14
AUXILIARY FUNCTIONS Chapter 7. Contents 7. AUXILIARY FUNCTIONS ....................................................................... 7 - 3 7.1 Air Pump ............................................................................................... 7 - 3 7.1.1 Filling the Beaker ........................................................................................ 7 - 3 7.1.2 Emptying the Beaker...................................................................................7 - 3 7.2 Burette .....
AUXILIARY FUNCTIONS 7-2
AUXILIARY FUNCTIONS 7 AUXILIARY FUNCTIONS 7.1 Air Pump The air pump is used to add or remove the solvent in the titration beaker without exposure to atmospheric moisture. To start the air pump, press from the Idle screen. The air pump can be stopped by pressing 7.1.1 . Filling the Beaker To add solvent to the titration vessel: 1. Depress the ‘fill’ button on the top of the pump housing.
AUXILIARY FUNCTIONS 7.2 Burette To access the Burette screen, press Highlight the desired option and then press from the Idle screen. . Note: Do not perform burette functions with solvent below the “Min” sign. Doing so could spray titrant on the beaker top or other components. 7.2.1 Prime Burette After solvent has been added to the titration cell, the burette can be primed with titrant. The priming process consists of several cycles of filling and emptying the burette with titrant.
AUXILIARY FUNCTIONS To prime the burette, select Prime Burette from the Burette screen. Enter the number of rinses and press . The number of burette rinses can be set between 1 and 5 (we recommend at least three rinses to assure that the air bubbles are completely removed). 7.2.2 Rinse Tip A 0.25 mL dose of titrant will be dispensed from the burette when this operation is selected. This operation will eliminate any contamination from the anti-diffusion dispensing tip. 7.2.
AUXILIARY FUNCTIONS The manual dispense volume must be between the limits shown below: 0.001 to 7.2.4 4.500 mL for a 5-mL burette Purge Burette This option allows the burette to be emptied before cleaning and/or storing. Note: Before starting this operation, remove the aspiration tube from the titrant bottle. The figures below show the steps in a purge burette operation. 7.3 Stirrer Note: When custom stirrer is selected (see Section 4.
AUXILIARY FUNCTIONS 7.4 Results To access the “Data Parameters” screen, press button. From the Data Parameters screen you can access the following options: 7.4.1 Review Last Titration Report The last titration report can be reviewed. The titration graph can be reviewed by selecting . The information seen in the report is based on the selections made in the Setup Titration Report screen. The following option keys are available: Review the titration graph. Print the titration report.
AUXILIARY FUNCTIONS 7.4.2 Review Available Reports Up to 100 reports can be saved on the titrator. To view one of the saved reports highlight a report and then press . All of the saved reports can be reviewed and printed. The report contains only the information selected in the Setup Titration Report screens during report generation. The following option keys are available: Review the titration graph. Print the titration report. Delete the selected report. 7.4.
AUXILIARY FUNCTIONS Operator Name: Allows the operator name to be recorded in each report. Electrode Name: Allows the electrode name to be recorded in each report. Fields 1, 2, 3: Allows any additional information to be recorded in each report. The fields must be selected from the Setup Titration Report screen (see Section 7.4.5, Setup Titration Report) in order to be displayed in the titration report. 7.4.4 Meter Information Displays titrator configuration data.
AUXILIARY FUNCTIONS 7.4.5 Setup Titration Report Customize a unique report to record the titration results. An asterisk means that it will be included in the titration report.
MAINTENANCE, PERIPHERALS Chapter 8. Contents 8 MAINTENANCE, PERIPHERALS .............................................................8 - 3 8.1 Burette Maintenance ............................................................................ 8 - 3 8.1.1 Burette Assembly ......................................................................................8 - 3 8.1.2 Changing the Burette .................................................................................8 - 3 8.1.
MAINTENANCE, PERIPHERALS 8-2
MAINTENANCE, PERIPHERALS 8 MAINTENANCE, PERIPHERALS The 5-mL burette included with the titrator exceeds the ISO 8655 standard for the accurate delivery of liquids by a motor-driven piston burette. 8.1 Burette Maintenance 8.1.1 Burette Assembly The burette is delivered with a 5-mL syringe inside and with all the accessories mounted (see Section 2. 3. 4. 2, Attaching the Burette for assembly details).
MAINTENANCE, PERIPHERALS 8.1.3 Disassembling the Dispensing Tube and Aspiration Tube Both the aspiration and the dispensing tubes have a fitting and a tube protector. The aspiration tube will be mounted in the left side and the dispensing tube will be mounted in the right side of the burette.
MAINTENANCE, PERIPHERALS 8.1.5 Cleaning the Burette To clean the burette, follow these steps: • If the burette is filled with titrant, remove the aspiration tube from the titrant bottle and purge burette (see Section 7.2.4, Purge Burette). • Insert the aspiration tube into the Karl Fischer solvent. • Prime burette to fill the burette with solvent (use 2 rinses) (see Section 7.2.1, Prime Burette).
MAINTENANCE, PERIPHERALS Warning: Avoid contact with the titrant with bare hands. Avoid spilling titrant. Clean the external side of the syringe and piston to remove aggressive chemicals. Do not touch the PTFE part of the piston or internal walls of the burette with bare hands or greasy materials. Consult Manufacturer’s MSDS for safe handling instructions. • Reinsert the piston into the syringe. • Reinsert the syringe by screwing it in the valve with your fingers.
MAINTENANCE, PERIPHERALS 8.1.6 Burette Preparation (Filling with Titrant) Before starting a titration, the burette must be properly filled with titrant in order to obtain an accurate and repeatable result. To fill the burette, follow the next steps and recommendations: • If necessary, clean the burette and make sure it is empty and dry. • From the main screen press . • Highlight Prime Burette option and press .
MAINTENANCE, PERIPHERALS 8.2 Probe Maintenance Proper probe maintenance is crucial for reliable measurements and extending the life of the probe. The frequency of maintenance will depend largely on the type of samples that are analyzed. Maintenance may be required if any of the following are observed: • Slow or no electrode response; • Noisy mV readings; • Debris on or between electrode pins • Coating on electrode pins If these signs are observed, the electrode pins may be dirty.
MAINTENANCE, PERIPHERALS 8.3.1 Connecting an External Display The information shown on the titrator display can be viewed also on a Standard VGA display connected with a 15-pin cable, as presented below. Connect the external display to the display socket. Turn on the titrator and then the external display. 8.3.2 Connecting an External PC Keyboard This connection allows you to use an external PS/2 PC Keyboard in addition to titrator’s keypad. Connect an external PC Keyboard (PS/2 connector).
MAINTENANCE, PERIPHERALS The correspondence between the Titrator’s Keypad and the United States 101-type external keyboard are: External PC Keyboard (United States 101) Titrator Keypad Function Key F-1 Function Key F-2 Function Key F-3 Function Key F-4 Function Key F-5 Option Key 1 (from left to right) Function Key F-6 Option Key 2 (from left to right) Function Key F-7 Option Key 3 (from left to right) Function Key F-8 Option Key 4 (from left to right) Function Key F-9 Option Key 5 (from left to
MAINTENANCE, PERIPHERALS 8.3.3 Connecting a Printer A variety of parallel printers can be connected to the parallel port of the titrator using a standard DB25–pin cable. Warning: The titrator and the external printer must both be OFF before they are connected. Connect the external printer to the standard 25–pin Socket. Turn on the titrator and then the printer. 8.3.4 Connecting to a Computer The titrator can be connected to a computer using a USB cable.
MAINTENANCE, PERIPHERALS Select the USB Link with PC screen on the titrator by following the path: General Options - USB Link with PC Launch the HI 900 PC application and then select the appropriate USB port on the PC. The HI 900 PC application allows the transfer of files (methods and reports) between titrator and PC.
METHODS OPTIMIZATION Chapter 9. Contents 9 OPTIMIZATION ..................................................................................... 9 - 3 9.1 Titrator Settings ................................................................................... 9 - 3 9.1.1 Control Parameters.................................................................................... 9 - 3 9.1.1.1 Endpoint Potential and Polarization Current ........................................................9 - 3 9.1.1.
METHODS OPTIMIZATION 9.2.4 Liquid Samples ........................................................................................ 9 - 1 1 9.2.5 Sample Preparation Techniques ................................................................... 9 - 1 2 9.2.5.1 Internal Extractions .........................................................................................9 - 1 2 9.2.5.2 Dilutions ..........................................................................................................9 - 1 2 9.
METHODS OPTIMIZATION 9 OPTIMIZATION 9.1 Titration Settings The default settings included with the standard methods have been developed by Hanna Instruments in order to provide accurate results for the majority of samples without requiring additional analyst input or method fine-tuning. However, in order to suit a wider variety of sample types and matrices, all of the HI 903 titration parameters are customizable.
METHODS OPTIMIZATION The table that follows correlates endpoint potential ranges for each of the possible polarization current settings of the HI 903. The suggested endpoints below are applicable for reagents formulated with methanol. Endpoint potentials should be increased by 20 to 25% when titrating with reagent systems formulated for use with aldehydes or ketones or where methanol has been replaced with higher alcohols or substituted ethers like diethylene glycol monoethyl ether or 2-methoxyethanol.
METHODS OPTIMIZATION excess iodine will result in a steep drop in electrode potential which will be interpreted by the HI 903 as an approaching endpoint. This will in turn result in the dynamic dosing algorithm reducing the dose size until the excess iodine has time to react. The reduced dose size effectively interrupts the titration and adds considerable time to the titration duration.
METHODS OPTIMIZATION 9.1.1.4 Start Mode The HI 903 can be set to either normal or cautious start mode. The cautious start feature is designed to prevent the accidental over-titration of a sample with very low water content. In cautious start mode, the HI 903 starts a titration using the minimum dose size specified by the user rather than starting with half of the maximum dose size as with normal start mode. 9.1.1.
METHODS OPTIMIZATION drift-based termination, the HI 903 incorporates two drift stop termination criteria which terminate titrations when the drift rate passes below a specified threshold. The methods can be distinguished by the way in which the drift rate thresholds are specified. 9.1.2.2.1 Relative Drift Stop The relative drift stop termination parameter should be the first choice termination criteria. It is the most universally applicable, easiest to use and results in fast, repeatable titrations.
METHODS OPTIMIZATION 9.1.3 Method Options 9.1.3.1 Pre-dispensing Amount It is possible to shorten titration times by adding a large fraction of the titrant at the start of the analysis if the approximate water content of the sample is known. When activated, the pre-dispensing amount can be set to deliver between 1% and 90% of the titrant required to reach the titration endpoint. A high pre-dispensing amount (around 90%) increases the chances of erroneous results.
METHODS OPTIMIZATION 9.2 The Sample 9.2.1 Proper Sampling Procedure Proper sampling is essential for accurately determining the water content of bulk materials, particularly with non-homogeneous samples. Many standard methods detail instructions to ensure proper sampling. As a general rule, the following guidelines should be followed: 1. The sample must be representative. The water content of the sample taken is the same as the average water content of the bulk material. 2.
METHODS OPTIMIZATION The ideal sample size can be estimated using the table by drawing a line from the expected water content to the amount of water in the sample corresponding to the desired titration reproducibility (relative standard deviation). The ideal sample size is indicated by where the drawn line intersects the ‘size of sample’ scale. Consider the line on the table as an example.
METHODS OPTIMIZATION Care should be taken to add a solid sample as fast as possible in order to minimize the amount of time that the sample port is open. It is also important to be sure that all of the sample reaches the solvent and does not make contact with, or stick to, the inner sides of the vessel cap. Losing even a small fraction of the sample mass will result in a high sample water content.
METHODS OPTIMIZATION vessel or other internal components of the cell may not be titrated with the rest of the sample. It is equally important that no drops remain on the tip of the needle. ‘Hanging drops’ will end up on the bottom of the septum. This will result in false low results for the determination. Liquid samples with high viscosity like honey can be added via a syringe without needle through the sample port following the steps outlined above.
METHODS OPTIMIZATION titration vessel. Dilutions are carried out using the ‘external dissolution’ sample type option. Anhydrous methanol is the solvent of choice for sample dilutions. If the sample contains fats or oils, then a mixture of methanol and chloroform can be used to promote solubility of the sample. The following outlines a generic dilution procedure: 1. Determine the mass of a dry flask equipped with a septum stopper. 2.
METHODS OPTIMIZATION 6. Facilitate extraction by shaking the solution or placing the solution on a stirring plate or in a sonicator. 7. Allow the insoluble portion of the sample to settle to the bottom of the extraction bottle. 8. Titrate an appropriately sized sample of the supernatant (solvent above the settled solid sample). 9.2.5.5 Homogenization Homogenization is recommended for non-aqueous or mixed phase liquid samples as well as solids with inhomogeneous distributions of water.
METHODS OPTIMIZATION 9.3 Karl Fischer Reagent System A wide variety of Karl Fischer reagents exist on the market today, each designed and formulated for specific sample matrices and titration conditions. Karl Fischer reagent systems consist of a solvent and a titrant. The solvent is the liquid to which the sample is added in the reaction vessel. The titrant is the iodine-containing liquid pumped into the cell during the titration. 9.3.
METHODS OPTIMIZATION on the type of alcohol included in the solvent. As the chain length of an alcohol’s alkyl or substituted alkyl group increases, the alcohol’s reactivity toward ketones and aldehydes decreases (i.e. methanol is the most reactive). Acetal or ketal formation can be prevented by the use of methanol-free reagents specially produced for this purpose. Reagents for aldehyde and ketone analysis replace methanol with higher alcohols, ethers, halogenated alkanes or similar combinations. 9.3.
METHODS OPTIMIZATION 9.3.4 Standardizing the Titrant Standardizing the Titrant, or determining the titer, is a routine and necessary part of accurate Karl Fischer analyses. The titrant should be standardized daily for greatest accuracy. Standardization serves to standardize the combination of parameters selected as part of a particular method and serve as a system check.
METHODS OPTIMIZATION 9-18
APPENDIX 1 Appendix 1. Contents A1 TECHNICAL SPECIFICATIONS ..............................................................
APPENDIX 1 A1-2
APPENDIX 1 A1 TECHNICAL SPECIFICATIONS Range Resolution Result Units Sample Type Determination Pre-Titration Conditioning Background Drift Correction Endpoint Criteria Dosing Result Statistics 100 ppm to 100% 1 ppm to (0.
APPENDIX 1 USB Flash Drive Laboratory Analytical Balance Printer Monitor Keyboard Methods and reports can be easily transferred between devices using a USB Flash Drive. Software upgrades are made easy.
APPENDIX 2 Appendix 2. Recommended Reagents A2 RECOMMENDED REAGENTS ................................................................ A2-3 A2.1 Titrants ................................................................................................A2-3 A2.1.1 1-component Titrants .............................................................................. A 2 - 3 A2.1.2 2-component Titrants............................................................................... A 2 - 3 A2.2 Solvents .............
APPENDIX 2 A2-2
APPENDIX 2 A2 RECOMMENDED REAGENTS A2.1 Titrants A2.1.1 1-component Titrants Sigma-Aldrich® 34805 34806 34816 34827 HYDRANAL® HYDRANAL® HYDRANAL® HYDRANAL® Composite Composite Composite Composite 5 2 5K 1 GFS Chemicals® 1600 WaterMark® Pyridine-Free Single Solution, 5 mg/mL 1601 WaterMark® Pyridine-Free Single Solution, 2 mg/mL J.T. Baker® 8890 HYDRA-POINT™ Comp 5 8891 HYDRA-POINT™ Comp 2 A2.1.
APPENDIX 2 A2.2.2 2-component Solvents GFS Chemicals® 1609 WaterMark® Solvent, Methanol-Free 1610 WaterMark® Solvent, General Purpose J.T. Baker® 8855 HYDRA-POINT™ Solvent G A2.3 Standards Sigma-Aldrich® 34803 34828 34847 34849 GFS Chemicals® 2302 KF Water Standard, 1.0 mg/g A2-4 HYDRANAL® HYDRANAL® HYDRANAL® HYDRANAL® Standard Sodium Tartrate Dihydrate Water Standard 1.00 Water Standard 0.10 Water Standard 10.
APPENDIX 3 Appendix 3. Accessories A3 TITRATOR COMPONENTS ....................................................................
APPENDIX 3 A3-2
APPENDIX 3 A3 TITRATOR COMPONENTS HI 900100 Pump assembly HI900522 Beaker for HI903 HI900570 Aspiration Tubing HI900580 Dispensing Tubing and fitting HI900520 Beaker Assembly HI900505 5 mL Burette Assembly HI900942 Tool for Burette Cap Removal HI900180 Air Pump A3-3
APPENDIX 3 HI900523 Dispensing tip, 2pcs HI900528 Solvent Port Plugs, 2pcs A3-4 HI900534 Waste Bottle HI900535 2 x Tubing for Solvent/ Waste Handling HI900536 2 x Tubing for Air Pump HI900530 Titrant Bottle Top Assembly HI900540 O-Ring Set HI900531 Solvent/Waste Bottle Top Assembly HI900527 Septum, 5pcs HI900532 Desiccant Cartridge for Beaker or Titrant HI900550 Desiccant, 250 g HI900533 Desiccant Cartridge for Solvent or Waste HI900946 Power Pack
APPENDIX 3 HI900941 Calibration Key HI900803 Manual (English) for HI 903 HI900900U PC Application on USB Flash Drive HI920013 USB Cable A3-5
APPENDIX 3 MAN HI903 10/13 A3-6
GENERAL APPLICATIONS BROCHURE HI 903 KARL FISCHER VOLUMETRIC TITRATOR Revision 1.00 www.hannainst.
Method ID: HI8001EN 5.0 mg/mL Titrant Standardization using a Liquid Water Standard for one-component titrant Description: Method for the standardization of 5.0 mg/mL OneComponent Karl Fischer Titrant using a Liquid Water Standard. The results are expressed in mg/mL.
Method ID: HI8001EN 5.0 mg/mL Titrant Standardization using a Liquid Water Standard for one-component titrant Results: Titration Report Method Name: Stdz 5mg/mL w/ water Std. Time & Date: 12:00 Jan 1, 2011 Standard Size: 1.0000 g Standard Conc.: 10.0000 mg/g Drift Value: 5.4 ug/min End Point Volume: 2.0341 mL Result: 4.9276 mg/mL Titration Duration: 4:19 [mm:ss] Estimated Cell Volume: 55.
Method ID: HI8002EN 2.0 mg/mL Titrant Standardization using a Liquid Water Standard for one-component titrant Description: Method for the standardization of 2.0 mg/mL OneComponent Karl Fischer Titrant using a Liquid Water Standard. The results are expressed in mg/mL. Electrode: HI 76320 Double Platinum Pin Electrode Reagents: 2 mg/mL One-Component KF Volumetric Titrant 1.
Method ID: HI8002EN 2.0 mg/mL Titrant Standardization using a Liquid Water Standard for one-component titrant Results: Titration Report Method Name: Stdz 2mg/mL w/ water Std. Time & Date: 12:00 Jan 1, 2011 Standard Size: 2.0000 g Standard Conc.: 1.0000 mg/g Drift Value: 5.0 ug/min End Point Volume: 1.0605 mL Result: 1.9103 mg/mL Titration Duration: 5:10 [mm:ss] Estimated Cell Volume: 60.
Method ID: HI8003EN 1.0 mg/mL Titrant Standardization using a Liquid Water Standard for one-component titrant Description: Method for the standardization of 1.0 mg/mL OneComponent Karl Fischer Titrant using a Liquid Water Standard. The results are expressed in mg/mL.
Method ID: HI8003EN 1.0 mg/mL Titrant Standardization using a Liquid Water Standard for one-component titrant Results: Titration Report Method Name: Stdz 1mg/mL w/ water Std. Time & Date: 12:00 Jan 1, 2011 Standard Size: 2.0000 g Standard Conc.: 1.0000 mg/g Drift Value: 5.0 ug/min End Point Volume: 1.8732 mL Result: 1.0824 mg/mL Titration Duration: 5:30 [mm:ss] Estimated Cell Volume: 64.
Method ID: HI8011EN 5.0 mg/mL Titrant Standardization using Disodium Tartrate Dihydrate for one-component titrant Description: Method for the standardization of 5.0 mg/mL OneComponent Karl Fischer Titrant using Disodium Tartrate Dihydrate water standard. The results are expressed in mg/mL. Electrode: HI 76320 Double Platinum Pin Electrode Reagents: 5 mg/mL One-Component KF Volumetric Titrant Disodium Tartrate Dihydrate, 15.
Method ID: HI8011EN 5.0 mg/mL Titrant Standardization using Disodium Tartrate Dihydrate for one-component titrant Results: Titration Report Method Name: Stdz 5mg/mL w/ Tartrate Time & Date: 12:00 Jan 1, 2011 Standard Size: 0.1000 g Standard Conc.: 15.66 % Drift Value: 4.0 ug/min End Point Volume: 3.1185 mL Result: 5.0329 mg/mL Titration Duration: 8:48 [mm:ss] Estimated Cell Volume: 69.
Method ID: HI8101EN Moisture Determination in Dairy Cream Description: Method for the determination of moisture in Dairy Cream. The results are expressed in % mass and should be between 70 and 80 %.
Method ID: HI8101EN Moisture Determination in Dairy Cream Results: Titration Report Method Name: Moisture in Dairy Cream Time & Date: 12:00 Jan 01, 2011 Sample Size: 0.0241 g Std. Titrant Conc.: 5.0000 mg/mL Drift Value: 4.7 ug/min End Point Volume: 3.4567 mL Result: 71.5481 % Titration Duration: 8:36 [mm:ss] Estimated Cell Volume: 65.72 mL Titration went to Completion Operator Name: Analyst Signature: ________________________ Titrator Application Methods: General Methods - r. 0.
Method ID: HI8102EN Moisture Determination in Milk Description: Method for the determination of moisture in Milk. The results are expressed in % mass and should be between 80 and 95 %.
Method ID: HI8102EN Moisture Determination in Milk Results: Titration Report Method Name: Moisture in Milk Time & Date: 12:00 Jan 01, 2011 Sample Size: 0.0188 g Std. Titrant Conc.: 5.0000 mg/mL Drift Value: 4.5 ug/min End Point Volume: 3.2614 mL Result: 86.5886 % Titration Duration: 6:18 [mm:ss] Estimated Cell Volume: 60.03 mL Titration went to Completion Operator Name: Analyst Signature: ________________________ Titrator Application Methods: General Methods - r. 0.
Method ID: HI8103EN Moisture Determination in Honey Description: Method for the determination of moisture in Honey. The results are expressed in % mass and should be between 15 and 20 %. At the end of the titration the “Sample Analysis Result” screen is displayed. The results are expressed in % mass of water.
Method ID: HI8104EN Surface Moisture Determination on White Sugar Description: Method for the determination of the surface moisture content of white sugar. The results are expressed in ppm and should be between 250 and 350 ppm. Electrode: HI 76320 Double Platinum Pin Electrode Use the numeric keypad to enter the exact weight and press “Enter” to start the analysis. At the end of the titration the “Sample Analysis Result” screen is displayed. The results are expressed in ppm of water.
Method ID: HI8104EN Surface Moisture Determination on White Sugar Results: Titration Report Method Name: Surface Moisture - Sugar Time & Date: 12:00 Jan 1, 2011 Sample Size: 7.5231 g Std. Titrant Conc.: 1.0000 mg/mL Drift Value: 5.7 ug/min End Point Volume: 2.4292 mL Result: 319 ppm Titration Duration: 4:42 [mm:ss] Estimated Cell Volume: 62.4 mL Titration went to Completion Operator Name: Analyst Signature: ________________________ Titrator Application Methods: General Methods - r. 0.
Method ID: HI8105EN Moisture Determination in Cooking Oil Description: Method for the determination of moisture in cooking oil. The results are expressed in ppm and should be between 200 and 800 ppm.
Method ID: HI8105EN Moisture Determination in Cooking Oil Results: Titration Report Method Name: Moisture in Cooking Oil Time & Date: 12:00 Jan 1, 2011 Sample Size: 4.0296 g Std. Titrant Conc.: 1.0000 mg/mL Drift Value: 3.4 ug/min End Point Volume: 2.6808 mL Result: 660 ppm Titration Duration: 6:30 [mm:ss] Estimated Cell Volume: 58.11 mL Titration went to Completion Operator Name: Analyst Signature: ________________________ Titrator Application Methods: General Methods - r. 0.
Method ID: HI8106EN Moisture Determination in Butter by external dissolution Description: Method for the determination of moisture in Butter by external dissolution. The results are expressed in % mass and should be between 15 and 20 %.
Method ID: HI8106EN Moisture Determination in Butter by external dissolution Method Parameters: Results: Name: Moisture in Butter Method Revision: 1.0 Type: Sample Analysis Predispensing Amount: None Pre-Analysis Stir Time: 10 Sec Stirring Speed: 900 RPM Stirbar Type: Medium Drift Entry: Automatic Solvent: Methanol Sample Parameters: Sample Determ.: External Dissolution Sample Name: Butter Sample Size: 0.7500 g External Solvent Size: 40.0000 g External Solvent Conc.: 0.0100 % Extracted Sample Size: 3.
Method ID: HI8107EN Moisture Determination in Margarine by external dissolution Description: Method for the determination of moisture in Margarine by external dissolution. The results are expressed in % mass and should be between 15 and 30 %.
Method ID: HI8107EN Moisture Determination in Margarine by external dissolution Method Parameters: Results: Name: Moisture in Margarine Method Revision: 1.0 Type: Sample Analysis Predispensing Amount: None Pre-Analysis Stir Time: 10 Sec Stirring Speed: 900 RPM Stirbar Type: Medium Drift Entry: Automatic Solvent: Methanol Sample Parameters: Sample Determ.: External Extraction Sample Name: Margarine Sample Size: 0.7500 g External Solvent Size: 40.0000 g External Solvent Conc.: 0.
Method ID: HI8108EN Moisture Determination in Mayonnaise by external extraction Description: Method for the determination of moisture in Mayonnaise by external extraction. The results are expressed in % mass and should be between 40 and 60 %.
Method ID: HI8108EN Moisture Determination in Mayonnaise by external extraction Method Parameters: Results: Name: Moisture in Mayonnaise Method Revision: 1.0 Type: Sample Analysis Predispensing Amount: None Pre-Analysis Stir Time: 10 Sec Stirring Speed: 900 RPM Stirbar Type: Medium Drift Entry: Automatic Solvent: Methanol Sample Parameters: Sample Determ.: External Extraction Sample Name: Mayonnaise Sample Size: 0.7500 g External Solvent Size: 40.0000 g External Solvent Conc.: 0.
Method ID: HI8201EN Moisture Determination in Shampoo Description: Method for the determination of water in Shampoo. The results are expressed in % mass and should be between 70 and 90 %.
Method ID: HI8201EN Moisture Determination in Shampoo Results: Titration Report Method Name: Moisture in Shampoo Time & Date: 12:00 Jan 1, 2011 Sample Size: 0.0200 g Std. Titrant Conc.: 5.0000 mg/mL Drift Value: 5.4 ug/min End Point Volume: 3.2010 mL Result: 79.9207 % Titration Duration: 7:19 [mm:ss] Estimated Cell Volume: 106.37 mL Titration went to Completion Operator Name: Analyst Signature: ________________________ Titrator Application Methods: General Methods - r. 0.
Method ID: HI8202EN Moisture Determination in Hand Cream Description: Method for the determination of moisture in Hand Cream. The results are expressed in % mass and should be between 50 and 75 %. Electrode: HI 76320 Double Platinum Pin Electrode Reagents: 5 mg/mL One-Component KF Volumetric Titrant Dry Methanol Dry Chloroform needle, dip the end of the needle briefly in the solvent.
Method ID: HI8202EN Moisture Determination in Hand Cream Results: Titration Report Method Name: Moisture Hand Cream Time & Date: 12:00 Jan 1, 2011 Sample Size: 0.0244 g Std. Titrant Conc.: 5.0000 mg/mL Drift Value: 5.4 ug/min End Point Volume: 2.6925 mL Result: 67.3125 % Titration Duration: 6:48 [mm:ss] Estimated Cell Volume: 106.37 mL Titration went to Completion Operator Name: Analyst Signature: ________________________ Titrator Application Methods: General Methods - r. 0.
Method ID: HI8301EN Moisture Determination in Solvent with 5 mg/mL Titrant (One-Comp.) for external dissolution or extraction Description: Method for the determination of moisture in extraction/dissolution solvent using 5 mg/mL OneComponent Titrant. The results are expressed in % mass and should be less than 0.1%.
Method ID: HI8301EN Moisture Determination in Solvent with 5 mg/mL Titrant (One-Comp.) for external dissolution or extraction Results: Titration Report Method Name: Solvent w/ 5mg/mL 1-comp. Time & Date: 12:00 Jan 01, 2011 Sample Size: 0.9580 g Std. Titrant Conc.: 5.0000 mg/mL Drift Value: 4.0 ug/min End Point Volume: 0.1157 mL Result: 0.0595 % Titration Duration: 2:06 [mm:ss] Estimated Cell Volume: 57.
TITRATION THEORY TITRATION THEORY Principles HI 903 KARL FISCHER VOLUMETRIC TITRATOR Revision 1.0 www.hannainst.
TITRATION THEORY 2
TITRATION THEORY Contents 1 1.1 1.2 1.3 GENERAL REVIEW OF TITRATION THEORY ............................................................................. Introduction to Titrations .................................................................................................. Uses of Titrations .............................................................................................................. Advantages and Disadvantages of Titrations ...........................................................
TITRATION THEORY 4
TITRATION THEORY 1 GENERAL REVIEW OF TITRATION THEORY 1.1 Introduction to Titrations A titration is a quantitative, volumetric procedure used in analytical chemistry to determine the concentration of an analyte (the species being measured) in solution. The concentration of the analyte is determined by slowly adding a titrant (reagent) to the solution. As the titrant is added, a chemical reaction occurs between the titrant and the analyte.
TITRATION THEORY 1.3 Advantages and Disadvantages of Titrations Some advantages of titrations, as an analytical technique, are: • More precise results than many instrumental methods, such as measurement by electrode, the accuracy of the measurement is up to 0.1%; • Simple methods, reasonable capital costs, and easy training; • Suitability to measure major components of a mixture or product; • Automation can reduce time and labor spent on each analysis.
TITRATION THEORY 2 TYPES OF TITRATIONS 2.1 Titrations According to The Measurement Method 2.1.1 Amperometric Titrations An amperometric titration is performed by placing two electrodes (often a metal electrode and a reference electrode) into the sample solution and holding the potential of the metal electrode at a selected voltage. The current that flows, due to the oxidation or reduction of a reactant or product, is plotted vs.
TITRATION THEORY electrode, are monitored to show the progress of the titration. Potentiometry is the measurement of a potential under conditions of zero current flow. The measured potential can then be used to determine the analytical quantity of interest, generally a component concentration of the analyte solution.
TITRATION THEORY 2.2 Titrations According to The Reaction Type 2.2.1 Karl Fischer Titrations This method is based on a well-defined chemical reaction between water and the Karl Fischer reagent. The chemistry provides excellent specificity for water determination. The method can be used to determine free and bound water in a sample matrix.
TITRATION THEORY of reaction decreases and titration endpoint become increasingly difficult to reach. If the pH exceeds 8, side reactions begin to occur between iodine and hydroxide or methylate ions, changing the titration stoichiometry. While solvents not containing alcohols can be used for Karl Fischer analysis, they also have an effect on reaction stoichiometry. When alcohols are not present, the reaction resembles the Bunsen reaction stoichiometry where the consumption ratio of water to iodine is 2:1.
TITRATION THEORY Bivoltametric indication involves measuring the voltage required to maintain a constant current flow between electrode elements. A small direct or alternating current called a polarization current (Ipol) is applied between the electrode pins or rings and the resulting voltage is measured in order to monitor the titration progress.
TITRATION THEORY Figure 3 pCl Figure 3 shows a traditional titration curve. The curve is obtained by plotting the pH value against the volume of NaOH added. 2.2.3 Argentometric Titrations Argentometric titrations use silver (nitrate) as the titrant and are generally precipitation titrations, as many silver salts are insoluble. These titrations are commonly used to titrate and determine the concentration of bromide, chloride, cyanide, iodide, and sulfide.
TITRATION THEORY titrant that binds strongly to it. Often these titrants contain EDTA or CDTA, polydentate ligands that form very stable coordination compounds with metal ions. The complexation reaction must be fast in order to be useful for direct titration. Some metal ions react too slowly with EDTA for a direct titration. An indicator electrode that responds to the metal ion can be used to monitor the titration progress. The titration curve will appear similar to a usual potentiometric titration.
TITRATION THEORY carboxylic acids, enols, phenols, imides, sulfonic acids, and inorganic acids. Water or lower alcohols are suitable for titrating medium to strong acids (pKa less than 5). Titrating a weaker acid with a strong base titrant requires a solvent less acidic than water or ethanol/methanol. Solvents such as acetone, acetonitrile, t-butyl alcohol, dimethlyformamide, isopropanol and pyridine have been found to work well for acid-base titrations of strong, medium and weak acids/ bases.
TITRATION THEORY Figure 6. Figure 7. Visual indicators such as Ferrion are also available. The oxidized and reduced form of the indicator will have different colors and can be used to determine the end point. Various reductants can be determined by titrants with oxidants such as potassium permanganate, potassium chromate or iodine. Commonly used reductants that are used as titrants include sodium thiosulfate, and ferrous ammonium sulfate.
TITRATION THEORY Potential, glass electrode, mV Figure 8.
TITRATION THEORY 3 INTRODUCTION TO TITRATION APPARATUS AND TYPICAL TITRATION PROCEDURE 3.
TITRATION THEORY 3.2 Automatic Titration Automatic titrators are high-precision analytical instruments that deliver the titrant, monitor the physical change associated with the titration reaction, automatically stops at the endpoint and calculates the concentration of the analyte. Automatic titrators are best for repetitive titrations and high-accuracy analyses. An automatic titrator must have an accurate liquid dispensing system.
TITRATION THEORY 4 TITRATION RESULTS 4.1 Accuracy The factors most critical to achieving accurate results with the HI 900 titration systems are the concentration of the sample, size of the sample and having an optimized set of method parameters. 4.2 Repeatability Repeatability, or the agreement between replicate determinations, is expressed quantitatively as the relative standard deviation (RSD). 4.3 Sources of Error One of the advantages of volumetric analysis is excellent accuracy and precision.
TITRATION THEORY 4.3.2.2 Dispensing Errors Incorrect dispensing due to: • Dead valve volume and leaking valve; • Inaccuracy in motor drive and gear lash/ backlash; • Poor burette/ piston seal; • Non-uniform diameter of burette glass cylinder; • Chemical incompatibility with tubing or bubble generation; • Density/ temperature changes in titrant. • Inadaquate volume to cover electrode. 4.3.
TITRATION THEORY 5 CALCULATIONS 5.1 Equations Used in Volumetric Karl Fischer Titrations 5.1.1 Calculation of water content as % mass from samples measured by mass C sample V titrant Titer m sample Concentration of Sample (% w/w) Volume of Titrant (mL) Titrant Titer (mg/mL) Mass of Sample (g) 5.1.
TITRATION THEORY 5.1.5 Calculation of water content in External Dissolution Samples C sample m solvent m sample C solution C solvent Concentration of Sample (% w/w) Mass of Solvent (g) Mass of Sample (g) Water Content of Dissoluted Sample (w/w) Water Content of Solvent (w/w) 5.1.
TITRATION THEORY 5.1.9 Calculation of titer (water equivalent of the titrant) using water standards C titrant m sample C standard V titrant Titrant Titer (mg/mL) Mass of Sample (g) Water Content of Standard (mg/g) Volume of Titrant (mL) 5.2 Equations Used in Titrations The main variables used in calculating a result from a titration are the sample volume, the concentration of the titrant, and the volume of titrant required to reach the equivalence point.
TITRATION THEORY By Mass C titrant m standard Ratio FW standard V titrant Titrant Concentration (N) Mass of Standard (g) Equivalence ratio of titrant/standard (eq titrant/ mol standard) Formula Weight of the Standard (g/mol) Volume of Titrant (L) By Volume C titrant V standard C standard V titrant Concentration of titrant (N) Volume of Standard (mL) Concentration of standard (eq/L) Volume of Titrant
TITRATION THEORY C sample1 C sample2 C sample3 V titrant 1 V titrant 2 V titrant 3 C titrant Ratio FW analyte 1 FW analyte 2 FW analyte 3 m sample Sample 1 Concentration (g/100g) Sample 2 Concentration (g/100g) Sample 3 Concentration (g/100g) Volume of titrant required to reach the first end point (L) Volume of titrant required to reach the second end point (L) Volume of
TITRATION THEORY 6 GLOSSARY Acid A chemical species that can donate one or more protons (hydrogen ions). Acid-Base Titration Stoichiometric neutralization titrations, based upon the reaction that occurs between an acid and base. Activity A physical property corresponding to the concentration of all ions in a solution. Electrodes respond to activity.
TITRATION THEORY End point The point where a titration is stopped because a physical change in the solution has indicated a completed titration. Titration end points typically coincide with the equivalence point. A fixed value end point (pH or mV), can be used as well. The titration will stop at the desired point regardless if the titration is complete. Equivalence point The point where the quantity of titrant is stoichiometrically equal to the quantity of analyte.
TITRATION THEORY Neutralization A chemical reaction where an acid and a base react to form a neutral salt and water. Non-aqueous A solution that does not contain water. Non-aqueous Titration A titration that is preformed in non-aqueous solutions. Typically used to titrate very weak acid and bases to eliminate the leveling effect water has on all acids and bases dissolved in it. Normal The concentration of a solution which accounts for any stoichiometric difference between the various species in a solution.
TITRATION THEORY Spectrophotometric Titration A titration in which the end point is marked by a change in the color and/or color intensity. Stoichiometry The quantitative relationship of the reactants and products in a chemical reaction. Titrant The chemical added in a titration that causes the given reaction to occur. Titration A quantitative, volumetric procedure used in analytical chemistry to determine the concentration of an analyte in solution.
TITRATION THEORY Titr THEORY 903 09/12 30