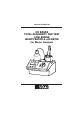
Instruction Manual HI 84442 TOTAL ALKALINITY FOR VERY LOW RANGE MINITITRATOR & pH METER for Water Analysis w w w. h a n n a i n s t .
Dear Customer, Thank you for choosing a Hanna product. This manual will provide you with the necessary information for the correct use of the instrument. Please read it carefully before using the meter. If you need additional technical information, do not hesitate to e-mail us at tech@hannainst.com. This instrument is in compliance with directives. TABLE OF CONTENTS PRELIMINARY EXAMINATION.................................................................................................
PRELIMINARY EXAMINATION Please examine this product carefully. Make sure that the instrument is not damaged. If any damage occurred during shipment, please notify your Dealer. Each HI 84442 minititrator is supplied complete with: • HI 1131B pH electrode • HI 7071S Filling solution (30 mL) • HI 7662-M Temperature probe • HI 84442-50 Titrant Stock solution (100 mL) (must be diluted before use) • HI 84442-55 Pump calibration solution (100 mL) • HI 7061M Cleaning solution (230 mL) • HI 7004M pH 4.
the instrument accuracy is assured. The instrument employs a powerful and effective built-in algorithm to analyze the pH response to determine the exact pH endpoint, then uses this to make the necessary calculations. The Titratable Alkalinity determination is instantaneously displayed in selected measurement units on the large dot matrix display. The instrument is ready for the next analysis immediately.
Potentiometric end point detection using a pH electrode is more objective than using visual end point determinations with color changing indicators. The HI 84442 minititrator is a potentiometric titrator. The instrument also can be used as a pH meter. The volume of titrant dispensed necessary to reach the end point is then used to calculate the water alkalinity expressed in mg/L as CaCO3 meq/L as CaCO3.
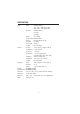
SPECIFICATIONS Titrator Range Titratable alkalinity: mg/L : 3.00 - 10.00 mg/L as CaCO3 meq/L : 0.06 - 0.20 meq/L as CaCO3 Resolution Titratable alkalinity: 0.01 mg/L 0.01 meq/L Accuracy 5% of reading Titration method Acid-base titration Principle End point titration: 4.50 pH Pump debit 0.5 mL/min Stirring speed 700 rpm Log data Up to 50 samples pH meter pH meter -2.0 to 16.0 pH / -2.00 to 16.00 pH pH Resolution: 0.1 pH / 0.01 pH pH Accuracy: ± 0.
REQUIRED REAGENTS Code HI 84442 - 50 HI 84442 - 55 Description Titrant Pump Calibration Solution Quantity/Test 1 mL 1 mL PRINCIPLE OF OPERATION Water alkalinity determination is performed by titration with acid reagent to pH end point. Alkalinity is expressed as: • Total alkalinity determination by titration at 4.5 pH (following the reactions): If sample ph > 8.
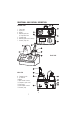
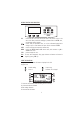
FUNCTIONAL AND PHYSICAL DESCRIPTION OVERHEAD VIEW 1. 2. 3. 4. Titrant bottle Graphic LCD Keypad Dedicated guide tube for Temperature Probe 5. Electrode holder 6. Dedicated guide tube for titrant tip 7. Peristaltic pump tube FRONT VIEW REAR VIEW 8. Temperature probe 9. pH Electrode 10. Beaker 11. BNC electrode connector 12. Temperature probe socket 13. Power switch 14. Power adapter connector 15.
KEYPAD FUNCTION AND INDICATORS - used to leave the current screen and to return either to the previous screen or to the main screen. When pressed while modifying a parameter within the SETUP menu, exits parameter without changing it.
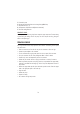
5. Functional key area 6. Indicates that the displayed value can be changed using ARROW keys 7. Temperature value (°C, °F) 8. pH temperature compensation mode (Manual or Automatic) 9. Stirrer and reading status area PERISTALTIC PUMP Peristaltic pumps are self priming. Liquid never contacts the pump components. The titrant tubing is pressed along the rotating rollers of the pump. The rollers compress the tubing, driving the titrant to the dispensing tip.
SETUP CONFIGURATION MENU The titrator’s setup configuration menu may be accessed from the pH or titration screens by pressing the MENU key, then Setup. A list of setup parameters will be displayed with currently configured setting. While in the setup menu it is possible to modify the instrument’s operation parameters. The ARROW keys permit the user to scroll the setup parameters. Press HELP to view the contextual help. Press ESC to return to the main screen. Concentration unit Options: mg/L, meq/L.
Temperature unit Options: °C, °F. Press the function key in order to change the temperature unit. Backlight Options: 0 to 8. Press Modify to access the backlight level. / in order to Use the ARROW keys or increase/decrease the displayed constrast. Press Accept to confirm or ESC to return to the setup menu. Contrast Option: 0 to 20. This option is used to set the display’s contrast. Press Modify to change the display’s contrast. Use the ARROW keys or / in order to increase/decrease the value.
Date / Time This option is used to set the instrument’s date and time. Press Modify to change the date/time. Press / to highlight the value to be modified (year, month, day, hour, minute or second). Use the ARROW keys to change the value. Press Accept to confirm the new value or ESC to return to the setup. Time format Option: AM/PM or 24 hours. Press the functional key to select the new value. Date format Press Modify to change the Date Format. Use the ARROW keys to select the desired format.
Language Press the corresponding function key to change the language. If the new selected language cannot be loaded, the previously selected language will be reloaded. Tutorial If no language can be loaded at startup the instrument will work in the “safe mode”. In “safe mode” all the messages are displayed in English and tutorial and help information are not available. This option is used to enable/disable tutorial mode. If enabled this option will provide the user short guides on the screen.
ELECTRODE PREPARATION PREPARATION PROCEDURE Remove the electrode protective cap. DO NOT BE ALARMED IF ANY SALT DEPOSITS ARE PRESENT. This is normal with electrodes and they will disappear when rinsed with distilled water. During transport tiny bubbles of air may have formed inside the glass bulb. The electrode cannot function properly under these conditions. These bubbles can be removed by "shaking down" the electrode as you would do with a glass thermometer.
ELECTRODE CALIBRATION PROCEDURE It is recommended to calibrate the instrument frequently, especially if high accuracy is required. The pH electrode should be recalibrated: a) Whenever the pH electrode is replaced b) At least once a week c) After testing aggressive chemicals and after electrode is cleaned d) When high accuracy is required e) If the pH calibration expired warning is displayed during measurement.
• The (unstable measurement) symbol will be shown on the display until the reading becomes stable. • When the reading is stable and close to the selected buffer, the (unstable measurement) symbol will disappear and the Confirm key will become active. • Press Confirm to confirm the calibration. • Press ESC to exit calibration. Notes:• To clear a previous calibration and to return to the default value, press Clear at any time after entering calibration mode.
• The calibrated value will be shown on the display and the third expected buffer value will be automatically selected. • After the second calibration point has been confirmed, press ESC to exit without performing the third calibration point. Point 3 calibration • Remove the electrode holder with electrodes from the top of the beaker. • Place the third buffer solution in a beaker and place in beaker holder. Rinse the probes in a beaker with third buffer rinsing solution.
• If the measured offset isn’t within the preset limits the meter will display the message “Buffer Contaminated” alternatively with ”Electrode Dirty/Broken”. • If the computed slope isn’t within the preset limits the meter will display the message “Wrong Slope”. If the slope is too high the symbol will be displayed. If the will be displayed. slope is too low the symbol • If the “Wrong Old Slope” error message is displayed, an inconsistency exists between the current and the previous (old) calibration.
pH BUFFER TEMPERATURE DEPENDENCE The temperature has an effect on pH. The calibration buffer solutions are affected by temperature changes to a lesser degree than normal solutions. During calibration the instrument will automatically calibrate to the pH value corresponding to the measured or set temperature. During calibration the instrument will display the pH buffer value at 25 °C. TEMP pH BUFFERS °C °F 4. 01 8. 30 10. 01 0 32 4.01 8.48 10.32 5 41 4.00 8.44 10.24 10 50 4.00 8.41 10.
PUMP TUBE INSTALLATION To mount the new peristaltic pump tube follow next steps: • Position one peristaltic pump fixing ring on its location. • Stretch the tube over the peristaltic pump rolls. • Fix the second pump fixing ring on its location. • Attach the tube to the reagent bottle. Note: Purge the peristaltic pump until drops of reagent appears on the dosing tip by pressing the PURGE key from the titrator main screen.
Press CAL to access the titration calibration menu where electrode and pump calibration may be accessed. Press HELP to view the contextual help. • Press Continue or ESC to skip the message and enter Titrator main screen. • Press Purge to begin a purge cycle. The purging stops automatically after 5 minutes. To stop purging at any time and return to the main screen press ESC or Stop. During a purge, the remaining time until the purge process will be completed is shown on the lower right side of the display.
After 5 minutes purging interval has elapsed, the “Completed” message is displayed. Another purge period can be initiated by pressing Restart or press ESC to return to main titrator screen. PUMP CALIBRATION PROCEDURE The pump calibration must be performed each time the titrant bottle or the pH electrode is changed. It is recommended the pump calibration to be performed before each set of titrations. Verify: The electrode has been calibrated in 4.01 pH buffer.
The instrument displays the date and time of the last electrode calibration, and the date and time of the last pump calibration, or calibration expired messages. • Press Pump. The next screen will be displayed. • Press Start. • After the pump calibration is started, on the upper right side of the display two animations will be shown in order to indicate that the pump and the stirrer are working.
• If the calibration doesn’t complete within 6 minutes the error message “Too much standard” will be displayed and the calibration can be restarted by pressing Restart after a new standard is prepared. • When pump calibration is complete, carefully unscrew electrode holder with pH electrode, temperature probe and titrant top intact. Hold over rinse beaker and rinse off with distilled or deionized water. Remove beaker and rinse out.
• Insert the dosing tip in the appropriate holder place. • From the titrator main screen press Titration. To enter titrator main screen from pH meter mode press Titrator and then Continue. • Press Start to begin the titration process. • After the titration is started on the upper right side of the display two animations will be shown in order to indicate that the pump and the stirrer are running. On the lower right side of the display is shown the period of time since the titration has been started.
• Remove electrode holder. Rinse the electrode into waste container. • Prepare a fresh sample and place on titrator. Place the temperature probe and the electrode in the appropriate guides. • Immerse the titrant tip and use care not to dislodge titrant from dispensing tip. Note: If the end-point is not reached or it is not recognized or the input reading is out of range, an error message will be displayed. The titration can be restarted after a new sample is prepared by pressing Restart.
Press Delete to enter delete record screen. Press Delete All to enter delete all records screen. Press More to view additional information of the measurement. Press Unit to convert the result between meq/L and mg/L. Press ESC to return to the previous screen. Use the ARROW keys when is displayed to scroll between the log records. If Delete was pressed the instrument will ask for confirmation. Use the ARROW keys to focus on the record to be deleted.
TITRATOR GLP INFORMATION Press MENU while in Titration mode and then GLP. From this screen it is possible to select between viewing the electrode GLP or the pump GLP. Press GLP elec. to view the electrode’s last calibration parameters and date. Press GLP pump to view the pump’s last calibration time and date. If GLP elec. is pressed one of the next screens will be displayed. GLP contains a set of information regarding electrode calibration.
The pump GLP displays the Time and Date of the last pump calibration. If a calibration hasn’t been performed the message “Not Calibrated” will be displayed. pH MEASUREMENT The HI 84442 may be used as a pH meter for direct measurements. Verify that the instrument has been calibrated before taking pH measurements. Set the instrument to pH meter. At power up the instrument enter pH meter mode. From titrator mode press ESC until pH units are displayed.
Press LOG to memorize the current reading. A message indicating the free log space will be displayed for a few seconds. In order to take pH measurements follow the next steps: • Submerge the pH bulb 2 cm (0,8’’) and the temperature probe into the sample to be tested and stir gently. Allow time for the electrode to stabilize. When the reading becomes stable the (unstable measurement) symbol will disappear. • If the pH readings are less than -2.00 or greater than 16.00 pH the closest full-scale value (-2.
VIEW OR DELETE PREVIOUSLY LOGGED RECORDS Press MENU key while in pH meter screen. Press Recall to access the pH recall. A list of records is stored in the pH log. Use the ARROW keys to scroll the list of records. Press More to see detailed information about the highlighted record. Press Delete to enter record deleting mode. Press Delete All to enter all records deleting mode. If More is pressed a complete set of data is displayed. Use ARROW keys when is displayed to scroll between the records.
Deleting a record will renumber the list of records. If Delete All was pressed the instrument will ask for confirmation. Press Confirm to delete all records or ESC to return to the previous screen without deleting. If the pH log is empty the message “No Records!” will be displayed. pH METER GLP INFORMATION The pH meter GLP information references the last pH calibration data. To view this information press MENU key while in pH meter mode then GLP.
TEMPERATURE CALIBRATION PROCEDURE (for technical personnel only) All the instruments are factory calibrated for temperature. HANNA’s temperature probes are interchangeable and no temperature calibration is needed when they are replaced. If the temperature measurements are inaccurate, temperature recalibration should be performed. For an accurate recalibration, contact your dealer or the nearest HANNA Customer Service Center, or follow the instructions below.
• Immerse the temperature probe in the second vessel as near as possible to the reference thermometer. Allow a few seconds for the probe to stabilize. • Use the ARROW keys to set the calibration point value to that of the hot water, measured by the reference thermometer. • The (unstable measurement) symbol will be shown on the display until the reading becomes stable.
TROUBLESHOOTING GUIDE SYMPTO MS PRO BLEM SO LU TI O N Slow resp onse/excessive d rift. D irty p H electrod e. Soa k the electrod e tip HI 7061 clea ning solution for 30 minutes. Refill with fill solution. Rea d ing fluctua tes up a nd d own (noise). Clog g ed /d irty junction. L ow electrolyte level (refilla b le p H electrod es only). Ca b le connection. Clea n the electrod es. Refill with fresh fill solution. Check ca b le connection to meter a nd verify p rotective ca p is removed .
ELECTRODE CONDITIONING AND MAINTENANCE STORAGE PROCEDURE To assure a quick response time, the glass bulb should be kept moist and not allowed to dry out. Replace the solution in the protective cap with a few drops of HI 70300 or HI 80300 Storage Solution. Follow the Preparation Procedure section before taking measurements. Note: NEVER STORE THE pH ELECTRODE IN DISTILLED OR DEIONIZED WATER. PERIODIC MAINTENANCE Inspect the electrodes and the cables.
ACCESSORIES REAGENTS HI 84442-50 HI 84442-55 HI 84442-70 Titrant solution for low range (100mL) Pump calibration solution (100mL) Reagents kit for low and high range (about 500 titrations) pH CALIBRATION SOLUTIONS HI 7004M Buffer solution pH 4.01 (230mL) HI 70083M Buffer solution pH 8.30 (230mL) HI 7010M Buffer solution pH 10.01 (230mL) HI 7004M-6 Buffer solution pH 4.01 (6 x 230mL) HI 70083M-6 Buffer solution pH 8.30 (6 x 230mL) HI 7010M-6 Buffer solution pH 10.
WARRANTY HI 84442 is warranteed for two years against defects in workmanship and materials when used for its intended purpose and maintained according to the instructions. This warranty is limited to repair or replacement free of charge. Damage due to accident, misuse, tampering or lack of prescribed maintenance is not covered. If service is required, contact your dealer. If under warranty, report the model number, date of purchase, serial number and the nature of the failure.
SALES AND TECHNICAL SERVICE CONTACTS Australia: Tel. (03) 9769.0666 • Fax (03) 9769.0699 China: Tel. (10) 88570068 • Fax (10) 88570060 Egypt: Tel. & Fax (02) 2758.683 Germany: Tel. (07851) 9129-0 • Fax (07851) 9129-99 Greece: Tel. (210) 823.5192 • Fax (210) 884.0210 Indonesia: Tel. (210) 4584.2941 • Fax (210) 4584.2942 Japan: Tel. (03) 3258.9565 • Fax (03) 3258.9567 Korea: Tel. (02) 2278.5147 • Fax (02) 2264.1729 Malaysia: Tel. (603) 5638.9940 • Fax (603) 5638.9829 Singapore: Tel. 6296.