
Owner manual


9
START UP
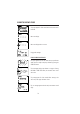
• Place the instrument on a flat table. Do not place the instrument on direct sun light.
• Connect the titrator to mains socket with ground connection and the correct voltage and
frequency. See the label on the instrument rear for this.
• Place the peristaltic pump tube on the pump. See the Pump Tube Replacement section for the
procedure.
• Remove the reagent bottle cap and place the bottle cap of the tubes set. Place the reagent
bottle in the appropriate place on the titrator top.
• Turn the instrument ON using the power switch from the rear panel of the instrument and wait
until it displays dashes.
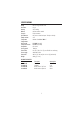
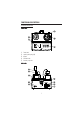
1) Selected mode: SETUP, CAL or CFM for confirming different values
2) Stability indicator: when reading is unstable or calibration is in progress
3) Stirrer active tags
4) Calibration messages
5) Pump active tags
6) Calibration messages
7) “pH” tag: when a buffer is displayed on the secondary display
8) Four digit and half secondary display
9) “Time” tag: when the time is displayed on the secondary display
10) Four digit and half main display
11) “pH” upper tag: when performing a pH calibration or entering SETUP mode to change the end-point
12) Automatic Temperature Compensation: when ATC blinks the temperature probe is not connected
and the temperature value will be considered to be 25
0
C.