Instruction Manual HI 504920 Remote User Interface pH Meter w w w . h a n n a i n s t .
Dear Customer, Thank you for choosing a Hanna Instruments Product. Please read this instruction manual carefully before using the instrument. This manual will provide you with all the necessary information for correct use of the instrument. If you need additional technical information, do not hesitate to e-mail us at tech@hannainst.com. This instrument is in compliance with directives.
PRELIMINARY EXAMINATION Remove the instrument from the packing material and examine it carefully to make sure that no damage has occurred during shipping. If there is any damage, notify your Dealer. Each meter is supplied complete with: • HI 62920 Amplified pH electrode with built-in temperature sensor, DIN connector and 2 m cable • Hanna HI 504910 interface cable (HI 7920) • pH 4.01 buffer, 1 sachet (20 mL) • pH 7.01 buffer, 1 sachet (20 mL) • Instruction Manual • 1.
through a password protection method. The Battery Error Preventing System (BEPS) detects when the batteries level becomes weak. When the batteries are getting low, a clear indication is displayed on LCD to warn the user of this condition. However, the meter continues to measure correctly even when the low battery indication is displayed. The meter automatically switches itself off when the batteries are too weak to support proper function.
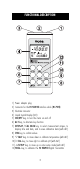
FUNCTIONAL DESCRIPTION 1) 2) 3) 4) 5) 6) 7) Power adapter plug Connector for the HI 504910 interface cable (HI 7920) Electrode Connector Liquid Crystal Display (LCD) ON/OFF key, to turn the meter on and off ALT key, to alternate key function DISPLAY / CAL DATA key, to select measurement ranges, to display time and date, and to view calibration data (with ALT) 8) CFM key, to confirm values 9) CALT key, to move down or calibrate temperature (with ALT) 10) CAL key, to move right or calibrate pH (with ALT)
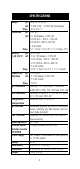
SPECIFICATIONS Range pH mV Temp. Resolution pH mV Temp. pH (@20°C/68°F) mV Accuracy Typical EMC Deviation Temp. pH mV Temp. pH Calibration mV Calibration Temperature Compensation pH Electrode ORP Electrode Input Impedance Infrared optical interface towards HI 504910 Power supply Casing Environment Dimensions Weight -4.00 to 19.99 pH ±600.0 mV ; ±2000 mV autoranging -20 to 120 °C 0.01 pH 0.1 mV between ±400 mV 0.2 mV from +400 to +600 mV 0.2 mV from -400 to -600 mV 1 mV outside 0.
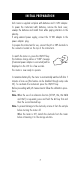
INITIAL PREPARATION Each meter is supplied complete with batteries and 12 VDC adapter. To power the instrument with batteries, remove the back cover, unwrap the batteries and install them while paying attention to the polarity. If using external power supply, connect the 12 VDC adapter to the power adapter plug. To prepare the instrument for use, connect the pH or ORP electrode to the connector located on the top of the instrument. To switch the meter on, press the ON/OFF key.
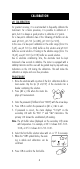
CALIBRATION pH CALIBRATION For greatest accuracy, it is recommended to frequently calibrate the instrument. For a faster procedure, it is possible to calibrate at 1 point, but it is always a good practice to calibrate at 2 points. For a two-point calibration two of the following pH buffers can be used: pH 4.01, pH 7.01 (or 6.86), pH 10.01 (or 9.18). In the case of a two-point calibration in the acidic range (from 0 to 7 pH), use pH 7.01 (or 6.86) buffer as first solution and pH 4.
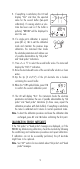
. If everything is satisfactory the LCD will display "Stor" and then the expected value for the second buffer (two-point calibration). If a wrong solution or electrode has been used or if the buffer is polluted, "WRONG" will be displayed to alert the user. 10. If a single point calibration is required, press (ALT+) CAL to exit the calibration mode and maintain the previous slope calibration.
mV CALIBRATION Contact your nearest Hanna Service Center for periodic mV calibration. It is recommended to have the meter recalibrated for mV reading at least every two years. TEMPERATURE CALIBRATION (for technical personnel only) Contact your nearest Hanna Service Center for periodic temperature calibration. It is recommended to have the meter recalibrated for temperature reading at least every two years.
USE AS REFERENCE pH METER HI 504910 QUICK pH CALIBRATION HI 504910 can be calibrated frequently through HI 504920 without interrupting the normal measurement. This is accomplished through a single point pH calibration at the pH value of the solution monitored by HI 504910. Perform the following steps: 1. Connect the supplied infrared optical interface cable (HI 7290) to the calibrator and to the HI 504910 Digital Transmitter. 2.
Note: At point 5, if the probe offset is outside the allowed limits, if HI 504910 is configured to measure ORP, or if some other error occurs, the LCD shows a blinking "bAd" message. To cancel this message and return to normal mode, press TXCAL. Then restart the calibration procedure from the beginning.
HI 504910 pH READING CHECK The check of the HI 504910 pH reading against the HI 504920 pH reading is possible at any time. Perform the following steps: • Connect the infrared optical interface cable to HI 504910. • Press (ALT+) TXCAL. • The primary LCD shows the HI 504910 pH reading and the secondary one displays the HI 504920 pH reading. Both pH tags blink alternatively. • Press (ALT+) TXCAL to return to normal mode.
SETUP MODE Setup can be used to view data regarding instrument status (e.g. battery charge) or to change the meter parameters (e.g. time). • To enter this mode press (ALT+) SETUP while the meter is in measurement mode. • The setup code "00" will blink on the secondary LCD and "SEt" will be displayed on the primary one. • Select the code of the desired parameter using the or key. • Press CFM to confirm the code.
PARAMETER SETTINGS • Once the parameter code (and password if needed) has been entered, the current value of the selected parameter will be displayed on the primary LCD and the parameter code on the secondary one. The parameter or a part of it will blink (e.g. only the hour blinks if time has been selected). • Enter the new value using the arrow keys. • If there is another part of the parameter to be set (e.g.
1 2 The meter automatically checks for entered time/date accuracy as follows: 0≤hh≤23; 0≤mm≤59; 01≤dd≤28/29/30/31; 1≤MM≤12; 1998≤YYYY≤2097. To change the password, the correct code must be entered first. If the password has been forgotten, the password protected features are no longer accessible; in this case contact your nearest Hanna Service Center. Some of the setup parameters are explained below.
TAKING MEASUREMENTS pH MEASUREMENTS Connect the pH electrode with the built-in temperature sensor to the meter and press ON/OFF to power on the instrument. If the electrode is not connected the LCD will display the "no probe" message and then dashes. For greatest accuracy, it is recommended to set the Calibration alarm time-out to the value appropriate to your specific use and calibrate the meter as soon as the "DATE" warning symbol blinks on LCD (see GLP section).
ORP MEASUREMENTS Connect the ORP electrode to the meter and press the ON/OFF key. The meter automatically sets the mV range. If the electrode is not connected the LCD will display the "no probe" message and then dashes. To take ORP measurements, remove the electrode protective cap and simply submerge the tip (4 cm/1½") of the electrode in the solution to be tested, stir gently and allow for the reading to stabilize. Note: The ORP electrodes are not provided with the temperature sensor.
GOOD LABORATORY PRACTICE (GLP) GLP is a set of functions that allows the storage or retrieval (when necessary) of data regarding the maintenance and status of the electrode. The meter can automatically analyze the data and advise the user with a clear message if a problem is found. PROBE LIFE VERIFICATION At the end of calibration, the meter checks if the electrode offset is within ±30 mV range and the slope between 53.5 and 62 mV/pH.
• The LCD will then display the last pH calibration date. • Press DISPLAY to scan remaining data, in the following order: last calibration time; electrode offset value in mV ("OFF" appears on the secondary LCD); electrode slope in mV/pH ("SLP" appears on the secondary LCD); first calibration point buffer; second calibration point buffer (only if a 2-point calibration has been performed). If calibration was performed with an old or dead probe, the message "old probe" or "dead probe" will scroll on LCD.
BATTERY REPLACEMENT When the batteries are inserted and no power adapter is connected, the meter can recognize two different batteries charge levels. 1. Weak batteries - "bAt" indication is displayed on the secondary LCD alternating the temperature reading. The meter can still work for about 10 hours. 2. Dead batteries - meter shuts off and stops working to avoid erroneous readings. Battery replacement must only take place in a non hazardous area using 1.5V alkaline AA type batteries.
TEMPERATURE-RESISTANCE CORRELATION FOR HANNA pH SENSITIVE GLASS The resistance of glass electrodes partially depends on the temperature. The lower the temperature, the higher the resistance. It takes longer time for the reading to stabilize if the resistance is higher. In addition, the response time will suffer to a greater degree at temperatures below 10°C.
ELECTRODE CONDITIONING AND MAINTENANCE Note: To prevent damage to the electrode, remove the pH electrode from the sample before turning the meter off. If the meter is OFF, detach the electrode from the meter before immersing the electrode in the storage solution. PREPARATION Remove the protective cap. DO NOT BE ALARMED IF SALT DEPOSITS ARE PRESENT. This is normal with electrodes and they will disappear when rinsed with water. During transport tiny bubbles of air may form inside the glass bulb.
Replace the solution in the protective cap with a few drops of HI 70300 Storage Solution. Follow the Preparation Procedure above before taking measurements. Note: NEVER STORE THE ELECTRODE IN DISTILLED WATER OR DRY. PERIODIC MAINTENANCE Inspect the electrode and the cable. The cable used for connection to the meter must be intact and there must be no points of broken insulation on the cable or cracks on the electrode stem or bulb. Connectors must be perfectly clean and dry.
• Dry Membrane/Junction: Soak in Storage Solution HI 70300 for at least 1 hour. • Drifting: Soak the electrode tip in warm Hanna Solution HI 7082 for 1 hour, then flush tip with distilled water. Refill with fresh HI 7071 for single junction electrodes and HI 7082 for double junction electrodes. • Low Slope: Refer to the cleaning procedure above. • No Slope: Check the electrode for cracks in glass stem or bulb and replace the electrode.
ORP PRETREATMENT SOLUTIONS HI 7091L HI 7092L Reducing Pretreatment solution, 460 mL bottle Oxidizing Pretreatment solution, 460 mL bottle ELECTRODES HI 62920 HI 32920 HI 3619D HI 3620D pH electrode with built-in temperature sensor, matching pin, Titanium-body, DIN connector & 2m (6.6') cable Combination ORP/Pt electrode, Titanium-body with DIN connector & 2m (6.6') cable Combination ORP/Pt electrode, glass-body, single junction, with DIN connector & 1m (3.
CE DECLARATION OF CONFORMITY Recommendations for Users Before using this product, make sure that it is entirely suitable for the environment in which it is used. Operation of this instrument in residential area could cause unacceptable interferences to radio and TV equipments, requiring the operator to take all necessary steps to correct interferences. The glass bulb at the end of the electrode is sensitive to electrostatic discharges. Avoid touching this glass bulb at all time.
MAN504920 02/03 w w w . h a n n a i n s t .