
User Guide


11
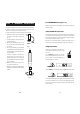
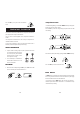
D.O. MEASUREMENTS (in ppm or %)
Make sure the meter has been calibrated (see page 12) and the protective cap
has been removed.
Salinity and Altitude compensation
If the sample contains significant concentration of salinity or if you are perform-
ing measurements at an altitude different from sea level, the readout values
must be corrected, taking into account the lower degree of oxygen solubility in
these situations as explained on pages 18-20.
Remember to set the altitude and/or the salinity before taking any D.O.
measurements. The meter will automatically compensate for these factors.
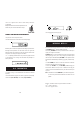
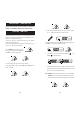
Taking measurements
Immerse the tip of the probe in the sample to be
tested. Make sure the temperature sensor is also
immersed.
Press the RANGE key to display D.O. measure-
ments. Allow approximately one minute for the
meter to stabilize and read the ppm value of
Dissolved Oxygen on the display.
Press the RANGE key to change the reading from ppm to % and vice-versa.
For accurate Dissolved Oxygen measurements, a water movement of 0.3 m/sec
is required at a minimum. This is to ensure that the oxygen-depleted mem-
brane surface is constantly replenished. A moving stream will provide ad-
equate circulation.
30
PROBE & MEMBRANE MAINTENANCE
The oxygen probe body is made of reinforced plastic for maximum durability.
A thermistor temperature sensor provides temperature measurements of the
sample. Use the protective probe cap when not in use.
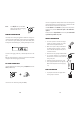
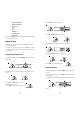
To replace the membrane or refill with electrolyte, proceed as follows:
• Remove the protective cap by gently twisting
and pulling it off the body of the probe (see
fig. 1).
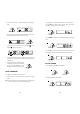
• Unscrew the membrane cap by turning it coun-
terclockwise (see fig.2).
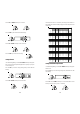
• Wet the sensor by soaking the bot tom 2½
cm (1") of the probe in electrolyte (HI 7041S)
for 5 minutes.
• Rinse the new membrane cap (HI 76407A)
supplied with the meter with electrolyte solu-
tion while shaking it gently. Refill with clean
electrolyte solution.
• Gently tap the sides of the membrane cap
with your finger tip to ensure that no air
bubbles remain trapped. Do not directly tap
the bottom with your finger as this will dam-
age the membrane.
• Make sure that the rubber O-ring sits prop-
erly inside the membrane cap.
• With the sensor facing down, slowly screw the
membrane cap clockwise. Some electrolyte will
overflow.
TWIST
AND
PULL
fig. 1
UNSCREW
fig. 2