
Quick Start Guide


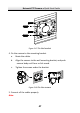


Table Of Contents
- 1 Overview
- 2 Installation
- 2.1 Installing the Memory Card
- 2.2 Installing DE1Axxx(I) Series PTZ Camera
- 2.3 Installing DE2Axxx(I) Series PTZ Camera
- 2.4 Installing DE2xxx(I) Series PTZ Camera
- 2.5 Installing DE3xxx Series PTZ Camera
- 2.6 Installing DY3xxx Series PTZ Bullet Camera
- 2.7 Installing DE4AxxxI Series PTZ Camera
- 2.8 Installing DE3AxxxI Series PTZ Camera
- 2.9 Installation of Network Cable Water-proof Jacket
- 2.10 Installation of Water-proof Tape
- 3 Setting the PTZ Camera over the LAN
- 4 Accessing via Web Browser
- 5 Operating via Hik-Connect App

Network PTZ Camera·Quick Start Guide
49
Figure 2-70 Water-proof Accessory Components
Table 2-1 Components
No. Components
1 Camera’s Network Interface Socket
2 O-Type Gasket
3 Network Plug
4 Waterproof Endcap
5 Waterproof Rubber Gasket
6 Lock Nut
7 Network Cable from Router/Switch
Steps:
1. Feed the plugless network cable ⑦ through the lock nut ⑥,
waterproof rubber gasket ⑤ (the rubber gasket inset ridge must
face the waterproof endcap), and the waterproof endcap ④ in
order.
2. Crimp an RJ-45 network plug ③onto the end of the cable, taking
care to insert the twisted pairs of wires in correct order.
3. Place the O-type gasket ② onto the end of the camera’s network
interface socket ①.
4. Insert the network plug ③ into the camera’s network interface
socket①.