
Quick Start Guide


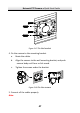


Table Of Contents
- 1 Overview
- 2 Installation
- 2.1 Installing the Memory Card
- 2.2 Installing DE1Axxx(I) Series PTZ Camera
- 2.3 Installing DE2Axxx(I) Series PTZ Camera
- 2.4 Installing DE2xxx(I) Series PTZ Camera
- 2.5 Installing DE3xxx Series PTZ Camera
- 2.6 Installing DY3xxx Series PTZ Bullet Camera
- 2.7 Installing DE4AxxxI Series PTZ Camera
- 2.8 Installing DE3AxxxI Series PTZ Camera
- 2.9 Installation of Network Cable Water-proof Jacket
- 2.10 Installation of Water-proof Tape
- 3 Setting the PTZ Camera over the LAN
- 4 Accessing via Web Browser
- 5 Operating via Hik-Connect App

Network PTZ Camera·Quick Start Guide
42
Rotate C
ounterclockwise
Separate the Base Plate from the
PTZ Camera
Figure 2-60 Separate the Base Plate from the PTZ camera
2. Attach the drill template (supplied) to the place where you want
to fix the PTZ camera, and drill a hole in the ceiling according to
the template.
212
Ø
Figure 2-61 Drill Template
3. Align the cable holes of the base plate to the cable holes of the
in-ceiling bracket and then fix the base plate onto the bracket with
the four screws in the package (supplied), as shown in Figure 2-59.