
Quick Start Guide


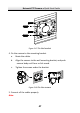


Table Of Contents
- 1 Overview
- 2 Installation
- 2.1 Installing the Memory Card
- 2.2 Installing DE1Axxx(I) Series PTZ Camera
- 2.3 Installing DE2Axxx(I) Series PTZ Camera
- 2.4 Installing DE2xxx(I) Series PTZ Camera
- 2.5 Installing DE3xxx Series PTZ Camera
- 2.6 Installing DY3xxx Series PTZ Bullet Camera
- 2.7 Installing DE4AxxxI Series PTZ Camera
- 2.8 Installing DE3AxxxI Series PTZ Camera
- 2.9 Installation of Network Cable Water-proof Jacket
- 2.10 Installation of Water-proof Tape
- 3 Setting the PTZ Camera over the LAN
- 4 Accessing via Web Browser
- 5 Operating via Hik-Connect App

Network PTZ Camera·Quick Start Guide
40
1. Drill screw holes on the plane surface according to the dimensions
of base-mounted camera.
2. Insert four M6 hexagon socket screws (with length of 30 mm)
through the camera bracket and the plane structure, and then
lock the screw nuts to fix the camera, as shown in Figure 2-55.
Figure 2-58 Install Base-mounted Camera
Note:
Water-proof treatment is required for cable connectors. Refer to
section 2.9 and 2.10 for details.
2.7 Installing DE4AxxxI Series PTZ Camera
DE4AxxxI series (IR) PTZ camera supports ceiling mounting and
in-ceiling mounting.
Note:
Wall mounting, pendant mounting, and installation with junction box
are supported for DE4AxxxI series (IR) PTZ camera. The
corresponding accessories shall be purchased separately.