
User's Manual
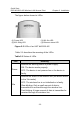

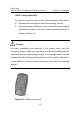
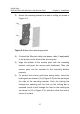
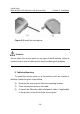
Table Of Contents

Quick Start
H3C WA2110-AG Wireless LAN Access Point
Chapter 2
Installation
2-7
3) Mount the mounting bracket to a wall or ceiling, as shown in
Figure 2-4.
Figure 2-4 Mount the mounting bracket
4) Connect the Ethernet cable (and power cable, if applicable)
to the port(s) on the front of the access point.
5) Align the bottom of the access point with the mounting
bracket, and press the access point backward. Then, the
access point can be mounted in the mounting bracket
properly.
6) To prevent the access point from being stolen, insert the
locking bar (as shown in (1) of
Figure 2-5) into the opening in
the side of the mounting bracket. Push the locking bar
through the opening until the hole on the locking bar is
exposed. Insert a lock through the hole on the locking bar
(as shown in (2) of
Figure 2-5), and then close the lock to
secure it in place.