
Hangar 9 P-51 Mustang 20cc Manual


11 EN
P-51D Mustang 20cc
FLAP INSTALLATION
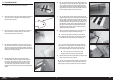
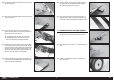
1. Remove the fl aps and aileron from the wing panel.
2. Locate the two fl ap control horns. When installed, the concave
portion of the horn (as indicated in the drawing) will face
toward the top of the fl aps.
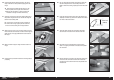
3. Use a pin vise and 1/16-inch (1.5mm) drill bit to remove any
paint from the hole in the fl ap control horn for the clevis.
Prepare all the control horns at this time.
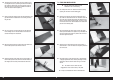
4. Use medium-grit sandpaper to remove any paint from the
fl ap control horn where it fi ts into the fl ap. Clean the sanded
area using a paper towel and isopropyl alcohol to remove any
debris or oils. Removing the paint provides the surface texture
necessary for the epoxy to bond to.
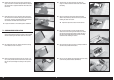
5. Remove the fl ap from the wing. Run your fi nger down
the leading edge of the fl ap to locate the area for the fl ap
control horn. Use a hobby knife and #11 blade to remove
the covering, exposing the slot for the control horn. Use
15-minute epoxy to glue the fl ap control horn in position.
Remove any excess epoxy using a paper towel and isopropyl
alcohol.
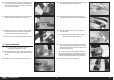
6. Run your fi nger down the lower surface leading edge of the
fl ap to locate the areas for the fl ap hinges. Use a hobby knife
and #11 blade to remove the covering, exposing the holes
for the fl ap hinges. Test fi t the hinges to the fl ap. Do not use
any adhesives now. Slide the hinge into position. Position as
shown, checking to make sure it can move freely.
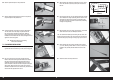
7. Run your fi nger down the lower surface trailing edge of the
wing to locate the areas for the fl ap hinges. Use a hobby knife
and #11 blade to remove the covering, exposing the holes for
the fl ap hinges. Check the fi t of the fl ap to the wing. The top
of the fl ap will align to the top of the wing. It will also line up
with the aileron. The fl ex point of the hinges will align with
the hinge line of the fl aps when installed properly. Test the
operation of the fl ap to make sure the hinges are properly
aligned and the fl ap movies freely.
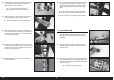
8. Apply a small amount of petroleum jelly to the fl ex point of
the hinge to prevent epoxy from entering the hinge.
Use care to only apply the petroleum jelly to the flex
point. If applied to the hinge portion, it could cause the epoxy
not to adhere to the hinge, resulting in a poor glue joint.
The flaps must be positioned to the wing before the
epoxy begins to cure. Make sure to read through all the steps
before mixing any epoxy. Glue only one flap at a time to
allow enough working time to properly install the hinges.
Use 15-minute or 30-minute epoxy to allow
enough working time during the hinge installation.
9. Remove the fl ap from the wing and remove the hinges. Apply
epoxy into each of the holes in the fl ap.
Do not use an excessive amount of epoxy when gluing the
hinges so that it expels from the hinge. Also make sure to use
enough epoxy so it securely adheres the hinge to the surfaces.