
User Manual

7
Required Parts
• Float (right and left) • Servo hatch (2)
• Strut bracket (4) • Rubber boot (2)
• Servo (2)
• 4-40 x 3/8-inch socket head bolt (2)
• Rudder assembly (right and left)
• Fuel tubing, 1/4-inch (6mm) (3)
• 10
1
/
4
-inch (260mm) front wire brace w/fittings (2)
• 11-inch (280mm) rear wire brace w/fittings (2)
• 19
1
/
4
-inch (489mm) horizontal wire brace (2)
• #2 x 1/2-inch sheet metal screw (8)
• 8-32 x 1
1
/
4
-inch socket head bolt w/shoulder (4)
• 18-inch (457mm) servo extension (2)
• Aluminum cross brace 1 x 20
1
/
2
-inch (front and rear)
• 4-40 x 1/2-inch socket head bolt (8)
• 27
1
/
2
-inch (700mm) rudder pushrod (2)
• 8
1
/
2
-inch (216mm) rear diagonal strut (2)
• 7
1
/
2
-inch (190mm) front diagonal strut (2)
• 14
1
/
2
-inch (370mm) side diagonal strut (2)
• 8-32 x 3/4-inch socket head bolt w/shoulder (4)
Required Tools and Adhesives
• Phillips screwdriver: #1 • Pin drill
• Drill bit: 5/64-inch (2mm) • Silicone sealant
• Hobby knife w/ #11 blade • Adjustable wrench
• Ball driver: 3/32-inch, 1/8-inch
• Hex wrench: 1.5mm (included in float kit)
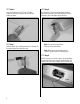
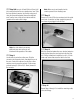
oo Step 1
Use painter's tape to tape a piece of plastic or waxed
paper over the opening for the servo hatch.
oo Step 2
Apply a bead of silicone sealer around the edge of the
servo hatch. Tape the hatch tightly against the float. The
silicone will create a gasket that will seal the opening after
the servo has been installed.
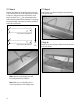
o Step 3
Repeat Steps 1 and 2 for the remaining float. Since the
silicone will take overnight to dry, it is a good idea to have
them both drying to speed assembly the next day.
oo Step 4
Once the silicone has had time to dry, use a hobby knife
to trim any that extends outside the hatch.
Step 5
Repeat Steps 1 thorugh 4 to create a silicone seal for the
weight access hatch for both the left and right float.
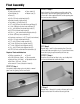
Float Assembly