
User Manual

15
Required Parts
• 8-32 x 3/4-inch socket head bolt
standard thread (8)
• 8-32 x 3/4- inch socket head bolt w/shoulder (4)
• 8-32 x 3/4-inch socket head bolt
from the original J-3 Cub kit(4)
• Strut bracket (4)
Required Tools and Adhesives
• Ball driver: 1/8-inch • Adjustable wrench
• Hobby knife • Medium CA
• Threadlock
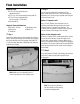
Step 1
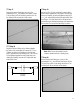
Remove the landing gear from the fuselage. Use a hobby
knife to remove the covering over the bolt holes to expose
the blind nuts at the rear of the fuselage. Use eight 8-32
x 3/4-inch socket head bolts to attach the strut mounting
bracket to the fuselage.
Note: Make sure to use threadlock on the
screws to prevent them from vibrating loose.
Step 2
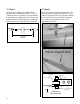
You will need to prepare for the connection of the
water rudder servos at this time. There are two options,
depending on if you are using a computer radio and plan
on using mixing or not:
Option 1: Computer radio
Use a 12-inch (304mm) servo extension from an
auxillary channel that has been mixed to the rudder
channel. Secure a Y-harness to the extension. The
Y-harness will be mounted so the ends can be accessed
from the outside of the fuselage in the next step.
Option 2: Non-Computer radio
Connect a Y-harness to the rudder channel at the receiver.
On one end of the harness, connect the rudder servo.
On the other, connect another Y-harness. Make sure to
secure all connections so they do not become unplugged
accidentally. The second Y-harness will be mounted so the
ends can be accessed from the outside of the fuselage in
the next step.
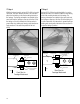
Step 3
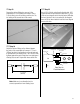
Cut a small notch in the side of the fuselage to mount the
end of the Y-harness so the lead from the float can
be plugged in.
Hint: Be sure and use silicone to
seal the connector to the covering
to provide a watertight seal.
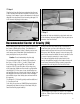
Float Installation