
Visor Handheld User Guide

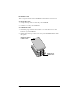
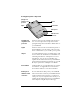
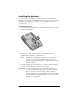
Table Of Contents
- Visor™ Handheld User Guide
- Windows Edition
- Contents
- About This Guide
- Introduction to Your Visor Handheld
- Getting to know your Visor handheld
- Installing the batteries
- Tapping and typing
- Customizing your handheld
- Entering Data in Your Visor Handheld
- Using Graffiti writing to enter data
- Using the onscreen keyboard
- Using your computer keyboard
- Importing data
- Using an external keyboard
- Managing Your Applications
- Overview of Basic Applications
- Common Tasks
- Application Specific Tasks
- Date Book
- Date Book Plus
- Address
- To Do List
- Memo Pad
- Calculator
- CityTime
- Expense
- Communicating Using Your Handheld
- Managing desktop E-Mail away from your desk
- In Mail, you can do the following:
- Setting up Mail on the desktop
- Synchronizing Mail with your E-Mail application
- Opening the Mail application on your handheld
- Viewing e-mail items
- Creating e-mail items
- Looking up an address
- Adding details to e-mail items
- Storing e-mail to be sent later
- Editing unsent e-mail
- Draft e-mail
- Filing e-mail
- Deleting e-mail
- Removing e-mail from the Deleted folder
- Purging deleted e-mail
- Message list options
- HotSync options
- Creating special filters
- Truncating e-mail items
- Mail menus
- Beaming information
- Managing desktop E-Mail away from your desk
- Advanced HotSync® Operations
- Selecting HotSync setup options
- Customizing HotSync application settings
- IR HotSync operations
- Conducting a HotSync operation via modem
- Conducting a HotSync operation via a network
- Using File Link
- Creating a user profile
- Setting Preferences for Your Handheld
- In the Preferences screens, you can do the following:
- Viewing preferences
- Buttons preferences
- Connection preferences
- Digitizer preferences
- Formats preferences
- General preferences
- Network preferences and TCP/IP software
- Selecting a service
- Entering a user name
- Entering a password
- Selecting a connection
- Adding telephone settings
- Connecting to your service
- Creating additional service templates
- Adding detailed information to a service template
- Creating a login script
- Deleting a service template
- Network preferences menu commands
- TCP/IP troubleshooting
- Owner preferences
- ShortCuts preferences
- Maintaining Your Handheld
- Troubleshooting Tips
- Creating a Custom Expense Report
- Non-ASCII Characters for Login Scripts
- Warranty and Other Product Information
- Index

Chapter 1 Page 7
Using the backlight
If you have difficulty seeing the information on your Visor handheld,
you can use the backlight to illuminate your screen.
To activate the backlight:
■ Press the power button and hold it down for about two seconds.
Release the button when the backlight turns on.
Tip: In addition, you can assign the full-screen pen stroke to
activate the backlight. See “Pen preferences” in Chapter 9 for
more information.
To turn off the backlight:
■ Press and hold the power button for about two seconds. The
backlight also turns off automatically (after a period of inactivity)
with the Auto-off feature. See “General preferences” in Chapter 9
for more information.
Contrast
Control
Displays the contrast control screen where you can
adjust the appearance of the screen for the clearest
screen display. Depending on the lighting conditions
or temperature of the environment where you use
your handheld, you may need to adjust the contrast.
To adjust the contrast, drag the slider or tap the
arrows to increase or decrease the contrast. To fine
tune the contrast, press the scroll buttons on the front
panel of your handheld.
Power
button/
backlight
control
Turns your Visor handheld on or off and controls the
backlight feature. If your Visor handheld is turned
off, pressing the power button turns the unit on and
returns you to the last screen you viewed.
If your Visor handheld is turned on, pressing the
power button turns the unit off. Holding the power
button down for about two seconds turns the
backlight on or off.
Microphone
Records sounds for use with Springboard expansion
modules that support this feature.