Getting started with your Husky fex21 Please read these instructions before using your Husky fex21 Contains important safety information
Contents USING YOUR fex21 SETTING UP How to adjust the screen contrast How to use the screen backlight How to use the pen How to enter data How to move the cursor How to reset your fex21 Batteries How to check the batteries Main battery status How to charge the battery How to replace the battery Cleaning Peripherals Problems AC Power Adapter Modem European Modem Only (CTR21) USA Modem Only (FCC part 68) Electromagnetic Compatibility
Contents © Copyright 1999 WPI Husky Technology Limited All Rights Reserved The information stored in this document is copyright and may not be reproduced, stored in a retrieval system in any form or by any means, electronic, mechanical, photocopying or otherwise without prior permission from the copyright holder, WPI Husky Technology Limited.
Contents Read ALL this leaflet before using your fex21. It contains essential information about setting up your computer and getting started. This is not intended to be an exhaustive guide to the computer. Refer to the fex21 Developer’s Guide (supplied on CD-ROM) for further information about using and maintaining your fex21. USING YOUR fex21 Your HUSKY fex21 computer is rugged and water resistant.
Contents • Slot the battery pack into your fex21 by locating the two small lugs in the side of the computer unit and pressing the battery pack firmly in place until the two small catches click into position. 2. Switch the unit on After fitting the battery, press the ù key at the top centre of the keyboard TWICE to switch your fex21 on - it may take a few seconds before the screen displays data. To switch off, press the key again.
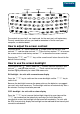
Contents Contrast Power Backlight The controls on your fex21 are simple and, for the most part, self-explanatory. The only combination of keys you need to remember is that to reset your computer, as detailed below. How to adjust the screen contrast To the left of the ù switch, below the ú symbol, there are two keys, one marked ÷ and the other marked ø. Press the key marked ÷ to increase the screen contrast and the key marked ø to decrease the screen contrast.
Contents How to use the pen Your fex21 is supplied with a special pen or stylus with which to click on the display screen icons to enable you to navigate through the application software installed on your computer. You can also use your finger instead of the pen to tap the screen. The pen is stored in the bottom of the computer, alongside the standard serial port (COM1).
Contents NOTE: For the soft RESET to work correctly, the screen must be displaying data while the three keys are held down. Take care not to hold the keys down for more than 16 seconds or the unit will perform a hard RESET (as detailed below). Hard RESET Press and hold down the three keys ú÷, úø, and the ù key for between 16 and 32 seconds. When you use Hard RESET you lose the Windows CE registry and all data stored in RAM. You also have to re-calibrate your fex21.
Contents Main battery status If the main battery status is shown as High, your battery should not need charging in the next few hours. If the status is shown as Low, you should consider changing or recharging the battery within the next hour or so. However, if the status is shown as Critical, you should change or re-charge the battery immediately. You will not lose the Windows CE registry or any data held in RAM while you change or re-charge the battery.
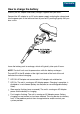
Contents How to charge the battery Use only the AC adapter and battery charger supplied with your fex21. Connect the AC adapter to an AC mains power supply and plug the charge lead into the power port at the left-hand front of your fex21, pushing it gently until you hear a click. Leave the battery pack to recharge, which will typically take up to 2 hours. NOTE: The fex21 unit must be powered on while the battery recharges.
Contents How to replace the battery CAUTION: Before removing the old battery pack, check that the fex21 pen is not slotted into the unit. Attempting to remove the battery pack while a pen is fitted may cause damage to both battery pack and pen. • • Switch off the unit. • Fit a new battery pack into your fex21by locating the two small lugs in the side of the computer unit and pressing the battery pack firmly in place until the two small catches click into position.
Contents Cleaning If the screen of your fex21 should become dirty, clean it with a dry, clean cloth. If the computer gets very dirty, clean it as follows: • Make sure the battery is correctly fitted. If you have dropped your fex21, check that the case is intact. • • Wipe the unit with a damp cloth. • Blow any water out of the connectors, then leave the unit to drain and air-dry. DO NOT EXPOSE THE UNIT TO TEMPERATURES ABOVE 50°C. • Polish the screen with a clean cloth.
Contents Peripherals CAUTION: Connect only approved cables and peripherals to your fex21. • • • • • • To connect a suitable peripheral : Switch off your fex21 and peripheral. If fitted, remove the protective cap from the appropriate connector. Fit the peripheral to the connector. Use connector locking mechanisms where fitted. Switch on the fex21 and peripheral.
Contents AC Power Adapter CAUTION: Use the ac power adapter only after reading and understanding the following instructions. • Hazardous voltages inside. No user serviceable parts inside. Do not attempt to open. • • • • Use indoors only. • Inspect adapter before connecting. Do not use if there are signs of damage or deterioration. • • • • • Ensure connectors are firmly mated. • • Do not attempt to use the special AC Adapter to power other equipment. Avoid liquid spillage.
Contents Modem If your fex21 contains a modem, read these important notes before using it: • • Connect the cable to the fex21 before connecting it to the network. • Use only the supplied telephone cable, which incorporates a radio interference suppresser. • • • • Use only as instructed. Where applicable, connect the cable so that the end closest to the ferrite bead is attached to the fex21 unit. Do not connect to the telephone network if the unit is wet. Do not attempt to open or modify the unit.
Contents The REN is used to determine the quantity of devices, which may be connected to the telephone line. Excessive REN’s on the telephone line may result in the devices not ringing in response to an incoming call. In most, but not all areas, the sum of REN’s should not exceed five (5.0). To be certain of the number of devices that may be connected to a line, as determined by the total REN’s, contact the local telephone company.
Contents Electromagnetic Compatibility CAUTION! Approved accessories only may be used with this equipment. In general, all cables must be high quality, shielded, correctly terminated and normally restricted to 2 metres in length. Husky AC adapters employ special provisions to avoid radio interference and should not be altered or substituted. Unapproved modifications or operations beyond or in conflict with these instructions for use may void authorisation by the authorities to operate the equipment.
WPI HUSKY TECHNOLOGY has offices in the following countries UK Eden Road, Walsgrave Triangle Business Park Coventry CV2 2TB, England Int Tel: +44 24 7660 4040 Int Fax: +44 24 7660 3060 E-mail: support@husky.co.uk USA 18167 US 19 North, Suite 285 Clearwater, Florida 33764 USA Int Tel: +1 727 530 4141 Int Fax: +1 727 536 9906 E-mail: techsupport@huskyinc.com France 12 Rue Le Corbusier, SILIC 216 94518 RUNGIS Cedex, France Int Tel: +33 1 46 87 8009 Int Fax: +33 1 45 60 5595 E-mail: support_technique@husky.co.