00034352 00034353 www.hama.com Hama GmbH & Co KG Postfach 80 86651 Monheim/Germany Tel. + 49 (0) 90 91 / 5 02-0 Fax + 49 (0) 90 91 / 5 02-2 74 hama@hama.com www.hama.
l PS2 Wireless Controller “Amazing” 2,4 Ghz Funktioniert auch in Verbindung mit PSone und PlayStation® Herzlich Willkommen! Vielen Dank für den Kauf des Wireless Controllers „Amazing“ 2,4GHz zur Verwendung mit der Videospielekonsole PlayStation 2®. Der Controller ist vollständig programmierbar und verfügt über zwei Motoren, die in unterstützten Spielen eine Vibration erzeugen.
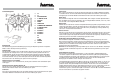
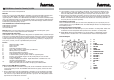
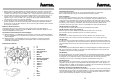
Controllerdiagramm: 1 2 3 4 5 6 7 8 9 0 t z u i [ ] 17 ä 18 ä L2 L1 RICHTUNGSPAD L-ANALOG-STICK RED LED MODE GREEN LED GUMMIERTER HANDGRIFF R-ANALOG-STICK BUTTON X BUTTON ö BUTTON ä BUTTON Δ R1 R2 START MACRO SELECT Richtungspad Mit dem Richtungspad wird die Bewegungsrichtung von Objekten gesteuert. Im digitalen Modus ist dies die Hauptrichtungssteuerung. Analoge Sticks Mit den beiden analogen Sticks werden jeweils zwei Achsen gesteuert (X- und Y-Achse).
So belegen Sie Tasten neu: 1. Drücken Sie die MACRO-Taste, bis die MACRO-LED aufleuchtet. Dadurch wird die Programmierungsfunktion aktiviert. 2. Drücken Sie eine der vier Tasten L2, L3, R2 oder R3, die Sie austauschen möchten, bis die MACRO-LED blinkt. 3. Drücken Sie die gewünschte Taste, mit der Sie die Position der in Schritt 2 gedrückten Taste belegen möchten. 4. Drücken Sie die MACRO-Taste, um die Programmierungsfunktion zu deaktivieren. Die MACRO-LED erlischt. 5.
L PS2 Wireless Controller “Amazing” 2,4 GHz Also works with PSone and PlayStation® Welcome Thanks for purchasing the 2.4GHz Wireless Controller to use onto PlayStation 2® video game console. The 2.4GHz Wireless Controller is fully programmable and has dual motors in supported games. In addition, the 2.
Directional Pad The D-pad controls the direction in which objects move. This is the primary directional control in digital mode. Analog Sticks The two analog sticks each control two axeis' (X- and Y-axis). Different games will allow you to modify the way the analog sticks react. While in Analog Mode, any game that is Vibration Function Compatible will cause the Advance Controller to vibrate at different levels, depending on what actions are taking place in the game (e.g. fighting, crashing, or shooting).
¬ Contrôleur Wireless PS2 »Amazing« 2,4 GHz Resetting the 2.4GHz Wireless Controller to default: To reset the 2.4GHz Wireless Controller back to its default settings: 1. Press the MACRO button to turn the programming function on. The MACRO led will be illuminated indicating that the programming function is active. 2. Press the button you wish to reset, the MACRO led will flashes. 3. Press the MACRO button to turn the programming function OFF. The MACRO led will be turn off.
2. Mettez 3 batteries du type AAA dans le contrôleur. Allumez le contrôleur via l’interrupteur d’alimentation. La DEL de devant (rouge) s’allume et le pavé recherche un signal en 10 secondes. Si le pavé trouve un signal, la DEL « RX » s’allume (jaune) pour indiquer la connexion. 3. Si le contrôleur ne trouve pas de connexion, veuillez appuyer sur le bouton Auto-Scan se trouvant à la face supérieure du récepteur. Si la DEL « RX » (jaune) clignote, veuillez répéter les points 1 et 2.
Remarque : Pour la nouvelle occupation et pour la programmation de touches, le récepteur Wireless doit être branché à la console PlayStation®. Il n’est pas possible de jouer pendant la programmation. Programmation de touches Le contrôleur est entièrement programmable ce qui vous permet de faire des mouvements rapides si nécessaire. Quant à quelques jeux (souvent des jeux de combat), des attaques plus compliquées sont réalisées grâce à une combinaison du pavé directionnel et des touches d’action.
: PS2 Wireless Controller “Amazing” 2,4 Ghz Functioneert ook in combinatie met PSone en PlayStation® Hartelijk welkom! Hartelijk dank voor de aanschaf van de Wireless Controller „Amazing“ 2,4Ghz voor het gebruik met de video-game-console PlayStation 2®. De controller is volledig te programmeren en beschikt over twee motoren die, bij tril-ondersteunde spellen, een trilling veroorzaken.
Controllerdiagram: 1 2 3 4 5 6 7 8 9 0 t z u i [ ] 17 ä 18 ä L2 L1 D-PAD L-Analoge-STICK Rode LED MODE (KIEZEN) Groene LED Handgreep uit rubber R-Analoge-STICK X-TOETS ö-TOETS ä-TOETS Δ-TOETS R1 R2 START MACRO SELECTEREN Richtingspad Met het richtingspad wordt de bewegingsrichting van objecten gestuurd. In de digitale modus is dit de hoofdrichting-besturing. Analoge sticks Met de beide analoge-sticks worden 2 assen gestuurd (X- en Y-as).
Zo kunt u de toetsen een nieuwe functie toekennen: 1. Druk de MACRO-toets in tot de MACRO-LED oplicht. Daardoor wordt de programmeerfunctie geactiveerd. 2. Druk één van de vier toetsen L2, L3, R2 of R3, die u wilt vervangen, tot de MACRO-LED knippert. 3. Druk de gewenste toets in, die de in stap 2 ingedrukte positie dient over te nemen. 4. Druk de MACRO-toets in om de programmeerfunctie te deactiveren. De MACRO-LED gaat uit. 5. De bovenstaande stappen herhalen om andere toetsen nieuw toe te kennen.
. PS2 Wireless Controller “Amazing” 2,4 Ghz Funziona anche in abbinamento con PSone e PlayStation® Benvenuti! Grazie per aver acquistato il controller wireless “Amazing” 2,4Ghz, da utilizzare con la console di gioco PlayStation 2®. Il controller è completamente programmabile e dispone di due motori, che producono una vibrazione nei giochi in cui è prevista.
Diagramma del controller: 1 2 3 4 5 6 7 8 9 0 t z u i [ ] 17 ä 18 ä L2 L1 PAD D L ANALOGICI-STICK LED ROSSO MODE LED VERDE IMPUGNATURA GOMMATA R ANALOGICI-STICK PULSANTE X PULSANTE ö PULSANTE ä PULSANTE Δ R1 R2 START MACRO SELECT Pad direzionale Con il pad direzionale vengono guidati i movimenti degli oggetti. Nella modalità digitale, questo è il controllo della direzione principale. Stick analogici Con entrambi gli stick analogici vengono rispettivamente guidati 2 assi (asse X e Y).
Per effettuare la nuova occupazione dei tasti: 1. Premere il tasto MACRO finché non si accende il LED MACRO. In questo modo viene attivata la funzione di programmazione. 2. Premere uno dei quattro tasti L2, L3, R2 o R3 che si desidera sostituire finché il LED MACRO non lampeggia. 3. Premere il tasto desiderato con cui si desidera occupare la posizione del tasto premuto al passo 2. 4. Premere il tasto MACRO per disattivare la funzione di programmazione. Il LED MACRO si spegne. 5.
fl PS2 Wireless Controller “Amazing” 2,4 Ghz Funciona también en combinación con PSone y PlayStation® Uso del control inalámbrico para PS2 “Amazing”: Bienvenidos! Le damos las gracias por la compra del control inalámbrico “Amazing” 2,4 GHz; éste se utiliza junto con la consola de juegos de vídeo PlayStation 2®. El control es completamente programable y dispone de dos motores que genera efectos de vibración para los juegos que soportan esa función.
Diagrama del control: 1 2 3 4 5 6 7 8 9 0 t z u i [ ] 17 ä 18 ä L2 L1 D-PAD L-ANALOGICES-STICK RED LED MODE GREEN LED RUBBERIZED GRIP R-ANALOGICES-STICK BUTTON X BUTTON ö BUTTON ä BUTTON Δ R1 R2 START MACRO SELECT Pad de dirección Con el pad de dirección se controla el sentido de los movimientos de los objetos. En el modo digital, éste es el control principal de dirección. Sticks analógicos Los dos sticks analógicos controlan 2 ejes cada uno (eje X y eje Y).
Para cambiar la ocupación de una tecla, proceda del siguiente modo: 1. Pulse de nuevo la tecla MACRO hasta que el LED MACRO se ilumine. La función de programación se activa entonces. 2. Pulse una de las cuatro teclas L2, L3, R2 ó R3 cuya ocupación desea cambiar hasta que el LED MACRO parpadee. 3. Pulse la tecla con la que desea ocupar la posición de la tecla pulsada en el paso 2. 4. Pulse la tecla MACRO para desactivar la función de programación. El LED MACRO se apaga. 5.
– PS2 Wireless Controller “Amazing” 2,4 Ghz Também funciona com PSone e PlayStation® Bem-vindo! Muito obrigada pela compra do controlador sem fio “Amazing“ 2,4Ghz para aplicação com a consola de jogos de vídeo PlayStation 2®. O controlador é completamente programável e dispõe de dois motores que criam uma vibração nos jogos que sejam compatíveis.
Diagrama do controlador: 1 2 3 4 5 6 7 8 9 0 t z u i [ ] 17 ä 18 ä L2 L1 D-PAD STICK-ANALÓGICOS-L RED LED MODE GREEN LED RUBBERIZED GRIP STICK-ANALÓGICOS-R BUTTON X BUTTON ö BUTTON ä BUTTON Δ R1 R2 START MACRO SELECT Comando de direcções Com o comando de direcções é possível controlar a direcção do movimento de objectos. No modo digital este é o comando principal de direcção. Sticks analógicos Com ambos os sticks analógicos são comandados respectivamente dois eixos (eixo X e Y).
Assim pode reocupar os botões: 1. Pressione o botão MACRO até acender o LED MACRO. Assim é activada a função de programação. 2. Prima um dos quatro botões L2, L3, R2 ou R3, os que pretender trocar, até piscar o LED MACRO. 3. Prima o botão desejado, com o qual pretende ocupar a posição do botão premido no passo 2. 4. Prima o botão MACRO para desactivar a função de programação. O LED MACRO apaga-se. 5. Repita os passos acima mencionados para reocupar outros botões.
– Em http://www.hama.com pode consultar a declaração de conformidade segundo a directiva R&TTE 99/5/UE. … Konformitetserklæringen R&TTE-retningslinierne 99/5/EC finder du under www.hama.com FIN Radio- ja telepäätelaitteita koskevan direktiivin 99/5/EY ø mukainen vaatim ustenmukaisuusvakuutus löytyy osoitteesta www.hama.com. ø PL Treść Deklaracji Zgodnoęsci na podstawie dyrektywy R&TTE 99/5/EC można znaleźć na stronach www.hama.