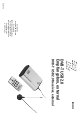
00020890-04.05 EasyLine by Hama GmbH & Co KG Postfach 80 86651 Monheim/Germany Tel. + 49 (0) 90 91 / 5 02-0 Fax + 49 (0) 90 91 / 5 02-2 74 hama@hama.de www.hama.de DVB-T USB 2.0 Empfangsbox, external 00020890 DVB-T USB 2.
L TV USB receiver User Manual Copyright note © Copyright 2004. All rights reserved. Hama GmbH & Co.KG reserves the right to modify the products and information at any time without prior notice. This user manual may not be reproduced in any from without the explicit written consent of Hama GmbH & Co.KG. Notes on trademarks and brands Microsoft and Windows are trademarks of the Microsoft Corporation All other trademarks and brands in this user manual are the property of the respective owner.
Chapter 2: Note on Installation The installation of the DVB-T USB 2.0 receiver is described in this chapter. System requirements DTV application program and DirectX installation Hardware installation Software installation The chapter comprises: • • • • IBM or IBM-compatible computer Operating system: Windows 2000(SP4)/ XP(SP2) CPU: 1000MHz or faster Memory: 256MB or more Sound card Microsoft DirectX9.0 or higher Microsoft Media Player 7.0 or higher 2.
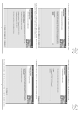
. Enter the user information in the column. Click Next to continue. 7. You can enter the installation path in this window. Click Next to continue. 6. Select a language, e.g. German and click Next to continue. 7 5. Enter the serial number of the product and click Next to continue. 6 Note: The serial number of the product is on the CD cover.
8. The next step allows you to select the installation drive. Drive C:\ is used by default. Click Next to continue. 11. Click Finish and restart your computer to complete the installation of the DTV application. 10. The following window shows that the installation process for the DTV application is started. 9 Note: If you do not restart your computer now, you must restart it later to complete the installation procedure. 9. The next window shows a summary of your entries to allow you to check them.
12. Click Finish to exit the installation program. The DTV application has now been successfully installed. 15. 15. The window shows that the DirectX installation process is started. This may take some time. Please wait. 14. Click Next to continue. 11 13. Once you have restarted the computer, you must install Windows DirectX9.0. Follow the subsequent instructions. Read the license agreement and then select I accept this contract and then clock Next to continue.
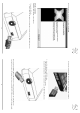
16. Close all applications and store your work before clicking Finish. 2.3 Hardware installation Installing the DTB-T USB 2.0 receiver hardware. 1. Connect the USB cable. I. Connect the B end of the USB cable to the USB socket on the case of the DVB-T USB 2.0 receiver. 12 II. Connect the A end of the USB cable to the USB socket on your desktop or laptop PC. 2. Connect the external passive DVB-T antenna. I. Make sure that the cable is connected to the antenna. II.
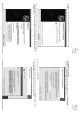
2.4 Installing the driver Follow the instructions below to install the driver from the installation CD-ROM of the DVB-T USB 2.0 receiver. 1. After you connect the DVB-T USB 2.0 receiver to the computer, the system recognizes the new USB hardware, and a window opens with the Found new hardware wizard. Select the option Install software from a list or particular source (for advanced users). ClickNext to continue. 14 2. Select Include this area in the search.
4. Click Finish to continue. The driver for the DVB-T USB 2.0 receiver firmware has been successfully installed. 5. The system recognizes the receiver as a new hardware component, and a window opens with the Found new hardware wizard. Select the option Install software from a list or particular source (for advanced users). Click Next to continue. 16 6. Select Include this area in the search. Click Browse to search for the location of the driver in the CD-ROM directory.
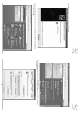
8. Click Finish. The DVB-T receiver has been successfully installed. 9. Check again whether the driver of the product is correctly installed. Click Start and then Control Panel. Then double click System. 18 10. Click Device Manager, and you will see the DTV USB DVB-T Adapter on the list. If this is not listed, you reinstall the driver.
Chapter 3 Installing the DTV/System Software Installation The software for the DVB-T transmission is very powerful. You can enjoy the digital sound output and visual effects in high quality. The software not only allows you to receive the TV programmes, but also enables you to make digital video recordings (DVR) in real time. The Timeshift function ensures that you don't miss the best moments. Once the software is installed, the DVB-Tplayer.exe symbol appears.
2. Select the RF frequency. You can select one of the following options: (1) Land/Region: Select your location. (2) All: If you do not find your location on the Land/Region list, select this option. (3) Area: You can determine your own frequency range. Select VHF or UHF and then enter its frequency range. (4) Single: If you know the exact frequency of a digital program, you can enter its frequency here. 3. Click Start to scan the frequency according to the selected RR frequency option. 4.
II. Recording according to the time schedule: Select Setup and the recording option. Then select Activate Default. Double click Channel in the default recording section. 24 When the Recording Input window appears, select the channel and enter the start time and end time of the recording. Click OK to continue. Once the recording ends, the ok menu is displayed as follows. 25 Note: You cannot simultaneously record two programs that have different frequencies.
3.3 Configuring the display If you must leave in the middle of the program, you can start the timeshift function. Simply click Play when you return. The system plays the program starting from the time you left. The longest time shift is ten minutes. 3.5 Configuring the timeshift and the image is recorded and 27 In the display configuration window, you can set the brightness, contrast and richness as desired. Move the mouse cursor to perform theses settings.
Function Symbol Chapter 4: DTV Software Overview 4.1 Control panel Symbol functions Symbol Function Play Rewind, Fast-forward Full screen Online help Video recording Stop Channel recall Photo Previewing several channels Personal selection Mute Pause Timeshift Volume up Electronic program guide Teletext Radio transmission reception for DVB-T Volume down Online help Configuration Open saved file Channel up and down 28 4.
4.3 Functions Clock The clock is automatically set to the time of the host computer. Channel title display The current channel name is displayed on the control panel in the language set by the channel provider. Video recording on the control panel. It only To record videos, click . Recording can also be determined according to the time schedule on the Recording Configuration screen in the Properties menu. Previewing several channels , to record a still image of the program that you are currently viewing.
Chapter 5: Troubleshooting This chapter should help you in remedying faults that can occur during installation and operation. 1. The DVB-T USB 2.0 receiver does not function properly. Check whether the driver is correctly installed. You can check this in the driver installation in the Device Manager under Control Panel. In the device category, a device with the designation DTV USB Receiver (DTV USB receiver) must be present.