
Installation Guide

© 2017 Halco Lighting Technologies, LLC. All rights reserved. Halco and ProLED are registered trademarks of Halco Lighting Technologies.
All sizes and specications are subject to change.
Halco Lighting Technologies | 2940 Pacic Drive | Norcross, GA 30071 | Toll Free 800.677.3334 | Phone 770.242.3612 | Fax 800.880.0822 | halcolighting.com | Atlanta | Carlstadt | Cleveland | Houston | Los Angeles | Phoenix
ProLED
®
LED T8 Installation Instructions
IMPORTANT
READ INSTRUCTIONS CAREFULLY BEFORE INSTALLING. KEEP THESE INSTRUCTIONS FOR FUTURE
REFERENCE.
This product must be installed in accordance with the applicable installation code by a qualied electrician who is familiar
with the construction and operation of the product and the hazards involved.
WARNING - Risk of re or electric shock. Disconnect power before installation.
WARNING - Risk of re or electric shock. the electrical rating of this product is 120V-277V. Installer must determine
whether they have 120V-277V at the xture before installation.
WARNING - T8 LED tube installation requires knowledge of uorescent lighting luminaires and
electrical systems. If not qualied, DO NOT attempt installation. Contact a qualied electrician.
WARNING - Install this kit only in the luminaires that have the construction features and dimensions
shown in the drawings and/or photographs.
WARNING - Do not use this kit in luminaires that employ shunted bi-pin lamp holders (found in
xtures that use instant start ballasts).
Installation steps:
Removing uorescent lamp system
STEP 1: Disconnect power from xture.
STEP 2: Remove uorescent bulb.
STEP 3: Remove wiring compartment cover.
STEP 4: Cut all wires which are connected to ballast and remove it.
STOP!
DO NOT install this product in a xture that uses shunted lamp holders (found in all xtures with instant start ballasts).
Installing this product with shunted lamp holders will cause a short circuit condition in the lamp holder and create a re or
shock hazard. Before continuing, determine if the lamp holders currently installed in the xture are shunted or
non-shunted. If the current lamp holders are shunted, cut the wires away from the lamp holders and install non-shunted
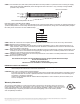
lamp holders, making new connections with the lead wires at terminals indicated here:
NOTE: If using existing non-shunted lamp holders, Installer should not disconnect lead wires from lamp holders and make
new connections at terminals. Instead, cut lead wires away from lamp holders and make new connections to lead wires
using approved connectors.
Retrotting xtures with ONE LAMP
NOTE: Only one end of this LED tube receives power. The “powered” end is indicated with a sticker on the tube itself.
Before beginning installation, determine which end of the xture will be the “powered” end and which end will be
the “dead” end.
STEP 1: Make sure AC power to xture is OFF
STEP 2: Make sure ground wire from AC supply is securely connected to ground screw inside xture.
®
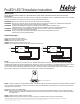
Fluorescent lamp
Ballast BallastAC Input
L
N
AC Input
L
N
Fluorescent lamp
Fluorescent lamp
Non-shunted lampholder