
Installation Guide
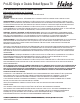
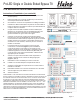
Table Of Contents

© 2020 Halco Lighting Technologies, LLC. All rights reserved. Halco and ProLED are registered trademarks of Halco Lighting Technologies.
®
ProLED Single or Double Ended Bypass T8
Single or Double-Ended Bypass T8
Page: 3
Installation Instructions (Single-Ended)
1. Make sure the circuit breaker that supplies the power to the
fixture is turned off.
2. Remove lens or diffuser cover (if applicable) and
existing fluorescent lamps.
3. Open/Remove ballast wiring compartment cover.
4. Identify the line and neutral wires running from the breaker box
to the ballast and confirm the power is off using a voltmeter.
5. Cut all wires connected to ballast, and remove ballast (and starter
if present). Dispose of removed ballast and fluorescent lamps in
accordance with government regulations in your area.
6. Ensure that the fixture contains non-shunted G13 bi-pin lamp
holders (Figure 1). If socket lamp holders are internally shunted,
then replace with new non-shunted socket lamp holders. If socket
lamp holders are shunted with a jumper wire, remove wire to
convert into non-shunted sockets.
7. LED T8 lamps are designed for single sided connections
only (Figure 2). To install, please wire non-shunted sockets by
connecting one wire from the lamp holder to branch circuit
L (LIVE) and the other wire at the opposite end to the branch
circuit N (NEUTRAL). Do not connect opposite side to power.
Use appropriate wires for connection.
8. Make sure all sockets are replaced and wired according to the
appropriate wiring diagram. (Figure 3, 4, 5, 6).
9. Reinstall the ballast cover to hide all wires.
10. Install your new LED T8 replacement lamps.
11. Apply Relamping Label on a visible location inside the fixture.
12. Reinstall lens or diffusion cover on the light fixture.
13. Turn power on at the breaker box.
14. Turn on the lights.
WARNING - TO AVOID POTENTIAL FIRE OR SHOCK HAZARD,
DO NOT USE THIS RETROFIT KIT IN LUMINAIRES
EMPLOYING SHUNTED BI-PIN LAMPHOLDERS. NOTE:
SHUNTED LAMPHOLDERS ARE FOUND ONL
Y IN
FLUORESCENT LUMINAIRES WITH INSTANT-START
BALLASTS. INSTANT-START BALLASTS CAN BE IDENTIFIED
BY THE WORDS “INSTANT START” OR “I.S.” MARKED ON THE
BALLAST. THIS DESIGNATION MAY BE IN THE FORM OF A
STATEMENT PERTAINING TO THE BALLAST ITSELF, OR MAY
BE COMBINED WITH THE MARKING FOR THE LAMPS WITH
WHICH THE BALLAST IS INTENDED TO BE USED, FOR
EXAMPLE F40T12/IS. FOR MORE INFORMATION, CONTACT
THE LED LUMINAIRE RETROFIT KIT MANUFACTURER.
Figure 1. - Non-shunted & Shunted Lamp Holder
Figure 2. - Single sided connection
Figure 3. - Retrofit with One Lamp
Figure 4. - Retrofit with Two Lamps
Figure 5. - Retrofit with Three/Four Lamps
Figure 6. - Retrofit with Three/Four Lamps
& Two Ballasts