
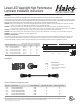
Installation Guide

© 2017 Halco Lighting Technologies, LLC. All rights reserved. Halco and ProLED are registered trademarks of Halco Lighting Technologies.
All sizes and specications are subject to change.
Halco Lighting Technologies | 2940 Pacic Drive | Norcross, GA 30071 | Toll Free 800.677.3334 | Phone 770.242.3612 | Fax 800.880.0822 | halcolighting.com | Atlanta | Carlstadt | Chicago | Cleveland | Houston | Phoenix
Linear LED Vaportight High Performance
Luminaire Installation Instructions
®
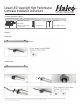
A.Ceiling Mounted
Open hole
Electric drill
a. Make a right position and screw hole b. Screw the clip on the ceiling tightly
Ceiling Ceiling
Screw driver
Open hole
Screw
Metal Bracket
Open hole
Electric drill
a. Make a right position and screw hole b. Screw the steel cable onto the ceiling
Ceiling Ceiling
B.Suspending
c. Connect the wire by junction box after power-off.
d. Adjust the position of the fixture and clean it.
Please Note:
All the operations
must be in the
condition of
power off.
Please Note:
All the operations
must be in the
condition of
power off.
OFF
ON
Power OFF
OFF
ON
Power OFF
Steel cable
Ceiling
The min. diameter is 1.0mm²/18AWG
Min.1.0mm²/18AWG
Ceiling
c. Connect the wire by junction box after power-off.
d. Adjust the position of the fixture and clean it.
Ceiling
Junction Box
(Used Provided)
The min. diameter is 1.0mm²/18AWG
Min.1.0mm²/18AWG
Ceiling
US
L
E
N
Junction Box
(Used Provided)
US
L
E
N
A.Ceiling Mounted
Open hole
Electric drill
a. Make a right position and screw hole
b. Screw the clip on the ceiling tightly
Ceiling
Ceiling
Screw driver
Open hole
Screw
Metal Bracket
Open hole
Electric drill
a. Make a right position and screw hole b. Screw the steel cable onto the ceiling
Ceiling Ceiling
B.Suspending
c. Connect the wire by junction box after power-off.
d. Adjust the position of the fixture and clean it.
Please Note:
All the operations
must be in the
condition of
power off.
Please Note:
All the operations
must be in the
condition of
power off.
OFF
ON
Power OFF
OFF
ON
Power OFF
Steel cable
Ceiling
The min. diameter is 1.0mm²/18AWG
Min.1.0mm²/18AWG
Ceiling
c. Connect the wire by junction box after power-off.
d. Adjust the position of the fixture and clean it.
Ceiling
Junction Box
(Used Provided)
The min. diameter is 1.0mm²/18AWG
Min.1.0mm²/18AWG
Ceiling
US
L
E
N
Junction Box
(Used Provided)
US
L
E
N
A.Ceiling Mounted
Open hole
Electric drill
a. Make a right position and screw hole b. Screw the clip on the ceiling tightly
Ceiling Ceiling
Screw driver
Open hole
Screw
Metal Bracket
Open hole
Electric drill
a. Make a right position and screw hole
b. Screw the steel cable onto the ceiling
Ceiling
Ceiling
B.Suspending
c. Connect the wire by junction box after power-off.
d. Adjust the position of the fixture and clean it.
Please Note:
All the operations
must be in the
condition of
power off.
Please Note:
All the operations
must be in the
condition of
power off.
OFF
ON
Power OFF
OFF
ON
Power OFF
Steel cable
Ceiling
The min. diameter is 1.0mm²/18AWG
Min.1.0mm²/18AWG
Ceiling
c. Connect the wire by junction box after power-off.
d. Adjust the position of the fixture and clean it.
Ceiling
Junction Box
(Used Provided)
The min. diameter is 1.0mm²/18AWG
Min.1.0mm²/18AWG
Ceiling
US
L
E
N
Junction Box
(Used Provided)
US
L
E
N
4
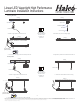
A.Ceiling Mounted
Open hole
Electric drill
a. Make a right position and screw hole
Ceiling
B.Suspending
c. Connect the wire by junction box after power-off.
Ceiling
Junction Box
(Not Provided)
The min. diameter is 1.0mm²/18AWG
Min.1.0mm²/18AWG
US
L
E
N
Open hole
Electric drill
a. Make a right position and screw hole
Ceiling
B.Suspended
c. Connect the wire by junction box after power-off.
Ceiling
The min. diameter is 1.0mm²/18AWG
Min.1.0mm²/18AWG
Junction Box
(Not Provided)
US
L
E
N