
Installation Guide

© 2017 Halco Lighting Technologies, LLC. All rights reserved. Halco is a registered trademark of Halco Lighting Technologies. All sizes and specications are subject to change.
Halco Lighting Technologies | 2940 Pacic Drive | Norcross, GA 30071 | Toll Free 800.677.3334 | Phone 770.242.3612 | Fax 800.880.0822 | halcolighting.com | Atlanta | Chicago | Cleveland | Houston | Los Angeles | Phoenix
MOUNTING INSTRUCTIONS
A: For V-Hook and Chain Mounting
Before installation, ensure if power supply is disconnected. Cables must be connected in accordance to instruction and proper standing rules.
Using Hook and Chain (chain not included)
LED Driver
Sensor
LED Driver
LED Driver 2
Brown
Blue
Green
Line
Neutral
Ground
Common
Switch
Switch
Unswitched
Hot
White/AC/N
Black/AC/L
Black/AC/L
Violet/DIM+
White/AC/N
Green/G
Black/AC/L (No Sensor)
Black/AC/L (With Sensor)
Violet/DIM+
Gray/DIM+
Violet/DIM+
Gray/DIM+
Black/AC/L
Green/G
White/AC/N
DC-Out
DC-Out
Gray/DIM+
Violet/DIM+
Grey/DIM-
Sensor
Brown
Blue
Green
Line
Neutral
Ground
LEDs
LED Driver
Sensor
LED Driver
LED Driver 2
Brown
Blue
Green
Line
Neutral
Ground
Common
Switch
Switch
Unswitched
Hot
White/AC/N
Black/AC/L
Black/AC/L
Violet/DIM+
White/AC/N
Green/G
Black/AC/L (No Sensor)
Black/AC/L (With Sensor)
Violet/DIM+
Gray/DIM+
Violet/DIM+
Gray/DIM+
Black/AC/L
Green/G
White/AC/N
DC-Out
DC-Out
Gray/DIM+
Violet/DIM+
Grey/DIM-
Sensor
Brown
Blue
Green
Line
Neutral
Ground
LEDs
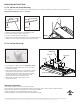
Step 1
Step 2
Step 4
1. Wrap the chain around the ceiling or service attachment point.
2. Loop the chain around the ceiling or service point.
3. Use an S or similar connector to close the loop.
4. Slide the other end of the chain through the V-hook provided with the xture.
Install the V-hook into the two slots shown above to support the xture.
B: For Pendent Mounting
Warranty Information:
This product is warranted for 5 years from the date of purchase.
If this product does not perform to the specications supplied on this package, send an email or write to the address below for
product return and replacement. This replacement is the sole remedy available.
Liability for incidental or consequential damage is expressly excluded.
Visit www.halcolighting.com for full warranty details and compatibility information.
Pendant Stem
Junction Box
Housing
Side plate
Screw amd washers
1. Choose length of 1/2” NPS ped and stem (Supplied by others).
2. Install pendant-mount kit including: stem, junction box, screws
and washers). See figure.
3. Feed wires through pendant stem and into junction box. wire the
housing leads to supply wires using UL listed wire connectors
according to NEC and local codes in the junction box. Push all
wires back into junction box, install side plate of box with
supplied screws. Be careful not to pinch the wires.
4. Slide the other end of the chain through the V-hook
provided with the fixture.