
Installation Guide

Models: FL1/CL12BZ50/KN/LED (99875)
FL1/CL12BZ50/YK/LED (99876)
FL2/CL28BZ50/KN/LED (99877)
FL2/CL28BZ50/YK/LED (99878)
FL2/CL48BZ50/KN/LED (99879)
FL2/CL48BZ50/YK/LED (99880)
IMPORTANT
READ INSTRUCTIONS CAREFULLY BEFORE INSTALLING.
KEEP THESE INSTRUCTIONS FOR FUTURE REFERENCE.
WARNING - Risk of re or electric shock.
WARNING - Make certain power is switched OFF before starting
installation or attempting any maintenance. Consult an
electrician if not qualied to prevent electrical shock
Application/ Use:
This product is rated for use in wet locations.
LED Flood Series
Installation Instructions
Halco Lighting Technologies | 2940 Pacic Drive | Norcross, GA 30071 | Toll Free 800.677.3334 | Phone 770.242.3612 | Fax 800.880.0822 | halcolighting.com | Atlanta | Carlstadt | Cleveland | Houston | Los Angeles | Phoenix
© 2017 Halco Lighting Technologies, LLC. All rights reserved. Halco is a registered trademark of Halco Lighting Technologies. All sizes and specications are subject to change. 06-01-17.
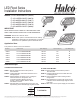
Black/Brown
Line
White/Blue
Neutral
Green
Ground
Luminaire
Figure 1.
Installation steps:
IF USING KNUCKLE MOUNT:
STEP 1: Before starting ensure that the power is
disconnected.
STEP 2: Unpack luminaire and ensure that there are no
damaged parts.
STEP 3: Attach luminaire to outdoor cover, routing the
luminaire wires into the junction box.
Connect luminaire cables as shown in
Figure 1. Black to Black, White to White
and Green to Green.
STEP 4: Aim luminaire by loosening bolt on the arm, and
repositioning to the desired angle. Tighten the bolt.
Product # Product Code Input Voltage (V) Input Current (mA) Input Wattage (W)
99875 FL1/CL12BZ50/KN/LED 120-277 0.9 12
99876 FL1/CL12BZ50/YK/LED 120-277 0.9 12
99877 FL2/CL28BZ50/KN/LED 120-277 0.23 28
99878 FL2/CL28BZ50/YK/LED 120-277 0.23 28
99879 FL2/CL48BZ50/KN/LED 120-277 0.40 48
99880 FL2/CL48BZ50/YK/LED 120-277 0.40 48
IF USING YOKE MOUNT:
STEP 1: Before starting ensure that the power is
disconnected.
STEP 2: Unpack luminaire and ensure that there are
no damaged parts.
STEP 3: Secure luminaire to at mounting surface
using 2 bolts.
STEP 4: Aim luminaire by loosening the 2 bolts on the
U-Bracket to the desired angle. Tighten down
both bolts.
STEP 5: Wire end of cord to power supply as seen below.