
Installation Guide

© 2017 Halco Lighting Technologies, LLC. All rights reserved. Halco and ProLED are registered trademarks of Halco Lighting Technologies. All sizes and specications are subject to change. 06-16-17.
Halco Lighting Technologies | 2940 Pacic Drive | Norcross, GA 30071 | Toll Free 800.677.3334 | Phone 770.242.3612 | Fax 800.880.0822 | halcolighting.com | Atlanta | Carlstadt | Cleveland | Houston | Los Angeles | Phoenix
ProLED
®
4" Downlight Replaceable Trim
Installation Instructions
NOTE: USE THE FOLLOWING HALCO TRIMS WITH ANY OF THE HALCO DOWNLIGHT LUMINAIRES LISTED BELOW.
®
͢ ͢
͢
Product # Product Code Product # Product Code
99924 DL4FR9/927/RT/LED 99934 DL4/WB
99925 DL4FR9/930/RT/LED 99935 DL4/WSS
99926 DL4FR9/940/RT/LED 99936 DL4/BN
99927 DL4FR9/950/RT/LED 99937 DL4/ORB
Product # Product Code Product # Product Code
99823 DL4FR9/927/RT2/LED 99934 DL4/WB
99824 DL4FR9/930/RT2/LED 99935 DL4/WSS
99825 DL4FR9/940/RT2/LED
99936 DL4/BN
99826 DL4FR9/950/RT2/LED
99937 DL4/ORB
4" Downlight Luminaire 4" Downlight Luminaire4" Trim Options 4" Trim Options
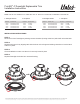
INSTALLATION INSTRUCTIONS:
STEP 1:
Remove trim from Downlight by twisting counter-clockwise (looking at the lens) which will unlock the latch.
STEP 2:
Replace with new trim by aligning latch with the slots on the ange and twisting clockwise to lock the latch
and trim in place.
STEP 3:
Check installation to make sure the trim is securely locked in place.
STEP 4:
Replace Downlight Luminaire into recessed housing.