
Ice Maker User Manual

7
English
OPERATING INSTRUCTIONS
Starting Off:
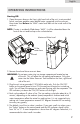
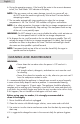
1. Open the access door on the front, right hand side of the unit, insert provided
funnel, and pour potable water (bottled water suggested) into the reservoir.
Keep water level below the “MAX” water level mark on the inside wall of the
reservoir.
NOTE: If water is accidently filled above “MAX”, it will be channeled down the
front of the unit and end up on the surface below.
2. Remove funnel and close reservoir door.
WARNING: Do not pour water into ice storage compartment located on top
of the unit. This will affect the ice making performance. Only pour
water into the Water Reservoir Tank located on the front, right hand
side of the unit.
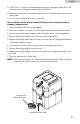
3. Plug the unit into a grounded, 120V/60Hz outlet only. Push the ON/OFF
button on the control panel to turn ON the machine to begin the ice making
cycle. You will hear the compressor and water flowing over the evaporator. The
LED indicator just above the ON/OFF button will also light.
4. Each cycle produces 9 cubes of ice. The ice making cycle takes about 6 to 15
minutes, depending on the ambient (room) temperature. Ambient and initial
water temperatures affect the actual ice making time. It is not suggested to try
making ice if room temperature exceeds 90˚ degrees farenheit as ice making
time may vary greatly.
5. The default size of the ice cube is medium. If you want small size cubes, press
the “Select” button on the control panel and the LED indicator should switch
from “M” to “S”. If room temperature is lower than 60˚ degrees Fahrenheit, it is
recommended to select small size cubes.
Fill the
water here
Maximum Water Level
Funnel