COLOR TV RECEIVER OWNER'S MANUAL Please READ this manual carefully before operating the unit, and keep it for future reference.
* For your enjoyment of this TV set, please read this manual carefully and keep it good for future reference. CONTENTS Before Operation Warning and cautions................................................................................................1 Installation...............................................................................................................2 Antenna connection...............................................................................................
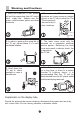
Warning and Cautions 1. When you clean the TV set, please pull out the power plug from AC outlet. Don't clean the cabinet and the screen with benzene, petrol and other chemicals. 4. Do not place the TV set near rain or moisture as it may cause an electric shock, or the TV set to catch fire. The TV set must only be used in dry in door locations. 2. In order to prolong the using life of the TV set, please place it in a well ventilated location. 5.
Installation Antenna connection General speaking, to enjoy a clearer picture, we recommend that you use a CATV system or an outdoor antenna .In different places, the suitable antenna type and position are different. 300 twin-lead cable Antenna adapter (additional purchase) Mixer additional purchase 75 coaxial cable Plug (additional purchase) Note Antenna input 75 standard coaxial type AC power socket * the plug type may vary depending on the model.
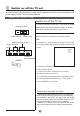
Position of Buttons and Plug-ins Front and Side panel Side AV terminal D29FV6 , D34FV6 Model Channel position up/down Infrared receiver Volume up/ down TV/Video MENU (input selector Power indicator Power switch Back panel D29FV6 Model D34FV6 Model DVI input terminal Antenna input VGA input terminal VGA input terminal DVI input terminal Antenna input AV output terminals DVI IN DVI IN AV output terminals S-video input terminal S-video input terminal AV2 input terminals HDTV input terminals AV1 i
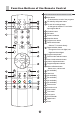
Function Buttons of the Remote Control Function buttons of the remote control Mute button TV/AV •••• To eliminate the sound of the programs DC standby and power button DV SNAPSHOT SCAN CALL TV and AV exchange button A changeover between TV and other input signals like AV I/II select button DV button Screen call button Snapshot button Program scan button Direct select button SWAP Select a TV channel directly Digital selection button P.STD S.
The Screen Display Menu For your convenience of operation, here lists the screen display menus of this model as your reference. Sound menu Picture menu PIC. Brightness Contrast Color Sharpness Hue Color Temp. 50 50 50 50 0 0 50 50 50 ON Function menu Tuning menu Prog NO. Skip Sound Sys. TUN. Fine Tune Search Auto Search Treble SOU. Bass Balance Sound Effect Surround 008 OFF B/G Time menu Language English Color Sys. Auto Prog. Sort Current Prog. 2 Amusement FUN. Special To Prog.
Switch on/ off the TV set In the following, the methods of using power switch and remote control to switch on/off power supply for the TV set will be explained. Switch on/ off the TV set Switch on/ off the TV set 1.Connect the power supply wire. Then press the power Infrared receiver switch button, the power indicator will light, in several seconds the picture will display on the screen. 2.
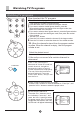
Watching TV Programs Watching TV programs How to select the TV program Select the desired program 1. Use the direct number selection button Press the button from 0-9 to select a one-figure channel. If you want to select a double figures channel, press the figure-selection button and change it into two-figure mode, then press the number of the channel. If you want to select a three figures channel, press the figure-selection button and change it into three-figure mode, then press the number of the channel.
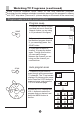
Watching TV Programs (continued) Swap function enables quick swap to the last watched program. Auto scan function enables automatic successive scanning of the programs in memory with "OFF" skip status (There are 12 pictures display on the screen at the same time). Program swap and auto scan functions Program swap 1. Suppose the channel number you used just now is 8 and the channel number you are using is 18 (as shown in the figure). SWAP 2.
Tuning The TV set has three methods to set the channels, which are Auto search, Search and Fine tune. In this section, how to use the remote control to set the channel is explained. You can also use the buttons on the TV set to set channel. Auto Search Select the search mode FUNCTION 2. Press the CH+/- buttons to move the indicator to "Special ", then press the VOL+ button to sub-menu. CH+ VOL- MENU 1. Press the FUNCTION button, the function menu will appear on the screen. Language English Color Sys.
Tuning (Continued) Search After searching (Continued) Press the CH+/- buttons to check channels. If the colour or sound is abnormal in a certain channel, it may be because that the colour or sound system has not been set properly, then, you may adjust it to proper system (Refer to page 8). CH+ VOL- MENU VOL+ Search CH- 1. Press the CH+/- buttons or Direct select button to select the desired channel number. 1 B/G 144MHz NORMAL TUNE 2. Press the TUNE button, the tuning menu will appear on the screen.
Tuning (Continued) Fine Tune Fine Tune If the picture and/or sound are poor, try using the FINE TUNE feature. Do not use this feature unless reception is poor. CH+ VOL- MENU VOL+ 1. Press the CH+/- buttons or Direct select button to select the desired channel number. ( For example, the channel 1.) 1 B/G 144MHz NORMAL CH- TUNE 2. Press the TUNE button, the tuning menu will appear on the screen. 3. Press the CH+/- buttons to move the indicator to " Fine Tune ". CH+ VOL- MENU Prog NO.
Tuning (Continued) Skip unnecessary channel Skip unnecessary channel The Program skip feature enables you to skip/hide programs that you do not wish to be displayed when using the CH+/- buttons. These channels will still be displayed by directly using the channel number buttons on the remote control. CH+ VOL- MENU VOL+ 1. Press the CH+/- buttons or Direct select button to select the desired channel number. ( For example, the channel 1.) 1 B/G 144MHz NORMAL CH- TUNE 2.
Tuning (Continued) Exchange Programs Exchange Programs This feature enables TV programmes that may be on a wrong program number to be moved to another number. This feature is very useful when Automatic Search Tuning has been used because programmes are stored in the order they are found, which is usually not the desired order. When organising, it is best to start from the lowest programme number first. FUNCTION 1.
Convenient Picture and Sound Controls Select the picture modes and set the picture quality How to select the picture modes You can quickly select the desired picture mode from four preset modes and one customized mode. Press the P.STD button to select the desired P.STD picture quality. Five kinds of picture modes NORMAL SOFT PIC MUTE (i.e., " NORMAL","SOFT" ,"PIC MUTE", PERSONAL "PERSONAL","BRIGHT", ) can be selected in turn.
Convenient Picture and Sound Controls (Continued) Select the sound modes and set the sound quality How to select the sound modes You can quickly select the desired sound mode from four preset modes and one customized mode. Press the S.STD button to select the desired S.STD THEATER PERSONAL picture quality. Five kinds of sound modes MUSIC (i.e., "THEATER" ,"PERSONAL","MUSIC", " NORMAL"," SPEECH", ) can be selected in turn.
Convenient Picture and Sound Controls (Continued) Surround effect chip has been employed to form a vivid and real space surround sound effect. Sound Effect, Surround and Mute functions Sound Effect function SOUND There are Stereo, V.SRS and MONO sound effect for the TV set. You may select the desired option. 1. Press the SOUND button, the Sound menu will appear on the screen. . Press the CH+/- buttons to move CH+ the indicator to "Sound Effect". Treble SOU.
Time Set Up Function This model has time set function such as On/Off Time, Sleep and Remind Time, etc. When the Child Lock is working, On Time and Remind Time function cannot be used. Clock and On/Off Time functions Set clock When this function is used, please first check whether the clock is in accordance with your local time; if not, you can follow the instructions to adjust it. 1. Press the TIME button, the Time menu will appear on the screen. TIME TIME .
Time Set Up Function(continued) Sleep and Remind Prog. Functions Sleep function The TV set have 18 sections option for sleep timer function (each section has a time interval of 10 minutes). TIME 1. Press the TIME button, the Time menu will appear on the screen. . Press the CH+/- buttons to move the indicator to " Sleep ", then press CH+ the VOL-/+ buttons to adjust. TIME Clock 18:18 On Time 18:00 On Prog. 008 Off Time --:-- Sleep 120 Remind Time --:-- Remind Prog. 001 VOL- MENU VOL+ .
Set Up Function Screen Saver function and Select the menu Language How to start screen saver function The SCREEN SAVER including " Moving ", " DV Play " and " Off ". The " Moving " function is moving screen saver. The " DV Play " is snatching in 3 interval. If no signal has been received, and after fifteen minutes, it will stand byautomatically. 1. Press the FUNCTION button, the Function menu will appear on the screen. FUNCTION CH+ Language English Color Sys. Auto Prog. Sort Amusement FUN.
Set Up Function(continued) Select Switch on mode Select Switch on mode There are some kind of Switch on mode, such as CURTAIN, OFF, FADE OUT , etc. You can choose one you need. FUNCTION 1. Press the FUNCTION button, the Function menu will appear on the screen. . Press the CH+/- buttons to move Language English Color Sys. Auto Prog. Sort Amusement FUN. Special RGB Sound Search Mode Ordinal Curtain Mode Off Screen Saver Off Tilt 0 the indicator to " Special ". CH+ .
Set Up Function(continued) Digital Scan function and SVM (Super Velocity Modulation) function Digital Scan function The Digital Scan includes Pixes Plus,PixesScan,100Hz, 50P, etc. The TV set will recover 100Hz after powering off. DIGITAL 1. Press the DIGITAL button, the DIGITAL menu will appear on the screen. . Press the CH+/- buttons to move CH+ VOL- MENU DIG. Digital Bass Digital Scan DV Play Comb Filter SVM DNR On On On Off Pix Plus Pix Scan 100Hz 50P the indicator to " Digital Scan ". VOL+ .
Set Up Function(continued) The pictures by DV recorder and Snapshot functions are be saved temporarily. After powering off or switching off the pictures will be cleared away. DV Recorder, Snapshot function and Screen Display DV Recorder function DV 1. On the TV,AV,S-VIDEO,YCbCr status,press the DV button to startup the DV function,at the same time the screen display " Recording " . 2. Press the DV button again to stop the DV function,and then go on playing.
Set Up Function(continued) The DV playing function include playing the picture and playing the recorder. DV Playing Function Play the picture ---Manual playing The DV playing picture function include the manual playing and the auto playing.You may select the desired mode as follow: 1. Press the DIGITAL button, the DIGITAL menu will appear on the screen. DIGITAL 2. Press the CH+/- buttons to move Digital Bass DV Play Comb Filter SVM DNR DIG. On On On Off D.Album DV the indicator to " DV Play ". .
Set Up Function(continued) DV Playing Function Playing the recorder 1. Press the DIGITAL button, the DIGITAL menu will appear on the screen. DIGITAL Digital Bass DV Play Comb Filter SVM DNR 2. Press the CH+/- buttons to move the indicator to " DV Play ". CH+ DIG. On On On Off D.Album DV . Press the VOL+ button to sub-menu, and then press the VOL- MENU VOL+ CH+/- buttons to move the indicator to " DV ". CH- . Press the VOL+ button to play the recorder.
Set Up Function(continued) DNR (Digital Noise Reduction) function and Comb Filter function DNR function 1. Press the DIGITAL button, the DIGITAL menu will appear on the screen. DIGITAL On DIG. Digital Bass Digital Scan DV Play Comb Filter SVM DNR On DIG. Digital Bass Digital Scan DV Play Comb Filter SVM DNR On DIG. Digital Bass Digital Scan DV Play Comb Filter SVM DNR On DIG. Digital Bass Digital Scan DV Play Comb Filter SVM DNR On On Off .
Set Up Function(continued) Tilt function and Digital Bass function Tilt function When the TV set is affected by the geomagnetism so that the whole picture turn tilt, you can use the function. 1. Press the FUNCTION button, the Function menu will appear on the screen. FUNCTION . Press the CH+/- buttons to move Language English Color Sys. Auto Prog. Sort Amusement FUN. Special RGB Sound the indicator to " Special ". CH+ . Press the VOL+ button to VOL- MENU VOL+ CH- sub-menu.
Set Up Function(continued) 7th. Star function 7th. Star display 1. Press the FUNCTION button, the Function menu will appear on the screen. FUNCTION . Press the CH+/- buttons to move the indicator to " Amusement ". Language English Color Sys. Auto Prog. Sort Amusement FUN. Special RGB Sound 7th.Star Tetris Jumper World Clock Calculator CH+ . Press the VOL+ button to VOL- MENU VOL+ sub-menu. 000000 . Press the CH+/- buttons to move CH- 7th Star the indicator to " 7th.
Set Up Function(continued) Tetris function Tetris display 1. Press the FUNCTION button, the Function menu will appear on the screen. FUNCTION . Press the CH+/- buttons to move the indicator to " Amusement ". Language English Color Sys. Auto Prog. Sort Amusement FUN. Special RGB Sound 7th.Star Tetris Jumper World Clock Calculator CH+ . Press the VOL+ button to sub-menu. VOL- MENU VOL+ 000000 .
Set Up Function(continued) Chinese Jumper function Chinese Jumper display 1. Press the FUNCTION button, the Function menu will appear on the screen. FUNCTION . Press the CH+/- buttons to move Language English Color Sys. Auto Prog. Sort Amusement FUN. Special RGB Sound the indicator to " Amusement ". 7th.Star Tetris Jumper World Clock Calculator CH+ . Press the VOL+ button to sub-menu. VOL- MENU Chinese Jumper New Game Help About VOL+ .
Set Up Function(continued) World Clock and Calculator function World Clock function FUNCTION 1. Press the FUNCTION button, the Function menu will appear on the screen. CH+ 2. Press the CH+/- buttons to move Language English Color Sys. Auto Prog. Sort 7th.Star Amusement FUN. Special Tetris RGB Sound Jumper World Clock Calculator the indicator to " Amusement ", then VOL- MENU VOL+ press the VOL+ button to sub-menu. CH- .
Set Up Function(continued) Calendar function Calendar function Note: The calendar can not renew automatically. CAL./EXIT 1. Press the CAL./EXIT button, the Calendar menu will appear on the screen. Calendar Date 2003 Year 1 Month 1900 to2100 Sun Mon Tue Wed Thu Fri Sat 1 2 3 4 6 7 8 9 10 11 the CH+/- buttons to adjust the 12 13 14 15 16 17 18 year and the month, to demand the 19 20 21 22 23 24 25 desired date. 26 27 28 29 30 .
Setting the Lock This TV set provides you with the LOCK function, you can choose it due to your need to protect your TV set. Change your password Change your password This TV set can set a four digit password, the original one is 0000, if you want to reset it, please follow the instructions below. H.LOCK 1. Press the H.LOCK button, then press the Digital number button to input the password, screen will show as the form on the right. CH+ VOL- MENU VOL+ .... OFF OFF OFF OFF 100 .
Setting the Lock (Continued) Setting the Lock Setting the Lock There are Tuning Lock, Preset Prog, Video Lock , Child Lock and Max Volume five lock setting, you can set it due to your need. H.LOCK 1.Press the H.LOCK button, the screen will show as the form on the right. New PW. ---- CH+ VOL- MENU CH- VOL+ 2.Press the Direct-digit Choosing button 0 for four times( or input the password you set) to enter the Lock Menu. 3.
Others Functions (Continued) VGA input adjustment Setting the PC software 1.First, click on Settings on the Windows start menu and click on "Control Panel". 2.Double click on the Display icon. 3.Click on the Settings tab on the display dialog-box. 4.Adjust the resolution to 640X480 pixels 5.Click the Advanced button and click the Monitor tab on the dialog-box. Set the vertical-frequency to 60Hz and then click the OK button. 6. Connect the PC to the TV set by the VGA terminal. TV/AV VGA input adjustment 1.
External connections In the following, the methods of connecting the video/audio system and PC for the TV set will be explained. Video/Audio Output Connection, VGA Input Note: The D34FV6 model can be connected such as the order of dashed; the D29FV6 model can be connected such as the order of real line. DVI IN To Video input To VGA input To Audio/Video input To Audio/Video input PC VCR Etc.
External connections (Continued) In the following, the methods of connecting the video/audio system and other sets for the TV set will be explained.
Trouble shooting To assist in location possible faults use help guide below. BREAKDOWN PHENOMENON PICTURE SOUND CHECKING The aerial direction and connection Picture with snow Double or Triple Image Noise Normal This is called ghosting which can be minimized with an outside aerial, and good quality cable and terminations. Altering the aerial direction can also minimize this effect.
Specifications Design and specifications are subject to change without notice.
01 0090505950