
Installation Manual


INSTALLATION
PAGE 9
ENGLISH SECTION A
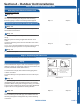
Step 3.3 Step 3.4A
Step 3.5A
Step 3.6
Step 3.4B
Step 3.5B
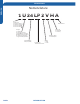
3.3
Step - 3.3
Remove the adapter and hose connection from the
suction line port, and replace the cap. Hoses should not be
removed and service valves should not be opened until any
additional refrigerant needed for a refrigerant line longer
than 25 ft. has first been added.
3.4
Step - 3.4A & 3.4B
Remove the cap from the liquid line valve. Using the hex
wrench, open the valve, then replace and tighten the cap.
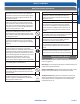
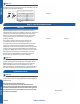
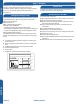
Illustration 6
It becomes
high midway.
Thegap with the
ground is too small
Thereisthe bad
smellfrom a sewer
It waves.
Theend is imm-
ersed in water.
Lessthan
5cm
3.5
Step - 3.5A & 3.5B
Remove the cap from the suction line valve. Using the hex
wrench, open the valve, then replace and tighten the cap.
3.6
Step - 3.6
Wrap the lineset, drain line, and wiring starting at the bottom
of the bundle with an overlap type wrap, concluding at the
piping hole. Use a sealant to seal the piping hole opening
to prevent weather elements from entering the building.
(Illustration 6)
Verify the condensate drain line has a constant pitch
downward for proper water ow. There should be no kinks
or rises in the tubing which may cause a trapping eect
resulting in the failure of the condensate to exit the piping.