
Installation Manual


INSTALLATION
PAGE 13
ENGLISH SECTION B
Step 1 - Preparation
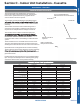
Required Tools for Installation
Procedure for Selecting the Location
• Drill
• Wire Snipper
• Hole Saw 2 3/4”
• Vacuum pump
• Soap-and-water solution or gas leakage
detector
• Torque wrench
• 17mm, 22mm, 26mm
• Tubing cutter
• Flaring tool
• Razor knife
• Measuring tape
• Level
• Micron gauge
• Nitrogen
• Mini-Split AD-87 Adapter (1/4” to 5/16”)
• A - Non-adhesive Tape
• B - Adhesive Tape
• C - Saddle (L.S.) with screws
• D - Electrical wiring
• E - Drain hose (Included)
• F - Insulation
• G - Piping hole cover (Included)
than 10ft away depending on radio wave
conditions.)
• Choose a place solid enough to bear the
weight and vibration of the unit and where
the operation noise will not be amplied.
• Choose a location where the hot air
discharged from the unit or the operation
noise and will not cause a nuisance to the
user.
• There must be sucient space for
carrying the unit into and out of the site.
• There must be sucient space for air
passage and no obstructions around the
air inlet and air outlet.
• The site must be free from the possibility
of ammable gas leakage in a nearby
place.
• Install units, power cords and inter-unit
cables at least 10ft away from television
and radio sets. This is to prevent
interference to images and sounds.
(Noise may be heard even if they are more
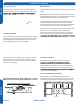
This picture is for reference only. Your product may look dierent. Read this manual before installation. Explain the operation of the unit to the user according to
this manual.
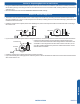
Clearances of Indoor and Outdoor Units
F
A
C
E
D
Fixing of outdoor unit
Anchor the outdoor unit to the pad.
When ins
talling the outdoor unit on a roof or a outside
wall, t
he i
nstallation s
hould m
eet t
he l
ocal code.
The marks from to
in the
gure are the
name of the parts.
The distance between
the indoor unit and the
oor should be more
than 6 feet.
The models adopt HFC free refrigerant R410A
more than
4in.
more than 4in.
more than 4in.
more than 4in.
more than 4in.
more than 24in.
more than 6in.
A
G
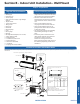
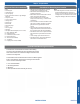
Arrangement of piping
directions
Rear left
Left
Rear
right
Right
Below
G
Attention must be paid to
the pitch of drain hose
Z
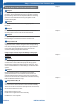
Dimensions(inches)
Model
6 7/8”
6 7/8”
23 5/8”
16”
1U24/36/42/48
LP2VHA
Floor fixing dimensions of the outdoor unit
(Unit: inch)
1 2
1 x2
Section B - Indoor Unit Installation - Wall Mount