
Assembly Instructions


CR
Assembly Instructions
15
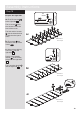
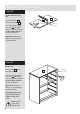
Step 26
Fit the divider to the
top
Push the divider
down onto the top .
Turn the 2 large locking
cam nuts clockwise
to the “2 o’clock” position
as far as they will go to
secure the panels.
Important: Make sure
there is no gap between
the fitted panels.
Finished
front edge
4
3
B
4
3
CR
CR
CR
CR
CR
CR
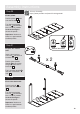
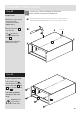
Step 27
Fit the top
Push the top down
onto the assembly.
Turn the 4 large locking
cam nuts clockwise
to the “2 o’clock” position
as far as they will go to
secure the panels.
Important: Make sure
there is no gap between
the fitted panels.
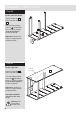
Carefully lay the unit
down onto its front
edges for the next
step.
3
B
Warning: The
unit is heavy.
Lift with care.
3
Finished
front edge