
Assembly Instructions

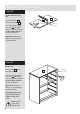


CL
CL
CL
CL
CL
CL
1
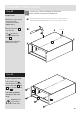
Assembly Instructions
12
Step 20
A
H
A
B
B
H
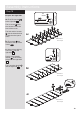
Prepare the 2 back
rails
Insert 2 large locking
cam nuts into each of
the back rails .
Push 2 of the quickfit
dowels as far as they
will go into each of the
back rails .
Tap 2 wooden dowels
into each of the back
rails .
A
7
B
7
H
7
7
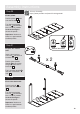
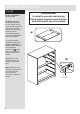
Step 22
Fit 1 of the back rails
Push a back rail
down onto the left side
. .
Turn the large locking
cam nut clockwise to
the “2 o’clock” position
as far as it will go to
secure the panels.
Important: Make sure
there is no gap between
the fitted panels.
Step 21
7
1
A
B
B
7
x 2
CL
CL
CL
CL
CL
CL
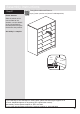
1
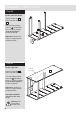
Fit the plinth
Push the plinth down
onto the left side .
Turn the large locking
cam nut clockwise to
the “2 o’clock” position
as far as it will go to
secure the panels.
Important: Make sure
there is no gap between
the fitted panels.
5
1
B
5
hps://www.youtube.com/watch?v=9C7tgv5xnbE
Carcase Assembly
B
Turn to “2 o’clock”
Edge Edge
Edge