
Instruction Manual


32
Before removing the existing fitting, carefully note the position of each set of cables. If there are
loop in cables that are not connected to the light, they must be terminated in a separate terminal
block not connected to the fitting.
1. Switch off the electricity supply at the fuse board.
2. Remove the mounting bracket from the fitting by removing the 2 screws, using the bracket as a
template, mark and drill fixing holes in the ceiling. Ensure the holes are drilled into a joist or other
suitable mounting surface and not just into plaster.
3. Attach mounting bracket to the ceiling using suitable fixings.
4. Insert the supplied protection sleevings over all the incoming Live and Neutral supply wires.
5. Bring the mains supply to connect into the terminal block of the junction box.
The weight of the fitting must be supported whilst making the electrical connections as follows:
a. Connect supply live (normally brown or red) to fitting live (marked “L”) on the terminal block.
b. Connect supply neutral (normally blue or black) to fitting neutral (marked “N”) on the terminal
block.
NOTE: Ensure electrical connections are tight and no loose strands of wire are left out of the
terminal block.
6. Offer fitting up onto the bracket and push any excess cable into ceiling void. Secure the ceiling cup into
position using the 2 screws removed earlier. Take care not to trap or damage wiring.
7. Fit the bulbs: Type and wattage as indicated on the fitting. The wattage indicated must not be exceeded.
8. Fit the glass shade to the fitting.
9. Switch on the electricity supply at the fuse board.
InstructionInstruction for use
4
5
2
1
2
1
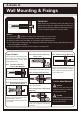
Step 1
Step 2
Step 3
mm02<
>20mm
7
6
3
3
4
1
2
4
3
L= Brown or Red
N= Blue or Black
L
N
L
N