RENOV FAISCEAU PTI PRO - 220 V FR 1-14 / 54-60 EN 15-27 / 54-60 DE 28-40 / 54-60 ES 41-53 / 54-60 73502_V2_08/04/2022
RENOV FAISCEAU PTI PRO - 220 V AVERTISSEMENTS - RÈGLES DE SÉCURITÉ CONSIGNE GÉNÉRALE Ces instructions doivent être lues et bien comprises avant toute opération. Toute modification ou maintenance non indiquée dans le manuel ne doit pas être entreprise. Veiller à bien conserver ce manuel d’instruction pour des consultations ultérieures. Tout dommage corporel ou matériel dû à une utilisation non-conforme aux instructions de ce manuel ne pourra être retenu à la charge du fabricant.
RENOV FAISCEAU PTI PRO - 220 V • Cet équipement de soudage produit des fumées et des gaz qui contiennent des produits chimiques dont l’État de Californie reconnait qu’ils provoquent des malformations congénitales et, dans certains cas, des cancers (code de santé et sécurité de Californie, chapitre 25249.5 et suivants).
RENOV FAISCEAU PTI PRO - 220 V RECOMMANDATIONS POUR ÉVALUER LA ZONE ET L’INSTALLATION DE SOUDAGE Généralités L’utilisateur est responsable de l’installation et de l’utilisation du matériel de soudage par résistance suivant les instructions du fabricant. Si des perturbations électromagnétiques sont détectées, il doit être de la responsabilité de l’utilisateur du matériel de soudage par résistance de résoudre la situation avec l’assistance technique du fabricant.
RENOV FAISCEAU PTI PRO - 220 V INSTALLATION DU MATÉRIEL • Mettre la source de courant de soudage sur un sol dont l’inclinaison maximum est de 10°. • La source de courant de soudage doit être à l’abri de la pluie battante et ne pas être exposée aux rayons du soleil. • Le matériel est de degré de protection IP20, signifiant : - une protection contre l’accès aux parties dangereuses des corps solides de diam >12.5 mm et, - aucune protection contre les projections d’eau.
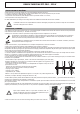
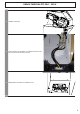
RENOV FAISCEAU PTI PRO - 220 V DESCRIPTION DE LA PINCE G 2 8 3 12345- 4 1 5 Levier de verrouillage/deverrouillage du bras Tuyau de refroidissement Gyroscope Corps pneumatique Electrode de surouverture 6 6789- 9 7 Bras mobile Poignée latérale Bouton de réglage des paramètres à distance Bouton de soudage point DÉMONTAGE DU FAISCEAU PTI-S7 1 Débrancher l’alimentation électrique de la PTI-S7. 2 Enlever les deux vis du boitier de protection. 3 Enlever les trois écrous du bornier.
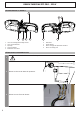
RENOV FAISCEAU PTI PRO - 220 V 4 Enlever les deux vis qui maintiennent le passe fil du faisceau, ainsi que tous les connecteurs. 5 Démonter les supports droit et gauche du bras de la PTI-S7. PE TOTY PRO MONTAGE DU FAISCEAU RENOV PTI-PRO M6x16 (x4) 1 Installer les supports de bras incliné gauche et droit fournis dans le Kit rénov. 10 N·m M6x16 (x4) 10 N·m PE TOTY PRO 2 Poser la pince sur le support incliné.
RENOV FAISCEAU PTI PRO - 220 V 3.1 Retirer la poignée en plastique, incliner le gyroscope comme ci-contre et le faire coulisser jusqu’à la coque. 3.2 Fixer le gyroscope avec 4 vis M5x10 sans tête. 3.3 Il peut tourner autour de la pince à 360°. La butée sur le gyroscope peut être levée ou abaissée. 3.4 Elle sert à décaler le câble de l’équilibreur pour pouvoir engager un grand bras plus aisément.
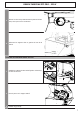
RENOV FAISCEAU PTI PRO - 220 V 4 Installer le bras G1. PE TOTY PRO 5 Poser le boitier de protection sur l’avant de la PTI et visser les trois cosses comme ci-contre. 6 Repositionner le boitier et remettre les vis.
RENOV FAISCEAU PTI PRO - 220 V 7 Fixer le passe-fil du faisceau ainsi que tous les connecteurs. (Voir notice PTI pour le branchement) 8 Brancher le connecteur de puissance. CHANGEMENT DES SUPPORTS DE BRAS 1 10 Démonter les supports de bras PTI-S7.
RENOV FAISCEAU PTI PRO - 220 V 2 Fixer les nouveaux supports petits bras PTI-PRO, avec les vis M5x12(x4) fournies. FIXATION DU SUPPORT DE GRANDS BRAS (FACULTATIF) Ce support devra être fixé sur un mur. Les vis M5 ne sont pas fournies. MISE À JOUR DU SOFT Consulter le SAV pour la procédure de mise à jour du logiciel.
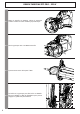
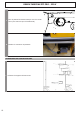
RENOV FAISCEAU PTI PRO - 220 V 250 250 500 600 250 180 235 128 daN) - ref. 022799 G4 (550 1000 G5 (550177 daN) (6.25 kg) - ref. 022805 G10 (400 daN) (5 kg) - ref. 067165 450 430 G12 (550 daN) - ref. 075238 384 G11 (550 daN) - ref. 071766 324 G8 (550 daN) - ref. 022836 UTILISATION DU PISTOLET (OPTION) - Sélectionner l’outil PISTOLET à l’aide de la touche . Fixer le cable de masse du pistolet sur l’électrode mobile.
RENOV FAISCEAU PTI PRO - 220 V - Fixer fermement le patin de masse aussi près que possible de l’endroit à souder. Dans le cas d’un soudage monopoint au pistolet, toujours placer le patin de masse sur la tôle qui n’est pas en contact avec l’électrode de soudage (de façon que le courant passe au travers des deux tôles à souder). - Souder en commençant par le point le plus éloigné de la masse, puis se rapprocher de celle-ci. - Le mode normal avec soudage d’étoiles est lancé par défaut.
RENOV FAISCEAU PTI PRO - 220 V SUR-OUVERTURE MÉCANIQUE DU BRAS Pour ouvrir le bras et accéder plus facilement à la carrosserie, actionner la surouverture en appuyant sur le bouton de la pince (FIG 2 -10). 1 2 3 4 Appuyez sur le bouton (FIG 2 -10) Le loquet dépasse côté cadenas ouvert Le levier doit être ouvert (~90°) en butée sur loquet. Les flèches ne doivent pas être alignées Incliner le bras.
PTI-PRO RENOV CABLE EN WARNING - SAFETY RULES GENERAL INSTRUCTIONS Read and understand the following safety instructions before use. Any modification or updates that are not specified in the instructions manual should not be undertaken. Please store this manual safely. The manufacturer is not liable for any injury or damage due to a non-compliance with the instructions featured in this manual. In the event of problems or uncertainties, please consult a qualified person to handle the installation properly.
PTI-PRO RENOV CABLE EN • This welding equipment produces fumes and gases that contain chemicals considered by the State of California as a source of congenital malformations and potentially, cancers (refer to the California Health Code, chapter 25249.5 and after). • This equipment contains chemicas, including lead, identified by the state if California as a potential cause of cancers and congenital malformations or other issues in relation to procreation. Wash your hands after handling.
PTI-PRO RENOV CABLE EN RECOMMENDATIONS FOR WELDING AREA ASSESSMENT AND WELDING Miscellaneous The user is responsible for the correct installation and usage of the welding material based on the instructions supplied by the manufacturer. If electromagnetic disturbances are detected, it is the user’s responsibility to resolve the situation with the manufacturer’s technical assistance. In some cases, this corrective action may be as simple as earthing the welding circuit.
EN PTI-PRO RENOV CABLE MAINTENANCE / RECOMMENDATIONS • The operators must have received suitable training in order to use the machine at its maximum potential and weld correctly. • Check which welding process is authorised by the manufacturer before attempting any vehicle repair. The maintenance and repair of the machine can only be undertaken by the manufacturer. Any work undertaken by a third party on the machine will invalidate the warranty.
EN PTI-PRO RENOV CABLE DESCRIPTION OF THE G CLAMP 2 8 3 1234- Arm locking/unlocking lever Cooling pipe Gyroscope Pneumatic body 5- Over-opening electrode 4 1 5 6 6789- 9 7 Mobile arm Side handle Remote settings button Spot welding button Clamp opening : push the button (FIG 2 - 10), the opening of the clamp can be released. The electrode retracts in the clamp leaving a space of 80 mm to access the welding area instead of 20 mm when not in use.
EN PTI-PRO RENOV CABLE 4 Remove the two screws holding the harness grommet and all connectors. 5 Remove the right and left arm supports from the PTI-S7. PE TOTY PRO RENOV PTI-PRO BUNDLE ASSEMBLY M6x16 (x4) 1 Install the left and right slope arm brackets supplied in the Renovation Kit. 10 N·m M6x16 (x4) 10 N·m PE TOTY PRO 2 Place the clamp on the inclined support.
PTI-PRO RENOV CABLE 3.1 EN Remove the plastic handle, tilt the gyro as shown and slide it to the shell. 3.2 Fix the gyro with 4 M5x10 headless screws. 3.3 It can rotate around the clamp 360°. The stop on the gyro can be raised or lowered. It is used 3.4 to shift the balancer cable so that a large arm can be engaged more easily.
EN PTI-PRO RENOV CABLE 4 Install the G1 arm. PE TOTY PRO 22 5 Place the protective box on the front of the PTI and screw on the three lugs as shown. 6 Reposition the case and replace the screws.
EN PTI-PRO RENOV CABLE 7 Attach the harness grommet and all connectors. (See PTI manual for connection) 8 Connect the power connector. PE TOTY PRO CHANGING THE ARM SUPPORTS 1 Remove the PTI-S7 arm supports.
EN PTI-PRO RENOV CABLE 2 Attach the new PTI-PRO small arm brackets, using the M5x12(x4) screws provided. ATTACHMENT OF LARGE ARM SUPPORT (OPTIONAL) This bracket should be fixed to a wall. M5 screws are not supplied. UPDATING THE SOFTWARE Consult the After Sales Service for the procedure to update the software.
EN PTI-PRO RENOV CABLE 250 250 500 600 250 180 235 128 1000 177 G4 (550 daN) - ref. 022799 G5 (550 daN) (6.25 kg) - ref. 022805 G10 (400 daN) (5 kg) - ref. 067165 450 G12 (550 daN) - ref. 075238 430 384 G11 (550 daN) - ref. 071766 324 G8 (550 daN) - ref. 022836 USE OF THE GUN (OPTION) - Select the GUN tool using the button . Attach the gun grounding cable to the mobile electrode. Slide and tighten the knurl. Remove the arm from the clamp and fix, in its place, the gun cable.
EN PTI-PRO RENOV CABLE - Fix the earth pad firmly and as close to the weld as possible. In the case of a monopoint weld, always place the earth on the sheet/panel that is not in contact with the welding electrode (in order for the current to go through the two sheets to be welded). - Weld starting with the furthest spot away from the earth and work towards it. - The normal welding mode using the stars is the one used by default. - The gun can be used in normal or manual mode.
EN PTI-PRO RENOV CABLE MECHANICAL OVER-OPENING OF THE ARM To open the arm and gain easier access to the bodywork, activate the over-opening by pressing the clamp button (FIG 2 -10). 1 2 3 4 Press the button (FIG 2 -10) The latch sticks out on the open lock side The lever must be open (~90°) at the stop on the latch. The arrows must not be aligned Incline the arm. 3 3 1 1 4 2 2 4 THE GYROSCOPE Remove the plastic handle, tilt the gyro as shown and slide it to the shell.
RENOV KOMPLETTPAKET PTI-PRO DE SICHERHEITSANWEISUNGEN ALLGEMEIN Lesen Sie vor Inbetriebnahme des Gerätes die Anleitung sorgfältig durch. Nehmen Sie keine Wartungarbeiten oder Veränderungen am Gerät vor, wenn diese nicht explizit in der Anleitung gennant werden. Bewahren sie diese Bedienungsanleitung sorgfältig auf. Der Hersteller haftet nicht für Verletzungen oder Schäden, die durch unsachgemäße Handhabung dieses Gerätes enstanden sind.
RENOV KOMPLETTPAKET PTI-PRO DE Achtung! Bei Schweißarbeiten in kleinen Räumen müssen Sicherheitsabstände besonders beachtet werden. Beim Schweißen von Blei, auch in Form von Überzügen, verzinkten Teilen, Kadmium, «kadmierte Schrauben», Beryllium (meist als Legierungsbestandteil, z.B. Beryllium-Kupfer) und andere Metalle entstehen giftige Dämpfe. Erhöhte Vorsicht gilt beim Schweißen von Behältern. Entleeren und reinigen Sie diese zuvor. Um die Bildung von Giftgasen zu vermeiden bzw.
RENOV KOMPLETTPAKET PTI-PRO DE Alle Schweißer sollten gemäß dem folgenden Verfahren die Exposition zu elektromagnetischen Feldern aus Schweißgeräten minimieren : • Elektrodenhalter und Massekabel bündeln, wenn möglich machen Sie sie mit Klebeband fest; • Achten Sie darauf, dass ihr Oberkörper und Kopf sich so weit wie möglich von der Schweißarbeit entfernt befinden; • Achten Sie darauf, dass sich die Kabel, den Brenner oder die Masseklemme nicht um Ihren Körper wickeln; • Stehen Sie niemals zwischen Masse
DE RENOV KOMPLETTPAKET PTI-PRO AUFSTELLUNG • Stellen Sie das Gerät ausschließlich auf festen und sicheren Grund, dessen Neigungswinkel nicht größer als 10° ist und sichern Sie es gegen weg rollen. • Schützen Sie das Gerät vor Regen und direkter Sonneneinstrahlung. • Das Gerät ist IP20-Schutzart konform, d.
DE RENOV KOMPLETTPAKET PTI-PRO BESCHREIBUNG DER ZANGE 2 8 3 4 1234- Ver-/Entriegelungshebel für Bügel Kühlschlauch Orbitalführung Schlauchkörper 5- Öffnungselektrode 1 5 6 6789- 9 7 Bügel Seitengriff Taste Fernregelung Taste Monopunkschweißen Überöffnen: durch Drücken der Taste (ABB 2 - 10) wird die bewegliche Elektrode der Zange von 20mm auf 80mm Öffnung zurück gezogen um eine bessere Zugänglichkeit zur Schweißposition zu ermöglichen.
DE RENOV KOMPLETTPAKET PTI-PRO 4 Entfernen Sie die beiden Schrauben, mit denen die Kabeltülle des Kabelbaums befestigt ist, sowie alle Steckverbinder. 5 Entfernen Sie die rechte und linke Halterung vom Arm des PTI-S7. PE TOTY PRO MOUNTING THE PTI-PRO HARNESS M6x16 (x4) 1 Installieren Sie die linke und rechte Schrägarmhalterung, die im Renovierungskit enthalten sind. 10 N·m M6x16 (x4) 10 N·m PE TOTY PRO 2 Legen Sie die Klammer auf die schräge Auflage.
RENOV KOMPLETTPAKET PTI-PRO Entfernen Sie den Plastikgriff, kippen Sie das Gyroskop 3.1 wie in der Abbildung gezeigt und schieben Sie es in den Rumpf. 3.2 Befestigen Sie das Gyroskop mit 4 Schrauben M5x10 ohne Kopf. 3.3 Er kann sich um 360° um den Greifer drehen. Der Anschlag auf dem Gyroskop kann angehoben oder abgesenkt werden. Er dient dazu, das Balancierkabel zu 3.4 versetzen, um einen großen Arm leichter eingreifen zu können.
DE RENOV KOMPLETTPAKET PTI-PRO 4 Installieren Sie den Arm G1. PE TOTY PRO 5 6 Legen Sie das Schutzgehäuse auf die Vorderseite des PTI und schrauben Sie die drei Kabelschuhe wie nebenstehend beschrieben an. Setzen Sie das Gehäuse wieder auf und bringen Sie die Schrauben wieder an.
DE RENOV KOMPLETTPAKET PTI-PRO 7 Befestigen Sie die Tülle des Kabelbaums sowie alle Anschlüsse (Siehe PTI-Anleitung für den Anschluss). 8 Schließen Sie den Leistungsstecker an. AUSWECHSELN DER ARMSTÜTZEN 1 36 Entfernen Sie die Armstützen PTI-S7.
DE RENOV KOMPLETTPAKET PTI-PRO 2 Befestigen Sie die neuen Halterungen für kleine PTIPROArme mit den mitgelieferten Schrauben M5x12(x4). ANBRINGEN DER HALTERUNG FÜR GROSSE ARME (OPTIONAL) Diese Halterung muss an einer Wand befestigt werden. Die M5-Schrauben sind nicht im Lieferumfang enthalten. AKTUALISIERUNG DER SOFTWARE Wenden Sie sich an den Kundendienst, um die Software zu aktualisieren.
DE RENOV KOMPLETTPAKET PTI-PRO 250 250 500 600 250 180 128 235 G4 (550 daN) - ref. 022799 1000 177 G5 (550 daN) (6.25 kg) - ref. 022805 G10 (400 daN) (5 kg) - ref. 067165 450 G12 (550 daN) - ref. 075238 430 384 G11 (550 daN) - ref. 071766 324 G8 (550 daN) - ref. 022836 VERWENDUNG DER MONOPUNKTPISTOLE (OPTION) • Wählen Sie das Werkzeug MONOPUNKTPISTOLE mithilfe der Taste . Befestigen Sie das Erdungskabel der Pistole an der beweglichen Elektrode.
RENOV KOMPLETTPAKET PTI-PRO DE • Befestigen Sie die Masseklemme am Werkstück, möglichst in der Nähe der zu bearbeitenden Stelle. Befestigen Sie beim Monopunktschweißen mit der Pistole die Masse immer am Unterblech, damit sichergestellt ist, dass der Schweißstrom durch beide Bleche fließt. • Die Schweißarbeit mit dem Punkt beginnen, der am weistesten von der Masse ist, und sich dieser nähern. • Automatisch wird der STANDARD Modus mit den Einstellungen für das Schweißen von Ausbeulsternen gestartet.
DE RENOV KOMPLETTPAKET PTI-PRO Den Bügel aufklappen. 3 3 1 1 4 2 2 4 360°-ORBITALFÜHRUNG 40 Entfernen Sie den Plastikgriff, kippen Sie den Gyro wie nebenstehend und schieben Sie ihn bis zum Rumpf. Befestigen Sie das Gyroskop mit 4 M5x10-Schrauben ohne Kopf. Er kann sich um 360° um die Klammer drehen. Der Anschlag auf dem Gyroskop kann angehoben oder abgesenkt werden. Er dient dazu, das Balancierseil zu versetzen, damit ein großer Arm leichter eingeklinkt werden kann.
RENOV FAISCEAU PTI PRO ES ADVERTENCIAS - NORMAS DE SEGURIDAD CONSIGNA GENERAL Estas instrucciones se deben leer y comprender antes de toda operación. Toda modificación o mantenimiento no indicado en el manual no se debe llevar a cabo. Conserve este manual de instrucciones para una consulta posterior. Todo daño físico o material debido a un uso no conforme con las instrucciones de este manual no podrá atribuírsele al fabricante.
RENOV FAISCEAU PTI PRO ES • Questa attrezzatura di saldatura produce fumi e gasche contengono prodotti chimici che lo stato della California ritiene provochino malformazioni congenite e, in alcuni casi, cancro (codice di salute e sicurezza della California, capitolo 25249.5 e successivi). • Questa attrezzatura contiene elementi chimici, tra cui il piombo, riconosciuto dallo stato della California come cancerogeno oltre che causa di malformazioni congenite o altri problemi di procreazione.
RENOV FAISCEAU PTI PRO ES RECOMENDACIONES PARA EVALUAR LA ZONA Y LA INSTALACIÓN DE SOLDADURA Generalidades El usuario se responsabiliza de instalar y usar el aparato siguiendo las instrucciones del fabricante. Si se detectan alteraciones electromagnéticas, el usuario del material de soldadura por resistencia debe resolver la situación siguiendo las recomendaciones del manual de usuario o consultando el servicio técnico del fabricante.
ES RENOV FAISCEAU PTI PRO INSTALACIÓN DEL MATERIAL • La fuente de corriente de soldadura se debe colocar sobre una superficie cuya inclinación máxima sea 10°. • La máquina debe ser protegida de la lluvia y no se debe exponer a los rayos del sol. • El material posee un grado de protección IP20, que significa : - una protección contra el acceso de cuerpos sólidos de >12.5mm a las partes peligrosas y, - ninguna protección contra las proyecciones de agua.
ES RENOV FAISCEAU PTI PRO DESCRIPCIÓN DE LA PINZA G (IMAGEN 2) 2 8 3 4 1 1234- Palanca de bloqueo/desbloqueo del brazo tubo de refrigeración Giroscopio Cuerpo de neumático 5- Electrodo de sobre abertura 5 9 6 7 6789- Brazo móvil Mango lateral Botón de configuración de parámetros a distancia Botón de soldadura por puntos DESMONTAJE DEL ARNÉS PTI-S7 1 Desconecte la alimentación del PTI-S7. 2 Retire los dos tornillos de la carcasa de protección.
ES RENOV FAISCEAU PTI PRO 4 Retire los dos tornillos que sujetan el mazo de cables y todos los conectores. 5 Retire los soportes del brazo derecho e izquierdo de la PTI-S7. PE TOTY PRO RENOVADO CONJUNTO DE PAQUETES PTI-PRO M6x16 (x4) 1 10 N·m Instale los soportes del brazo inclinado izquierdo y derecho suministrados en el kit de renovación. M6x16 (x4) 10 N·m PE TOTY PRO 2 Coloque la pinza en el soporte inclinado. PE TOTY PRO 3 46 Instale el giroscopio.
RENOV FAISCEAU PTI PRO 3.1 ES Retire el asa de plástico, incline el giroscopio como se muestra y deslícelo hacia la carcasa. 3.2 Fije el giroscopio con 4 tornillos sin cabeza M5x10. 3.3 Puede girar alrededor de la pinza 360°. El tope del giroscopio se puede subir o bajar. Se utiliza 3.4 para desplazar el cable del equilibrador de modo que un brazo grande pueda engancharse más fácilmente.
ES RENOV FAISCEAU PTI PRO 4 Instale el brazo G1. PE TOTY PRO 48 5 Coloque la caja de protección en la parte delantera de la PTI y atornille los tres terminales como se indica. 6 Vuelva a colocar la carcasa y los tornillos.
ES RENOV FAISCEAU PTI PRO 7 Coloque el ojal del arnés y todos los conectores. (Véase el manual de PTI para la conexión) 8 Conecta el conector de alimentación. PE TOTY PRO CAMBIO DE LOS SOPORTES DE LOS BRAZOS 1 Retire los soportes del brazo PTI-S7.
ES RENOV FAISCEAU PTI PRO 2 Fije los nuevos soportes del brazo pequeño PTI-PRO, utilizando los tornillos M5x12(x4) suministrados. FIJACIÓN DEL SOPORTE DEL BRAZO GRANDE (OPCIONAL) Este soporte debe fijarse a la pared. Los tornillos M5 no se suministran. ACTUALIZAR EL SOFTWARE Consulte con el Servicio Técnico el procedimiento de actualización del software.
ES RENOV FAISCEAU PTI PRO 250 250 500 600 250 180 235 128 G4 (550 daN) - ref. 022799 1000 177 G5 (550 daN) (6.25 kg) - ref. 022805 G10 (400 daN) (5 kg) - ref. 067165 450 430 G12 (550 daN) - ref. 075238 384 G11 (550 daN) - ref. 071766 324 G8 (550 daN) - ref. 022836 USO DE LA PISTOLA (OPCIÓN) - Seleccione la herramienta PISTOLA mediante la tecla . Conecte el cable de tierra de la pistola al electrodo móvil. Deslice y apriete la rueda selectora.
ES RENOV FAISCEAU PTI PRO - Fije con firmeza el soporte de masa lo más cerca posible de la pieza a soldar. En el caso de una soldadura monopunto con pistola, coloque el soporte de masa sobre la chapa que no está en contacto con el electrodo de soldadura (de forma que la corriente pase a través de las dos chapas a soldar). - Suelde comenzando por el punto más alejado de la masa, luego acérquese a este. - El modo normal con soldadura de estrellas se inicia por defecto.
ES RENOV FAISCEAU PTI PRO SOBREAPERTURA MECÁNICA DEL BRAZO Para abrir el brazo y acceder con mayor facilidad a la carrocería, accione la sobreapertura presionando sobre el botón de la pinza (IMAGEN 2 - 10). 1 2 3 4 Presione sobre el botón (Imagen 2 -10) El pestillo sobresale del lado del candado abierto La palanca debe estar abierta (~90°) en el tope del pestillo. Las flechas no deben estar alineadas. Incline el brazo.
RENOV FAISCEAU PTI PRO - 220 V PIÈCES DE RECHANGE / SPARE PARTS / ERSATZTEILE / PIEZAS DE RECAMBIO No.
RENOV FAISCEAU PTI PRO - 220 V Clamp 1 Collier de serrage / Hose clip / Hose clip / Abrazadera 71195 2 Circuit mesure température primaire transfo / Primary temperature measuring circuit transformer / PrimärtemperaturMesskreis Transformator / Circuito de medición de la temperatura del primario Transformador 3 Shunt pince / Shunt clamp / Nebenschlussklemme / Pinza de derivación 77060 4 Raccord équerre mâle Ø6 / Angle male fitting Ø6 / Winkelstück männlich Ø6 / Racor macho angular Ø6 71482 5 Ensem
RENOV FAISCEAU PTI PRO - 220 V 22 23 G7 22 2 électrodes pour bras accès difficile / 2 electrodes for difficult access arm / 2 Elektroden für schwer zugänglichen Arm / 2 electrodos para el brazo de difícil acceso 051614 23 Socle bras équipé / Equipped arm base / Ausgestatteter Arm-Einschubsockel / Base de brazo equipado 94172 G1 G3 G4 G5 G6 G8 G10 G12 26 24 25 G1/G3/G4/G5/G6/G8/G10/G12 24 56 Tuyau anti-étincelles / Anti-spark hose / Funkengeschützte Leitung / Conducto anti-chispas G1 91264
RENOV FAISCEAU PTI PRO - 220 V 30 31 29 28 G11 27 35 32 34 33 G11 27 Tuyau anti-étincelles 125 mm / Anti-spark hose 125 mm / Funkengeschützte Leitung 125 mm / Conducto anti-chispas 125 mm F0504 28 Tuyau anti-étincelles 115 mm / Anti-spark hose 115 mm / Funkengeschützte Leitung 115 mm / Conducto anti-chispas 115 mm F0505 29 Tuyau anti-étincelles 150 mm / Anti-spark hose 150 mm / Funkengeschützte Leitung 150 mm / Conducto anti-chispas 150 mm F0506 30 Tuyau anti-étincelles 195 mm / Anti-spar
RENOV FAISCEAU PTI PRO - 220 V SCHÉMA FAISCEAUX / CABLE ASSEMBLY SCHEMATICS / SCHLAUCHPAKET SCHALTPLAN / ESQUEMA CABLEADO 5 (6m) TH2 TH1 3 V+ V- ICÔNES / SYMBOLS / ZEICHENERKLÄRUNG / SÍMBOLOS - Attention ! Lire le manuel d’instruction avant utilisation. Warning ! Read the instructions manual before use. Внимание! Прочтите инструкцию перед использованием ¡Cuidado! Lea el manual de instrucciones antes de su uso.
RENOV FAISCEAU PTI PRO - 220 V Sortie d’eau - Water outlet - Kühlmittelausgang - Salida de agua Entrée d’eau - Water inlet - Kühlmitteleingang - Entrada de agua MAXI Niveau maximum d’eau - Maximum water level - Maximaler Kühlmittelstand - Nivel máximo de agua MINI Niveau minimum d’eau - Minimum water level - Minimaler Kühlmittelstand - Nivel mínimo de agua Les porteurs de pacemaker ne doivent pas rester à proximité de cet appareil.