
User manual
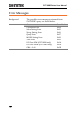

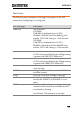
Table Of Contents
- SAFETY INSTRUCTIONS
- GETTING STARTED
- OPERATION
- Menu Tree
- Test Lead Connection
- ACW, DCW and GB Manual Testing
- Choose/Recall a Manual Test Number
- Edit Manual Test Settings
- Setting the Test Function
- Setting the Test Voltage or Test Current
- Setting the Test Frequency
- Setting the Upper and Lower Limits
- Setting a Reference Value
- Setting the Test Time (Timer)
- Setting the Ramp Up Time
- Creating a MANU Test File Name
- Setting the ARC Mode
- Setting PASS HOLD
- Setting FAIL MODE
- Setting MAX HOLD
- Setting the Grounding Mode
- Saving and Exiting EDIT Status
- Running a MANU Test
- PASS / FAIL MANU Test
- Zeroing of the Test Leads (GB only)
- Special MANU Test Mode (000)
- Automatic Tests
- Common Utility Settings
- EXTERNAL CONTROL
- REMOTE CONTROL
- FAQ
- APPENDIX
- INDEX

APPENDIX
157
APPENDIX
Fuse Replacement
Steps
1. Turn the instrument
off.
POWER
2. Remove the power
cord.
2
2
0
1
0
0
120
230
3. Remove the fuse
socket using a flat
screwdriver.
2
2
0
1
0
0
120
230
4. Replace the fuse in
the fuse holder.
2
2
0
1
0
0
120
230
5. Ensure the correct line voltage is lined up with
the arrow on the fuse holder. Insert the fuse
socket.