GV 8 quart Model BP BATTERY POWERED BACKPACK VACUUM Operation Instruction Read all instructions before using this appliance Congratulations on your purchase of the GV 8 Quart Battery Powered Back pack vacuum! With over 30 minutes of vacuuming time per charge this vacuum is designed to save you time and money! Simply turn on and go!
IMPORTANT SAFETY INSTRUCTIONS When using your Vacuum, basic safety precautions should always be observed, Including the following: Vacuum Safety Read Owner’s Manual before using this product. Failure to do so can result in serious injury or death. To reduce the risk of fire, electric shock, or injury. 1. Use only as described in this manual. Use only the recommended attachments, battery, charger, and replacement parts. 2. DO NOT use the vacuum outdoors or on wet surfaces. DO NOT expose to rain or water. 3.
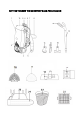
GETTING TO KNOW THE GV BATTERY BACK PACK VACUUM
1. Main Unit 2. Exhaust Grill Port 3. On/Off Power Switch 4. Canister Lid Tabs 5. Waist Band 6. Shoulder Straps 7. Back Board Panel 8. Carry Handle 9. Hose Inlet 10. Canister Lid 11. Flexible Hose 12. Telescopic Tube 13. Dusting Brush 14. Crevice Tool 15. Upholstery Tool 16. Exhaust Grill 17. Exhaust Filter 18. Floor Tool 19. Disposable bag 20. Waist Band Back Support Panel 21. Waist Bang Tool Carrier 22. Cloth Dust Bag 23.
Operating Instructions ASSEMBLING YOUR VACUUM I INSERT THE HEPA DUST BAG Important: Do not use the vacuum without all filters, cloth dust bag, and with or without the HEPA dust bag in place. 1. Close the power with switch and remove the flexible hose. 2. To open the canister lid press on the canister lid tabs on each side of the unit and lift canister lid. (Fig.1) 3. Pull the tab on the patented HEPA dust bag holder out slightly and flip upwards.(Fig 2) 4.
Attaching the Flexible hose to The vacuum The flexible hose should be connected to the Vacuum before strapping the unit on. 1. To connect the flexible hose into the hose inlet, insert the threaded end of the flexible hose into the hose inlet and turn counter-clockwise until it locks into place. (Fig 6) 2. Turn on the switch than you can operate the vacuum. 3. To remove the telescopic tube from the flexible hose, press on the telescopic tube release button and pull it out. (Fig.7) 4.
USING THE ATTACHMENTS Dusting Brush The dusting brush is used for the furniture(Fig9) Crevice Tool Use for radiators, crevices, corners, baseboards and between cushions. (Fig10) Upholstery Tool The Upholstery tool is used for upholstery, stairs, cars, pet hair & more. The unique surface makes it an excellent tool for cleaning. (Fig11) Note: This tool is not a grooming tool and should not be used on animals. Caution: Do not use Upholstery tool on delicate or woven Fabrics that may snag.
Manual Suction Control Your vacuum cleaner includes a manual variable suction control on the flexible hose handle. The suction power can be adjusted by moving the suction regulator to the desired position between open and Closed. (Fig. 12) Fig 12 Using Your Vacuum 1. Ensure the battery pack is correct assemble in the vacuum 2. Connect hose and telescopic tube if desired. 3. Correctly place shoulder straps on each shoulder and secure the waist band with hook and loop strips. (Fig.
Removing & Replacing HEPA Dust Bag To remove the HEPA dust bag from the vacuum: Important: DO NOT use the vacuum without all filters, shake-out bag, and with or without HEPA dust bag in place 1. To remove the HEPA dust bag, press on the canister lid tabs on each side of the unit and lift canister lid. (Fig.15) 2. Pull the tab on the HEPA dust bag holder out slightly and lift upwards.(Fig.15) 3. Holding the HEPA dust bag in your hand, slide it out from the slots in the bag holder .
Cleaning & Replacing the Shake-Out Bag Note: Clean the shake-out bag out-doors when changing the HEPA dust bag. Optimum performance is achieved by using the HEPA dust bag with the shake-out bag decreasing the need for washing the shake-out bag. Cleaning the Shake-Out Bag Used with the HEPA Dust Bag: 1. Remove the shake-out bag, holding the handle at the bottom of the bag, shake out doors vigorously over a garbage receptacle until there is no 2. Inspect shake-out bag regularly for tears or damage .
HOW TO CHARGE THE BATTERY PACK When using the charger, basic precautions should always be followed, including the following: Battery and Charging Safety To reduce the risk of electric shock, fire, battery explosion, or injury: 16. Basic information and warning for the Battery and Charger are contained below. For detailed usage and warning information, read the HOW TO CHARGE THE BATTERY PACK carefully before using this unit. 17. DO NOT expose battery pack to temperatures above 122°F(50°C).
SPECIFICATIONS AND PARTS Charger Specification: Charger input: 120V 50/60Hz AC only Charger output: 30V 1A Battery Specification: Lithium Polymer chemistry 25.2V Approximate charge time: 8 hours Approximate run time for new battery: 30 minutes. . Battery pack 2. Charger OPERATION Charge in a well ventilated area. DO NOT block charger vents. Keep them clear to allow proper ventilation. CHARGING LITHIUM POLYMER BATTERY PACKS Lithium Polymer batteries deliver fade-free power for their entire run time.
BATTERY PROTECTION FEATURE The 25.2-volt Lithium Polymer batteries are designed with features that protect the Lithium Polymer cells and maximize battery life. When the battery has reached its minimum voltage level the electronics will shut off the battery. Once the battery shuts off, it must be recharged. PREPARING BATTERY PACK FOR CHARGING 1. Turn off the power switch. Confirm the switch is on the “O” position. 2.
Warranty – The GV 8 quart BP is covered by 2 years motor warranty, 1 year body warranty, 90 days on battery & charger. Items that wear out over time (like tools, filters, and bags) are not covered by the warranty. Items that will void your warranty are leaving the vacuum in to cold or to hot of an area, charging your battery over 24 hours, dropping your battery or vacuum, and using the vacuum for commercial or industrial use.