
Use and Care Manual


6
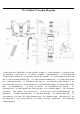
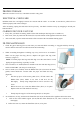
completely and tightly (Figure C).
6. Check the hose ends to make sure that they are tightly fixed. In the event a hose end comes apart from the
hose the hose can simply be rethreaded into the hose end.
7. Check the wear on the cord by the vacuum body and at the plug. Pass the power supply cord (No.13) through
the strip outside the left side of the waist belt.( Figure E).
8. Fix the switch box (No.11 and No.15) under the sewn strap and knot the other strap around the switch box.
(Figure F & Figure G).
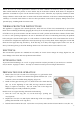
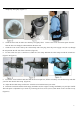
9. Loosen the waist belt latch and chest belt latch. In an open area, lift the vacuum by one shoulder strap and slide
your free arm into the other strap. (Figure D)
10. Adjust the shoulder straps to allow the waist belt to be buckled aroud your waist.
11. Fasten the waist belt and chest belt snugly and make sure the weight is resting comfortably on your hips. NOTE:
The back-plate is adjustable up or down by removing the four screws (No.27) that attach to the vacuum’s body.
(Figure H)