
User's Manual
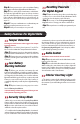


Audio Control
This feature turns audio for unit o and on.
Step 1: Open the unit and locate the Mute button
on the interior roof of the unit.
Step 2: Press and hold the Mute button for three se-
conds. While holding the mute button, the indicator
light will remain solid red. When the indicator light
ashes green and beeps 3 times this will indicate a
successful activation.
Step 3: Now you have successfully activated/deacti-
vated the mute feature.
Interior Courtesy Light
•
The interior courtesy light activates for ve seconds
when the safe door is opened. The light will illuminate the
contents of your safe making it easier to access even in the
dark.
Safes, Accessories and More
Loving your new GunVault safe and wanting to purchase more?
Check out our website www.GunVault.com for special promotions, product information and more.
Safe Categories
• Digital Safes
• Biometric Safes
• AR Safes
Accessories
• Security cable
• MagVault
Vital Information
• Downloadable manuals
• How-to video tutorials
• Warranty registration
• Frequently asked questions
• And MORE
SCAN QR CODE TO VISIT OUR WEBSITE
FOR FAQ'S, VIDEO TUTORIALS, AND MORE.
09
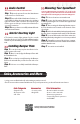
Mounting Your SpeedVault
Your SpeedVault must be mounted at a 90° angle as the
door is gravity operated. The unit can be mounted from the
left, right or back side using the provided mounting holes.
Step 1: Select a location to mount the unit.
Step 2: Secure the Mounting Bracket to desired
location by fastening the wood screws through the wall
mounting holes.
Step 3:
After securing the Mounting Bracket, remove
the two thumbscrews located on the bottom of the
closed unit.
Step 4: Unlock the unit with the backup key and remove
the drop down compartment from the shell of the unit.
Step 5: Secure and fasten the shell of the unit to the
Mounting Bracket by using the 3 woodscrews provided.
Step 6: Reinstall the removed drop down compart-
ment to the shell and restore the small bottom bracket
with the thumbscrews.
Step 7: Your unit is now installed.
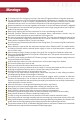
Installing Bumper Plate
Step 1: Locate the bumper plate installation holes
on the bottom of the unit.
Step 2: Once located, align the Bumper Plate with
the installation holes.
Step 3: Proceed to by securely fastening the Bumper
Plate to the unit with the provided screws and screw
driver.
Step 4: You have successfully installed the Bumper
Plate.